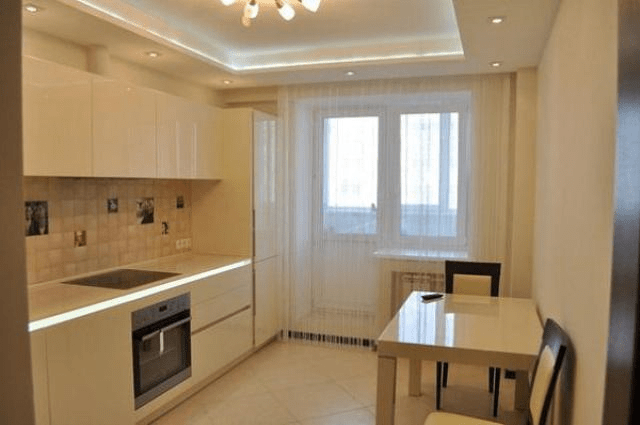
In modern realities, a plasterboard ceiling in the kitchen, regardless of the size and proportions of the room, remains the best option solving the problem of finishing the ceiling space. First of all, due to the perfectly smooth and flat surface of the plasterboard sheet. Any, even the most fantastic ceiling design in the kitchen, thanks to the high stability of plasterboard, will retain its original shape, design and quality after 20 years.
Two-level plasterboard ceiling in the kitchen
The main advantage of plasterboard, which made the material extremely popular, was and remains the ideal geometry of the sheets. To get a completely smooth and flat ceiling surface, you only need to fulfill two conditions:
- Properly plan and secure the suspended mounting system on the ceiling;
- Install plasterboard ceilings in the kitchen and seal the joints between the slabs as carefully and carefully as possible.
Achieving similar quality with plaster, even gypsum-based and with mesh reinforcement, is much more difficult, and in addition, considerable experience and skills in working with ceiling plastering will be required. Whereas even a novice finisher who is familiar with the basics of assembling plasterboard structures can assemble a suspended plasterboard ceiling in the kitchen.

The advantages of drywall on the kitchen ceiling
In addition, the construction of a suspended plasterboard ceiling allows you to solve a number of secondary problems:
- Improve sound insulation and thermal insulation;
- Remove and hide kitchen communication lines behind a plaster screen, primarily ventilation, electrical wiring and pipes.

Advice! It is possible to build a suspended ceiling from plasterboard only for kitchen areas in houses three years old and older.
In new buildings, before starting the full finishing of the ceiling and walls, you have to wait for the complete completion of the shrinkage processes. Otherwise, there is a serious risk of breakage and destruction of the suspension system.
If we were talking only about decorating communications in the kitchen, then we could get by with a suspended ceiling with tiles or plastic panels. This solution is simpler and cheaper to implement in practice. They resort to decorating the ceiling space with suspended structures if it is necessary to build a specially designed ceiling from plasterboard in the kitchen.

Types of plasterboard ceiling structures
Almost always, the design of a plasterboard ceiling in a kitchen, photo, is developed at the stage of planning the interior of the kitchen space, determining the layout of the furniture set, arranging lighting and a place to relax.

Designing a kitchen ceiling design is considered sufficient challenging task, since it is necessary to link into one whole, at least decorative finishing walls, design style kitchen furniture and lighting system.
Formally, all suspended ceilings for the kitchen, assembled on the basis of sheet plasterboard, are divided into two large groups:


Box structures are widely used to disguise ventilation pipes, lay tunnels for kitchen umbrella hoods located in non-standard places, and redistribute lighting. As a rule, the lower level of the ceiling is located above the tabletop, wall cabinets, in the zone ceiling plinth. The upper level is usually located in the center and seating area of the kitchen, which ensures maximum comfort and a good flow of fresh air.
Curly two-level plasterboard ceilings are used primarily as a decorative element. The kitchen area is usually planned as utilitarian, with maximum level functionality, so the number of decorative elements is not as large as in the case of a hall or bedroom. Curly plasterboard ceilings in the kitchen photo make it possible to make the interior of the room more impressive and relaxed.

Design of a plasterboard ceiling in the kitchen
Planning and developing the design of a plasterboard ceiling in the kitchen, photo, requires considerable effort, since you almost always have to find a compromise between the shape and size of the tiers of the suspension system and maximum thickness the entire structure. Unlike suspended ceilings, plasterboard structures have one serious drawback - each level “steals” 15-20 cm of height from the kitchen space.

Therefore, for small kitchens we are limited to the simplest options for two-level ceilings. But even in such conditions, two-level plasterboard cladding, in interior design terms, allows you to “expand and lift” the space of the room.

Simple and functional plasterboard box ceilings
The main advantages of box-shaped plasterboard structures include the two most obvious. Firstly, the box is ideal for almost any room interior. A small second level, running along the perimeter of the ceiling, turns out to be equally appropriate both in a large spacious kitchen with a corner unit and light tones of decoration, and in a small room.

Secondly, box-shaped decorative plasterboard trim is relatively easy to make yourself. At the same time, simplicity of design does not mean primitive design.
For example, a simple plasterboard border with spotlights and internal lighting allows you to achieve the effect of high ceilings in the central part of the room.
At the same time, most of the ceiling surface remains under the upper tier, that is, the kitchen room practically does not lose in volume, as one might expect due to the use of a suspended decor structure.
The simplicity of the box structure does not mean that its design is limited to primitive plasterboard frame structures. For example, the skillful use of boxes with a podium in the center of the ceiling provides a screen effect when all the main colors of the kitchen interior are collected and concentrated on the ceiling.

How to Enhance the Design of Box Ceilings
Another technique widely used when planning suspended box-shaped plasterboard ceilings involves the simultaneous use of a suspended polymer ceiling and a standard box made of plasterboard sheet.
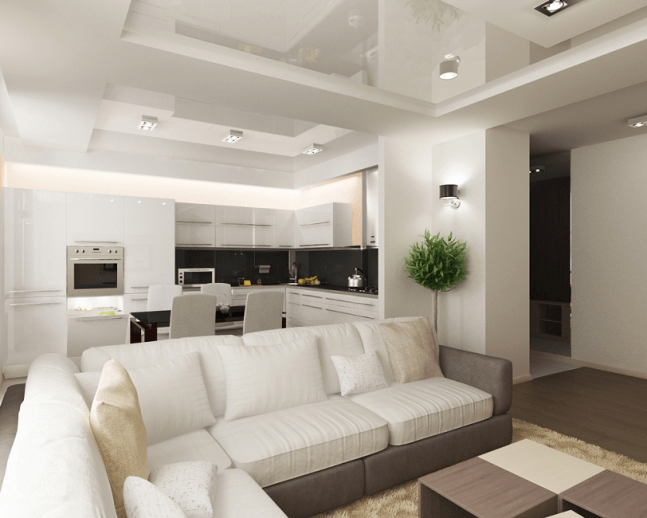
The mirror surface of the polymer membrane, illuminated by the lamps of the plasterboard frame, ideally reflects light, due to which the height of the ceilings is visually almost doubled.

A similar effect of visually increasing the height and volume of the kitchen space can be achieved using multi-level ceilings laid with steps, as in the photo. Due to the use of three levels, the peripheral part of the ceiling space loses in height, but in this case such a loss does not play a special role, since the lower level occupies a corner zone.
Curved plasterboard ceilings
Really complex and original design ceiling surface can only be achieved using complex figured structures from plasterboard sheets. Compared to box-shaped structures, a figured ceiling is a real aerobatics in kitchen design, so the development and installation of such structures requires serious experience in working with profiles and drywall.
Curly ceilings can be simply stunningly beautiful and look organic in almost any kitchen interior.

Concept figured ceiling allows you to implement two of the most popular ideas of modern design:
- Zoning the kitchen area;
- Color saturation and addition to the kitchen interior.
Thanks to the use of curved inserts of complex geometric shapes with the help of ceiling decor, you can divide the kitchen into several important zones.
The cooking area remains darkened and less bright, the sector where the dining table is located is illuminated more intensely and brightly. The seating area is equipped with the most comfortable type of lamp.
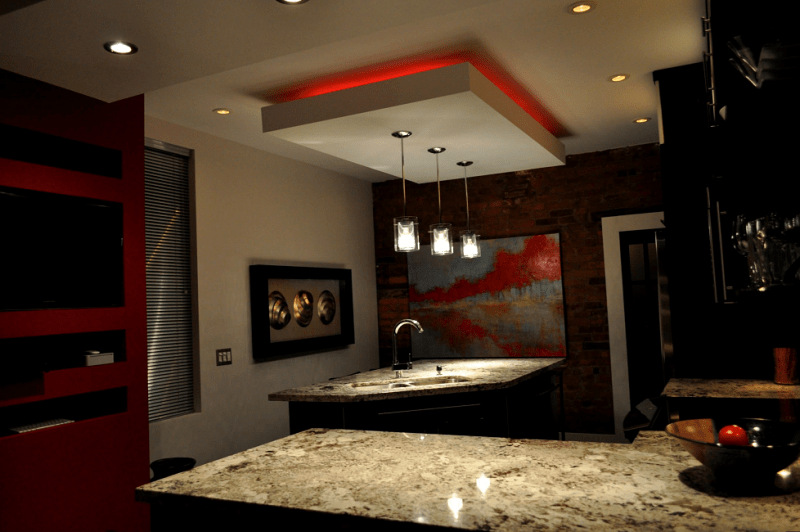
Several curved and circular sections on the kitchen ceiling can soften the contrasting bright red color used in the kitchen furniture.

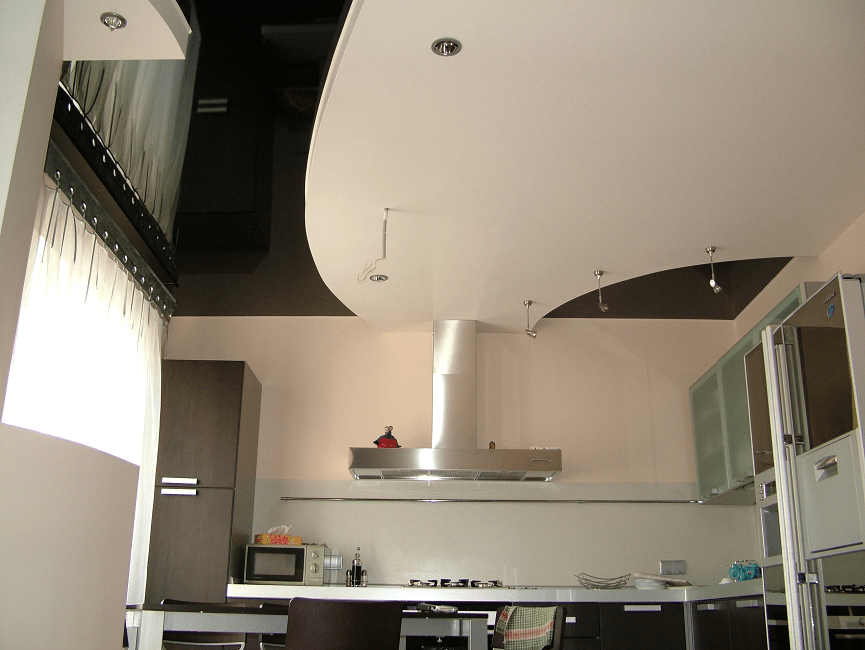
A monochrome division into black and white zones of a plasterboard ceiling can not only enhance color scheme interior, but also helps to skillfully hide details ventilation system, hidden behind the hanging decor.
A rather interesting and new solution is the use of inserts with stained glass and photo wallpaper on the upper tier of the suspended ceiling.

Plasterboard ceiling with lighting in the kitchen
To a large extent, the expressiveness of the kitchen interior depends on correct location lamps, their type and number of lighting points. Traditionally, three types of lighting are used for plasterboard suspended ceilings.

The most common lighting option is the distribution of spotlights on the lower tier pendants. This type of lamp creates uniform background lighting throughout the kitchen.
More modern version The backlight is based on two and three-color LED strips. Tapes laid in the upper tier of a plasterboard suspended ceiling provide soft diffused light; if necessary, you can change the color and saturation of the lighting, thereby enhancing the color background of the kitchen interior.

The third type of backlight is used for local lighting. It could be Entrance door in the kitchen, dining table or additional cutting table at the countertop.

DIY plasterboard ceiling in the kitchen
Regardless of the characteristics of the room, only moisture-resistant green ones are used to assemble a plasterboard suspended ceiling plasterboard sheets and galvanized metal profiles UD and CD. No wooden sheathing or ordinary GVL. All elements of the ceiling structure must be moisture resistant, since the kitchen has always been and remains the largest producer of water vapor and condensation.
Marking the future suspended structure
It is necessary to begin work by applying marking lines for the installation of the carrier on the walls and ceiling surface metal profile. It is best to rent a dual-beam laser level for these purposes.

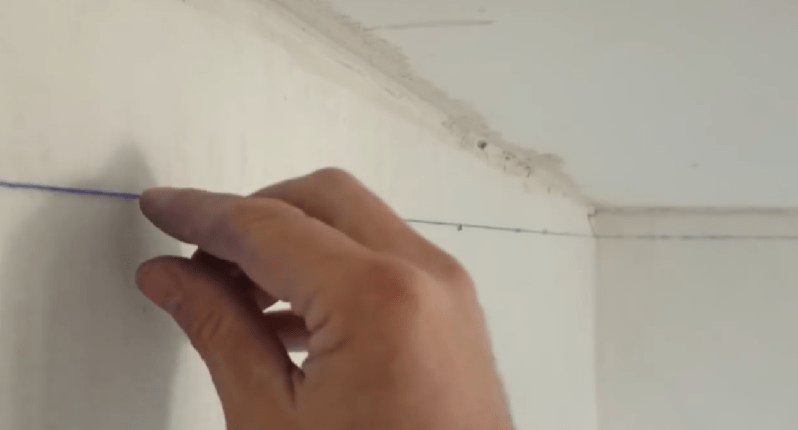
We fix the device on the wall, turn it on and adjust it, use a ruler or tape measure to measure the distance from the horizontal laser beam to the ceiling.

At the lowest point of the ceiling surface, the distance from the laser beam to the ceiling should be at least 4 cm, so we adjust and lower the marking line issued by the laser to keep it at least 5-6 cm. After the final adjustment along the laser line, you need to pull the painting cord or duplicate the horizontal markings with a simple pencil.
For your information! In any kitchen or other living space, the ceilings always lie crookedly, with a slope and a height difference on the walls of up to 5-6 cm.
After applying horizontal markings on the walls, it is necessary to draw the ceiling lines for installing the supporting profile of the CD suspension, in increments of 60-70 cm.
Installing a profile on the kitchen ceiling
The first step is to install and secure the UD profile guides on the kitchen walls according to the horizontal markings. To do this, we drill holes in the wall and profile in increments of 30 cm, hammer in the plugs and tighten the mounting screws.

To install the galvanized CD profile, we mark the installation points of the U-shaped strip on opposite walls of the kitchen. Each section of the CD profile is inserted inside and placed on the shelf of the UD frame. Before installing the crabs, the CD strips remain “hanging” in the air, supported only by the UD slats sewn to the kitchen walls.
This design will clearly not withstand the weight of drywall, especially if the kitchen ceiling is two-level, with numerous inserts and cut-ins. Therefore, the next stage of assembling a structure made of sheet plasterboard will be the installation of “crabs”.
Each “crab” is a short perforated strip, which is pulled behind the supporting profile and sewn to the kitchen ceiling. Next, the edges of the tape are bent and placed on the “cheeks” of the CD profile.

Before attaching the edges of the ribbons under the profile, a marking cord is pulled between the opposite walls of the kitchen, along which the height of installation and fastening of the CD profile is adjusted.
Strengthening the suspension system and installing drywall
Two-level ceilings in the kitchen with additional boxes and decorative elements always require reinforcement of the suspension system in places where additional loads are attached. Despite its apparent lightness, drywall, which consists of 98% gypsum, has significant weight, so in the place where the boxes are installed, it is always necessary to attach additional spacers and mountings that increase the rigidity of the supporting frame.

Be sure to install jumpers and spacers in places where lamps or ventilation elements are installed.

If the kitchen ceiling design includes additional suspended podiums or built-in niches, each element will need to cut out its own frame from a galvanized profile, which will subsequently be sheathed with pieces of plasterboard.
To fasten curved figures, the hanging profile is retrofitted with a mounting rail with split edges. Every 4-5 cm, a cut is made in the horizontal flange of the profile, which allows you to bend the supporting profile exactly along the curved contour of the plasterboard sheet.

The joint lines of plasterboard sheets are also reinforced. To prevent the seams between the kitchen ceiling cladding parts from cracking, both edges of the mating sheets must be attached to the backing CD profile.
The main part of the drywall is attached to the kitchen ceiling using self-tapping screws. In places where there is a transition from the upper level to the lower level, the material can be glued with acrylic glue, for example, “Moment” or “Liquid Nails”.

Finishing operations for assembling the ceiling in the kitchen
After laying the drywall, in order to relieve tension in the ceiling cladding, first of all, cut the seams at the transition points. After this, all joints are cleaned, primed and sealed with gypsum putty.
Next, the lower level of the ceiling is assembled in a similar way, all transition points to the upper level are glued with mesh and sealed with putty. At the end of the work, the hanging decor is primed and painted with acrylic enamel.
Conclusion
The plasterboard ceiling in the kitchen de facto becomes the standard or standard solution problems with crooked ceilings. The low cost of work and good decorative data make it possible to compete with the most expensive tension systems. In addition, a plasterboard structure is easy to maintain and repair, which cannot be said about more modern types finishing of kitchen ceilings.
The design of a plasterboard ceiling can be any, have different shapes - straight, curved, round, oval. In any interior style, plasterboard ceilings will be appropriate and will allow you to solve a number of both technical and aesthetic problems.

Design of plasterboard ceilings in the kitchen
Before you start designing plasterboard construction, it is necessary to take into account a number technical specifications. For example, equipping a work area with a hood requires an air duct above it, and this must be provided for. If you plan to build in lamps, the distance between the ceilings and the drywall should be selected taking into account the size of these lamps.
The work begins with assessing the size of the room and the shape of the ceiling. Then the number of levels and their location are determined depending on the chosen style and functionality. Next, choose the color and method by which the ceiling surface will be finished. The final stage of work on the design of plasterboard ceilings in the kitchen - choice lighting fixtures and decorative elements.


When choosing a color you should be guided by general rules design:
- In small rooms it is better to use light colors;
- In spacious kitchens, rich dark shades are acceptable;
- Pastel colors will suit almost any interior style and add coziness;
- Bright, harsh colors can have a negative impact on your well-being and mood.
Tip: If you want to emphasize visual zoning, install a suspended plasterboard ceiling in the kitchen in different levels– above each of the zones at its own height. Spotlights mounted in the ceiling along the border separating different heights will enhance the effect.


This is the most simple design, suitable for any room. Its surface can be plastered and painted - and in this case the ceiling will not differ in appearance from the traditional one, while retaining all its advantages.
You can remove communications, wiring or install lamps under the ceiling. At the same time, the visual zoning of the kitchen can be emphasized by using different color or different texture over different zones. For example, over dining table the ceiling can be light, and above the work area - a more saturated tone. This will draw attention to the dining area and ensure its dominance in the interior.


A plasterboard ceiling in the kitchen will also help to emphasize the definition of zones if you install lamps in it along the boundaries of these zones. Directed downwards, the light will create a kind of “light curtain”, effectively highlighting one or another part of the room.
You can turn a simple ceiling into a masterpiece if you decorate it with three-dimensional drawings. You can create them yourself - and it’s not difficult. Having applied the selected pattern to the surface, use liquid paper to draw it and dry it. After this, the sheets of drywall are strengthened in the selected places and painted in the usual way.

A two-level design often provides more opportunities to obtain spectacular interior or solving technical problems that arise when renovating such a complex room as a kitchen. The protruding parts will hide large communication elements, for example, air ducts, or large recessed lamps.
The combination of parts of different heights will add volume and allow you to solve interior problems. The higher parts of the structure are often located in the kitchen work area or in the center. They can have the most different shapes depending on the chosen design. Often, plasterboard ceilings in the kitchen combine oval and rectangular elements. There are also combinations of plasterboard elements with stretch ceilings. This diversifies the interior and adds a “zest” to it.


If elements of a plasterboard structure are used, located in three or more levels, such a ceiling is called multi-level. More often it is used in spacious kitchens with high ceilings - from three meters or more.
This is especially true in cases where the ceiling height exceeds four meters, which is typical for apartments old building, especially “Stalinist”. Not too large in area, but having a significant height, such rooms look disproportionate, and a multi-level ceiling allows you to correct the proportions and make the room more comfortable.


Such ceilings can hide large differences in ceiling heights, significant defects in it, and also hide ceiling beams or ventilation ducts from view. With their help, you can place accents, for example, to emphasize the exclusivity of kitchen furniture.


Plasterboard ceiling in the kitchen: pros and cons
There are many advantages to plasterboard structures; we list the main ones:
- Hide wiring and communications;
- Remove unevenness and defects in ceilings;
- Help to implement visual zoning;
- Give individuality to the interior;
- Allows the installation of spotlights at the same level as the ceiling;
- Provide additional sound insulation;
- Do not change when the building settles, do not crack;
- Provide unlimited possibilities for design.
In addition to the obvious advantages, there are also disadvantages, and they must be taken into account when deciding on finishing the ceiling.
- When installing a plasterboard structure, 7 cm of height is lost;
- Installation requires skills and is carried out by specialists;
- Over time, the joints between drywall boards may crack.


Well-chosen lighting schemes can completely change a room, make it more spacious, highlight individual parts, and focus attention on the main areas. Spotlights, which can be mounted in the ceiling, can serve as main lighting or be directed to specific places in the room.


An interesting option is cornice ceiling lighting. In this option, the cornice is glued to the wall with a distance of a few centimeters from the ceiling, and behind it is laid LED Strip Light. The power and color of this backlight may vary. The illuminated ceiling seems higher, and the room itself acquires additional volume. Directional light from built-in sources can create an interesting play of light and shadow that transforms the interior.


The small size of the kitchen space cannot be an obstacle to the use of plasterboard ceiling structures. You just need to choose the right type and design.
- If the kitchen height is small, choose a single-level ceiling - it will “eat up” less centimeters, which are already counting.
- A thoughtful lighting scheme, as well as the use of cornice lighting, will help to complicate a single-level ceiling and make it more impressive.
- Light colors for painting the ceiling will help to visually enlarge the room.
- The use of glossy textures on the ceiling will visually increase the volume of the room.
Tip: If the height of the kitchen is small, but you want to have a ceiling on two levels, add a wide decorative cornice to the usual single-level ceiling, placing it slightly below the main level. Lighting placed behind the cornice will help create the necessary impression.


In principle, any person is inclined to ensure that his plans are brought to life as quickly as possible and this requires a minimum of physical and material costs. One of these finishing options is a do-it-yourself plasterboard ceiling in the kitchen, which will help you save both time and money.
Ceiling plasterboard and methods of its installation
In this article we will look at several options for how to make a plasterboard ceiling in a kitchen. The word “several” means a straight plane and an addition from the second tier of the suspended structure, but this will be just one of many options that craftsmen use.
Related articles:
Metal hanging frame

- Whether you will make only one plane, or it will be a multi-level suspended ceiling made of plasterboard in the kitchen - in any case, you need, first of all, to determine the thickness of the first tier or the depth of the ceiling cavity. Whatever the height of your kitchen, minimum distance, on which you can lower the sheathing of the first plane - 25 mm, i.e. This is the thickness of the CD profile, and it is impossible to raise it higher.
- Therefore, find the lowest point on the main ceiling and go down from it by at least 25 mm, making a mark on the wall. Now, using a water level, transfer it to all corners of the room, internal and external. A kitchen ceiling made of plasterboard will be lower by 10-12 mm (plasterboard plus putty).

- Between the marks that you made using a water level, stretch the chokeline (painting cord) and tap out a reference line.
Some people prefer to draw a guideline under a rule or a long level, but a plasterboard ceiling for a kitchen is much longer than the length of these tools, and using them for this purpose is extremely inconvenient.

- We continue to install the plasterboard ceiling in the kitchen with our own hands and install the UD profile so that it Bottom part coincided with the broken line.
Fastening is carried out using regular or impact dowels, every 30-40 cm, the optimal diameter of which is 6 mm (sometimes UD profiles are produced with ready-made holes for installation). - Now you need to make markings for the CD profiles and for this you need to decide on which lathing the plasterboard ceilings for the kitchen will be mounted.
The fact is that there are two types of frames - transverse and cellular, but for the second it is much more more consumption components, although in terms of strength it does not exceed the first. Therefore, we determine in which direction the gypsum boards will be screwed, and make markings across it every 50 cm. - This is very important point, because the plasterboard ceiling in a small kitchen is mounted starting from the corner, and this angle must be 90⁰ for the gypsum board to fit correctly.
If there is no such angle, then make markings with the expectation that the sheet will need to be trimmed. In large kitchens this is a little easier, since the installation of sheets can be started from the middle, and then trimmed from pieces.

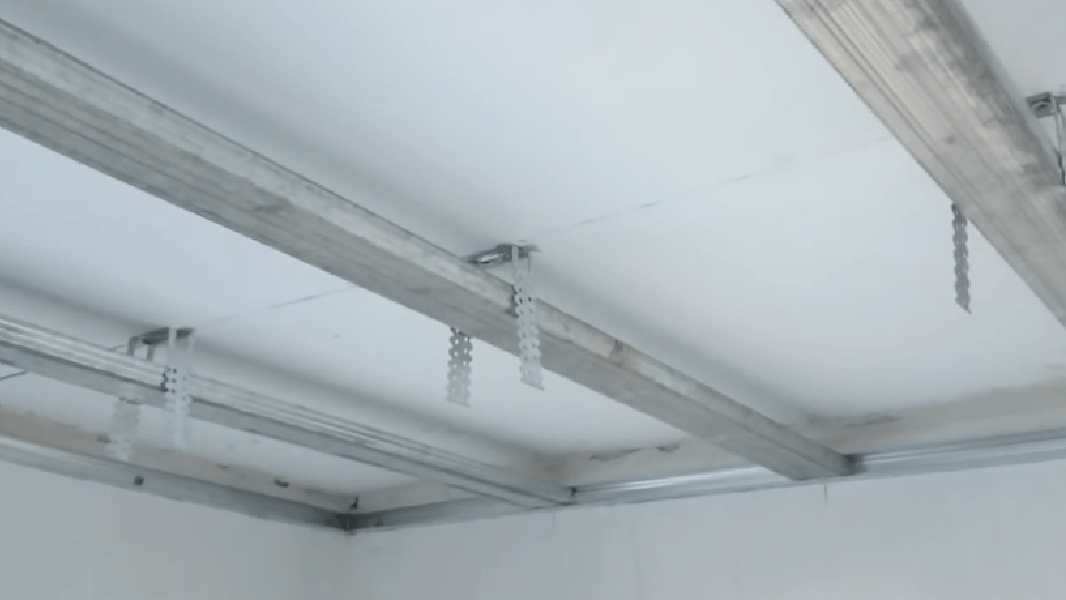
- Now you need to install the consoles for the CD profiles along the lines at a distance of 50-69 cm from each other. U-shaped galvanized hangers are used as brackets. After they are fixed, the ears are lowered, and the dewlap takes the shape of the letter P or, as they are also called, pawns.
Advice: it is best to mount the hangers on dowels with a flared sleeve so that they do not fall into the void of the concrete floor.
Impact dowels have such flaring in the form of flaps, but it is better to change the screw on them to a thicker one so that the set does not come out of the seat.

- When making a ceiling in the kitchen with your own hands from plasterboard, we move on to installing CD profiles and inserting them into UD under the already installed hangers. Make the length of each installed profile 5 mm less than required so that there is no deformation during installation.

- Do not rush to screw the profiles to the hangers and to each other - they need to be leveled by stretching a nylon thread under them.
To prevent the profiles from pulling the thread, bend a central hanger under each of them. Then lower each CD one by one, screwing them to the hangers and to each other with small self-tapping screws (fleas).
GKL fastening

- When you marked plasterboard ceilings for the kitchen, you did it every 50 cm, and the sheet is 250 cm long, which means that the edges of the two sheets on the end side should lie on the profile, each on its own half.
For fixation, use metal screws 25 mm long and screw them in 30 cm from each other. For one gypsum board you will need approximately 50-60 screws.

- It is better to lift a sheet of drywall to the sheathing together, because its dimensions (250x120 cm) will not allow you to do this alone - the panel will break.
Some people make various devices in the form of supports, but this can be used as a last resort. Of course, individual craftsmen are able to do this alone and without supports, but they have many years of experience, and they use it in exceptional situations.

Tips: drywall is cut with a knife according to front side sheet and then break it, and for figured cutting a hacksaw is used (you can use a regular one for wood).
The head of the screw should be either flush or slightly recessed, but there is a danger of the paper breaking through, so it is better to use a special attachment with a lampshade, as in the photo above.
Drywall sheets due to their availability in the market and reasonable price have long regained leadership in the field interior decoration residential and commercial premises. From this material craftsmen make figured arches and interesting niches. Plasterboard sheets are good for leveling walls and ceilings. This article will discuss plasterboard suspended ceilings in the kitchen.
Main advantages and disadvantages of the material
A plasterboard ceiling for a kitchen is preferable to traditional plaster for a number of reasons:
- installation requires a minimum of effort, and the leveling effect is maximum;
- under the frame of the structure you can hide wires or other communication circuits;
- Any type of directional or diffuse lighting fixtures can be perfectly integrated into such a ceiling. The design of a kitchen with a plasterboard ceiling can be anything;
- the ability to create ceilings with complex geometries - with several levels, with original decorative elements (niches, bends and transitions);
- a ceiling made of plasterboard sheets can be additionally insulated, which allows you to save energy resources for heating a given room;
- laid insulation reduces the permeability of sounds from the kitchen to the neighbors;
- the method does not require plastering skills, all work is done “dry”. There are no waiting periods for the next layer of plaster to dry.

Finishing the ceiling with plasterboard sheets, while having numerous advantages, also has its disadvantages:
- the height of the kitchen is reduced by 4-5 cm, which is caused by the significant thickness of the profile;
- For a novice master, installation may seem complicated;
- special equipment is required: screwdriver, hammer drill;
- after some period of time, the joints between the sheets may become covered with cracks;
- It is very difficult for one craftsman to build such a ceiling; the help of another person will be required (especially on the cladding).
The presence of the above disadvantages does not stop craftsmen who often make a plasterboard ceiling for the kitchen. Below we will talk about the design of the simplest one - a single-level ceiling structure. More complex options require special knowledge and extensive practical experience.
List of required tools

To build a plasterboard ceiling in the kitchen, the master will need the following set of tools and supplies:
- guide profile 28x27 mm (marking PN);
- ceiling profile 60x27 mm (PP marking);
- direct types of suspensions;
- crabs for connecting the profile of a single-level ceiling structure;
- scissors that can be used to cut metal;
- sealing tape, self-adhesive;
- anchor wedges;
- dowels - nails;
- painting thread;
- construction level (laser or bubble);
- 2.5 meter rule;
- plasterboard sheets;
- putty for sealing seams;
- serpyanka for reinforcing seams;
- a hammer drill equipped with a drill;
- screwdriver;
- metal screws, from 25 to 33 mm;
- self-tapping screws with a press washer;
- acrylic-based primer;
- heat and sound insulation material (if necessary);
- profile extensions (if needed);
- 3 types of spatulas: angular, wide and narrow;
- Standard construction tools: knife, tape measure and hammer.
Every craftsman has half of the above list, so a DIY plasterboard ceiling in the kitchen is inexpensive for homeowners.
In order to correctly calculate the consumption of all materials (profiles, plasterboard sheets, fastenings), it is necessary to carefully study the installation technology. To make it easier to understand the work algorithm, the sequence of work operations described below is given for a specific room size.

Very the right tool for ceiling construction - this is a hydraulic level
If it is not yet clear to a beginner which brand of profile and drywall is better, preference should be given to products from well-known brands. Market leader in finishing and building materials- Knauf company. If you buy a cheap profile and drywall of dubious quality, the suspended ceiling structure may sag and collapse over time.
A hydraulic level is necessary to control the horizontal line of the future ceiling. The principle of operation of this tool is based on the law of physics, when water in 2 communicating vessels is at the same level. This device marks points on opposite walls of the kitchen, which are connected with paint thread. If you use a simple level, you will have to draw a line along the entire perimeter of the room, which is very tedious.
Plasterboard ceiling in the kitchen it can be made of simple or moisture-resistant plasterboard. In rooms with high humidity, it is recommended to install only materials that have a protective coating with hydrophobic additives. These 2 types of sheets differ in color: green material is moisture resistant, gray material is ordinary.

For plating kitchen ceiling sheets with a thickness of 8-9.5 mm are used; thicker material (12.5 mm) is used for interior wall decoration. The purpose of the sealing tape is that a 30 cm porous base is laid along the entire perimeter of the ceiling to soundproof the structure.
Marking the ceiling and attaching the profile
How to make a plasterboard ceiling in the kitchen after preparing all the materials and surface? You need to start working with the markup:

The most important stage is the correct marking
- Using a tape measure, measure all 4 corners of the room, the goal is to find the lowest corner. At this point, a 5 cm indentation is made from the ceiling and a mark is applied;
Important: 5 cm must be retreated from the ceiling if you do not plan to install lamps. When installing lamps, a space of at least 8 cm is made.
- then, using a hydraulic level, marks are applied to the remaining 3 walls so that the surface of the future ceiling is perfectly flat;
- performing tapping - connecting all the points and applying an even imprint on the wall surface using a painting cord;
- securing the guide profile along the lines marked on the walls. The profile is applied to the wall and dots are placed in the finished holes. The ends of the profile must also have holes. If they are missing, you need to retreat 10 cm from each edge and make holes with any drill;
- A sealing tape is glued to the profile and fixed with dowels on the walls. The minimum number of dowels is 3;
- the next step is marking for the main ceiling profiles. The width of a standard plasterboard sheet is 1.2 m, so the step for securing the profile is 40 cm. Typically, these three fasteners are distributed along the edges of the profile and in its middle. The result is lines on the ceiling structure, located 40 cm from each other;
- for such a close location of the ceiling profile, it will be necessary to fasten jumpers only at the transverse joints of the material, i.e. every 2.5 m (this is the length of a standard plasterboard sheet);
- The step for attaching hangers for the ceiling option under consideration is 50 cm, but the first hanger is fixed at a distance of 25 cm from the wall. The second is obtained at a distance of 75 cm (25+50) and then according to the algorithm (+50 cm);
- to mark the places where the hangers are attached, it is necessary to use anchor bolts, drilling holes for which involves big amount dust.
Important: when making holes in the ceiling and walls, the master must protect his eyes from dust. Personal protective equipment in this situation is a respirator that protects the eyes and glasses to prevent debris from getting into the eyes.
How to mount the frame

To continue building a suspended plasterboard ceiling in the kitchen, you need to install the frame well:
- fastening of suspensions with anchors. The choice of such fasteners is due to the high strength requirements for the finished structure. A sealing tape is also attached to the hangers;
- after fixing the suspension, its edges bend as much as possible, which will prevent further curvature of the profile;
- the next stage is installation of the ceiling profile. The standard length of products is 3 m, therefore, with smaller kitchen dimensions, the material is cut to a length that is 1 cm shorter than the required one;
- If the length or width of the kitchen exceeds the dimensions of the ceiling suspension, it is necessary to install an extension. To increase the length of the profile, a special type of connecting element is used;

- Ceiling profiles are first attached to the corners of the kitchen. To secure the products without sagging, the assistant master holds the profile with a rule. Supporting the profile towards all guides will ensure the evenness and reliability of the structure. While the assistant is holding the profile, the master must have time to fasten the product with 4 self-tapping screws that have press washers. At the same time, it is necessary to fix the profile on hangers;
- After fixing the corners, they proceed to fastening the profile on the central hangers. If it is impossible to attach the rule to the center, it must be placed under the starting profile, following the horizontal direction. A long level is used to check evenness. When the hangers are fixed to the profile, their excess length is bent upward at the ends;
- the second profile is fixed using a similar algorithm; the product must be constantly maintained according to the rule. The next step is to move to the opposite wall and attach the ceiling profile there;
- when the profile is firmly fixed on the sides, the master moves on to the central part of the structure. It is always easier to secure the center, because its elements always rest on those already fixed;
- the joining points of the drywall sheets (every 2.5 m) are the places where the jumpers are attached, which are installed on the crabs. In this case, crabs are special types of fasteners for 1-level structures;
- Next, jumpers are cut from the ceiling profile used in the work, which are attached to the crab with self-tapping screws. The antennae are curled. Bottom mount jumpers to the ceiling profile can be eliminated; this role will be performed by plasterboard sheets after installation;
- To soundproof a plasterboard suspended ceiling, it is used various material, but most often it is a new generation of mineral wool. The insulation material is cut into equal rectangles, which are placed in the cells of the suspended structure.
Important: all manipulations related to mineral wool, must be performed with gloves and a respirator.
On the Internet you can find many thematic videos on how to make a plasterboard ceiling in the kitchen with your own hands. Therefore, even a beginner, if desired, will understand the technology of the process.
Installation of plasterboard sheets
Any novice builder needs to know: after purchase, sheets of drywall must be “rested” in a horizontal position for at least 2 days. In general, the material only accepts horizontal storage.

The algorithm for fastening sheet material is as follows:
- work begins with chamfering. To do this, use a knife to cut off all the edges of the material, this is done to better penetration putty in the cracks;
- It is better to fasten the first sheet from the corner, retreating from 10 to 15 mm, the step of fixing the material is 20 cm;
- adjacent sheets must be fastened at different distances, i.e. the pitch of each new sheet should not repeat the pattern of holes in the previous one. It is very important to recess the heads of the screws being screwed in; under no circumstances should they stick out;
- fastening sheets - staggered, shifted - at least 1 cell;
- It is necessary to leave a gap between the sheet material of at least 2 mm.
The presence of external corners in the kitchen should not allow joining of drywall sheets near this area. And one more thing - if the joint is located very close to the corner, an ugly crack will subsequently appear in this place.
How to calculate the volume of materials

After describing the construction algorithm, it is necessary to understand the basic principles of calculating the required material. It will be easier for the master if he draws a sketch plan of the future structure on paper. When transferring a kitchen drawing onto a paper sheet, it is important to indicate all its dimensions, and then correctly place the location of the profiles and fasteners.
Real example: a kitchen with an area of 20.8 square meters. m requires the following set of consumables:
- suspensions – 99 or 100 (in reserve);
- plasterboard sheets 1.2x2.5 m - 8 pieces;
- ceiling profile – 19 pcs.;
- guide elements – 8 pcs.;
- crabs – 24 pieces.
If we talk about the cost of installing a suspended plasterboard ceiling, then many companies charge for similar work from 400 rub./sq. m. If you do all this yourself in a kitchen of the above size, you can save about 8.3 thousand rubles. With the money freed from the budget you can buy a good construction tool or something for the interior of a room being renovated.
How to seal seams

The last stage in the work on installing a suspended ceiling is the operation of puttying and sealing seams:
- all inter-sheet gaps are treated with a primer;
- after the solution has dried, it is necessary to prepare for putty;
- The durability of the ceiling structure directly depends on the quality of the putty, so putty becomes the best option well-known companies(Knauf Uniflott);
Important: you cannot use simple wall putty for plasterboard ceilings.
- The product is diluted in strict compliance with the instructions, most often printed by the manufacturer directly on the packaging;
- The seams near the walls are sealed first, then the heads of the recessed screws;
- to seal factory seams, use a spatula with a wide spatula;
Important: for more than 1.5 years, the Knauf company has been producing moisture-resistant drywall (marked - GKL), which has an original edge (PLUK). This saves the craftsman from using reinforcing mesh along the edges and greatly increases the strength of the joining seams.

An indispensable assistant in the construction of a plasterboard ceiling is self-adhesive tape for seams.
The use of sheet material and putty from one manufacturer guarantees a high construction result. If applicable Knauf sheets, which means the choice of putty is predetermined - Knauf Uniflott.
- After the putty has completely dried, the joints of the sheets are glued with serpyanka (self-adhesive tape). Where the material intersects, the film is glued overlapping;
- the top of the serpyanka should be covered with putty;
- To apply putty to a plasterboard suspended ceiling, it is preferable to use an angled spatula.
If the installation technology is followed correctly, plasterboard ceilings in the kitchen are smooth and completely free of joints. To enhance the effect of a single canvas, fiberglass “gossamer” is glued to the sheet material.
The next stage is finishing putty and applying the final coating.

The process of installing a plasterboard ceiling structure is simple, so it is in great demand among consumers. When working, it is important to comply with safety precautions (protection from dust and small particles) and to consistently perform all work operations. This ceiling structure serves for many years, reliably protects against noise and is an excellent base for finishing.
A novice craftsman needs to understand that only from high-quality material can a reliable and durable structure be created. Therefore, it is better to purchase sheet material and fastenings in specialized construction stores. For the drywall itself, the seller must provide a certificate of conformity, which is almost impossible to obtain from resellers on the market. The use of products of questionable manufacture cannot guarantee an excellent construction result.
For many, the start of renovations means chaos for an indefinite period of time. All inconveniences are compensated by an enchanting, pleasing result. Modern style The apartment is much different from the standard renovation of the last century. Innovative image solutions in apartment renovation will help to implement many products on the market. Let's talk about the design of the ceiling in the kitchen using plasterboard, which is rightfully considered one of the most affordable, easy-to-use materials.

The kitchen is a very capricious room. It contains odors, humidity, and the temperature constantly changes. In this part of the apartment, as a rule, communications, equipment with wires, and many lighting fixtures for different zones are concentrated. The material for the ceiling should cope perfectly with the features of the food room and help visually hide all that is unnecessary and add aesthetics. Ventilation is important for the dining area. GKL* is an environmentally friendly, breathable material on which mold and mildew do not form and odors are absorbed.

Advantages and disadvantages of drywall
The main advantages of gypsum boards:
- Fast, simple and inexpensive. This is a versatile and unpretentious material that is easy to work with, install and can be completed with the ceiling within a week. Compared to other finishing materials, plasterboard is affordable, and the result of the work will look expensive, modern and unusual.
- Strength of gypsum plasterboard. Stretch ceilings, for example, are not so difficult to tear. And drywall is a fairly strong material and therefore more durable than many.
- Environmental friendliness. GKL consists of two materials: environmentally friendly gypsum, covered with cardboard on both sides. This allows the drywall to “breathe” and it does not harm the inhabitants of the apartment.
- GCRs absorb odors, do not accumulate moisture (prevents the appearance of fungus and mold, which is often a cause for distress for the owners of the premises), and are resistant to temperature changes. All these incidental manifestations of the kitchen area often cause many problems and quickly spoil the appearance.
- Aesthetics. With the help of drywall it is easy to hide all the imperfections that visually spoil the kitchen room: unevenness, defects, wiring.
- Lighting. Thanks to the space, you can hang any lamps at the same level as the ceiling.
- Soundproofing. GCRs additionally isolate sound in the room, which helps create the greatest comfort for all family members.
- Insulation. Thanks to the plasterboard construction, it is possible, if necessary, to make the room warmer by laying a special material between the ceiling and the plasterboard.
- Durability of gypsum plasterboard. This material does not deform when the building settles (important in new buildings), and does not crack. These properties will save you from many problems, frustrations and save your family budget.
- All kinds of interior options. Drywall gives free rein to all sorts of design solutions: takes any shape, it can be made matte, glossy, depict any pattern, painted in any color, easy to combine with other materials, convenient to mount lighting.

The main disadvantages of gypsum boards:
- Loss of centimeters. The more levels of plasterboard ceiling you choose, the more cm it will take up. On average, one level takes up 10 cm of height.
- To build a gypsum board ceiling, skill is required and you may need to hire workers (in particular, this applies to ceilings of more than one level).


Summing up the “pros” and “cons” of a plasterboard ceiling in the kitchen, we see a clear superiority of the positive aspects. Having confirmed our position, we boldly begin to implement the plan. Let's start with the room.

How the kitchen area affects the appearance of the ceiling
Before you begin designing the ceiling, you need to assess the scale of the work site.

A small kitchen can be visually increased in area and height. Light shades, additional bright lamps and a single-level ceiling will help with this: color and light will illusoryly make the room larger, and one level will minimally take away centimeters of height.

If the kitchen is large in size, but its height is minimal, then a multi-level ceiling will also not work, but you can easily experiment with the colors of the room.

Having very high walls, a multi-level plasterboard ceiling will make the space cozier and more aesthetically pleasing. To close ventilation pipe You might want to think about the option with a box. It will look much more aesthetically pleasing than the pipe itself.

For a living room combined with a kitchen, separating zones using a thoughtful design is perfect. For example, construct a ceiling that flows into a partition or arch. This option also looks great in a large kitchen: you can separate the work area from the dining area. A simpler option is to visually separate zones using lamps, colors or various figured patterns from gypsum plasterboard.

Decide how you can use the ceiling to visually enhance your living room and begin designing the ceiling.

photos
Ceiling levels and their features
Single level
A single-level ceiling will suit all types of kitchens and you can easily handle the installation yourself, without the help of specialists. For lovers of a classic look, their gypsum board ceiling can be plastered and painted. The result will be a standard look while maintaining the advantages of this material.

Designers advise choosing glossy paint for small rooms light shade to visually enlarge the area. It is important to take into account the style of the room as a whole and choose the right color in harmony with the furniture.

For those who want to create something unusual, but have a low ceiling and small “squares” at their disposal, colors, patterns and lamps will come to the rescue. One great way would be to zone the kitchen. It is popular to highlight the place where the dining table is, or the middle of the kitchen. With this arrangement of accents, you can darken the work areas. You can also create bright zones using light: install several bright lamps above the desired area, and distribute the rest of the light in work areas as needed.

The individuality and uniqueness of the kitchen room will be given by a drawing made on plasterboard. A unique design will transform the kitchen, help highlight the interior and set the right priorities.

Two-level
Two levels of gypsum plasterboard will help you build a very impressive ceiling. Walls with a height of less than 2.5 meters are not suitable for such a structure, because the construction will take about 15 centimeters.

Competent, well-thought-out arrangement and combinations of heights will make the kitchen room more voluminous and allow a large number of interior tasks. Most often, high parts of the ceiling are placed in the center of the room or in the work area.

A plasterboard ceiling can easily take any shape. Usually they combine oval and rectangular elements. Shapes such as a snake and a spiral look interesting. Your imagination is limitless here.

Combinations of drywall with other types of material look excellent. Most often, gypsum boards are combined with suspended ceilings, wood and plywood.

Variations with light will be especially wonderful. IN two-level ceilings You can install any lamps. Proper zoning of space is necessary. One of the generally accepted combinations of arranging light sources on two levels is as follows: the main lamps are installed in the center of the room, and neon and LED lamps are placed below the edges.

Another option for light distribution looks like this: certain areas are illuminated with bright lamps (for example, a dinner table, a bar counter, paintings), and other areas are illuminated with slightly dim light.
Color combinations, glossy and matte colors, and patterned accents look impressive. Don’t forget that bold decisions and previously unimaginable color combinations are in fashion now.

Multi-level
A ceiling of three levels or more is considered multi-level. If you own an apartment with a ceiling height of three meters or more, then several ceiling levels will be an excellent interior design. This option is the most decorated. The play of lines, colors, light and textures will transform the kitchen and make it the most enchanting room where you will want to host receptions and grand dinners.

When the height of the kitchen is more than four meters, and the area is small, then the room as a whole looks awkward. A decorated ceiling in several levels will immortalize the room and make it much more comfortable.

Ceilings for a living room combined with a kitchen
The kitchen and living room are the most visited rooms in an apartment or house. The combined premises welcome guests and organize various events. Therefore, it is important to make these areas beautiful, solemn and cozy.

The most attractive option is to build a wall that will flow smoothly from the ceiling, or a shaped arch. The wall can be patterned, with windows and curtains, or decorated with a gallery of paintings. For the arch, you can choose fancy shapes that emphasize the overall style. Do not forget that classics are very harmoniously and unusually combined with modernity. An area with a large dining table will be perfectly highlighted by bright light. The relaxation area can be made darker - this will further relax the household and invited guests after a hearty dinner. In general, this amount of space gives free rein to the imagination. The main thing is to think everything thoroughly and act boldly.