I have been engaged in weightlifting for quite a long time and to increase power functionality, I decided to include in my own exercises with my own weight. These parallel bars are easy to manufacture and inexpensive. They are sufficiently easy to move them, and strong enough to perform basic sports exercises. The cost of manufacture can also be reduced depending on which materials and tools you have. The following is described in detail how to make bars at home.
Materials for assembling outdoor bars do it yourself:
- 2 square wooden bars 10x10 cm, 3 meters long
- 2 metal pole diameter 4 cm
- Board 5x10, 250 long
- Box 7.5 cm screws for wood
Tools: (can be replaced by others, but this is what I had at home)
- Table Pila
- Drilling machine
- Electric drill
- Nozzle for drilling holes for 4 cm
- Handy drill on a tree by 3.8
Step 1: Split wood on the necessary dimensions


At this step, you need to determine the size and at what height your parallel poles will be located, as well as how wide they will be located apart. The best way Understand this and make drawings - measure the width of the shoulders. Those that I did, are located at a distance of 51 cm from each other and 120 from the floor (plus \\ minus - I did not take into account the height of horizontal planks).
Cut four pieces of bars long 120.
Since these columns are located at a distance of 51 inches from each other, we will deduct the width of each vertical rack (10 cm).
Cut the two bar 41 cm long.
Now take the 5x10 board and scold two pieces of 61 cm from it. These boards will be used to enhance the wooden frame.
Step 2: Drink holes

Now we need to drill holes for the poles.
Measure 5 cm from the end of each 120-centimeter wooden rack. Exactly check the center of the rack at this point.
Drill the hole at this mark using the first drill (you can drill to the end, if you want, but I decided to reserved only until the middle of the bar).
Drill the same distance in the rack at the same point, but this time use the nozzle for drilling holes.
Clean the garbage hole with a finger or screwdriver.
Step 3: Collect the wooden frame


As soon as we drill holes, we will collect the frame as shown in the photo. I used the clamps to lay the wood in the form of the letter U with a board along the bottom of the U. Screw through the boards into the wooden rack about 7-10 screws. Make sure that at least two enter vertical racks and five - in horizontal racks.
You will make two such racks and make sure that in each and they drilled earlier holes are directed in the same side so that when the sixth soles are located opposite each other, they can connect with each of the sets of holes.
You can see in the photo that the design also has a small bracket in the form L, which turned out to be unnecessary after adding boards to enhance the design. These brackets will not harm the designs, but if you are going to carry out an additional step described below, then there is no need to add them.
Optional Step
If you want to add at this stage additional support For a frame, you can place and fasten along the board on each of its corner, ensuring greater stability. I have no photos of this process, because during the assembly I did not use these supports and add them when I need extra force.
Step 4: Insert the poles
The rods will fit tightly to the holes drilled by the nozzle to drill the holes in the tree.
Hold the pole tightly, at the same time, knocking the hammer on the reverse side wooden pillarSo that the pole passed to the base of the hole. Repeat this step for each of the ends of the poles until you collect homemade bars for pushups, as shown in the photo.
For convenience, I recorded a small video with the process of assembling homemade bars for the house:
To maintain physical form, not everyone has the opportunity to visit the gym, but the exercises can be done at home. To strengthen the muscles of the hands, back and press you can make a horizontal bar for the house. There are different designs - the simplest and more complicated.
Types of tourists
For supporting sports form It is advisable to have sports shells at home. The most simple of which belongs to the horizontal bar. This is one or more small crossbar that allows you to train the muscles of the hands, chest, press and back. It is only necessary to find a suitable set of exercises.
One of the simple options
For home (apartments)
The house usually find a place for the horizontal bar. In the apartment, it is usually more complicated in the apartment, so many are looking for options that occupy a little space are easily removed and installed: so that you can store, say, in the closet and hang only on time. To use indoors there are such models:
- Wall mounted. There are different sizes and structures - from a simple crossbar in the corners, to more complex structures for different grip and different muscle groups. Have a general type of fastening: powerful corners that are attached directly to the wall.
- Corner. One of the varieties of wall mounted. The difference is clear from the name - are attached to two adjacent walls forming the angle.
- IN doorway
. Requires a minimum of time for making, and can also be removable. There are two versions:
- Installed in the doorway. This is usually just one crossbar. A more complex design here still do not strengthen.
- Fastened above the door. A little more complicated design that allows you to diversify classes.

Two small wallpapers: one for pulling, the other for the press and "corner"

Model 3 in 1

In the doorway or in a narrow corridor

Methods for fastening the removable horizontal bar in the doorway

There are completely simple street horizons - two racks with a crossbar, there are whole complexes

Universal option - with a Swedish wall and devices for pumping all muscle groups

Mini-sports complex in the backyard
In general, you can outdoor wall At home hang wall-mounted horizontal bar - an option for summer training.
Choosing materials
Usually, the home horizontal bar is made of metal pipes. They are round and rectangular (square) sections. Rectangular with the same section (diameter and diagonal) and wall thickness have greater rigidity, carry a large load. But if the pipe is frozen, then the rectangular is sharply refracted, and the round slowly bends. That this does not happen, choose the walls thoroughly (from 2.5 mm and more). The horizontal bar is heavier, but will be more reliable, it will be able to withstand heavy loads.

If the walls allow, you can hang heavy designs
You still need to choose pipes for the horizontal bar for convenience. If we talk about the operation, it is more convenient in the hand there are a round. But the rectangular is easier to cook, as the round requires a higher degree of skill. Even rectangular better "falls" on the wall, the area of \u200b\u200bsupport is more. This is important for wall structures. Apparently, therefore, the frames and racks of domestic tourists make a square (profiled) pipe, and the crossbars are from the round.
As a rule, the diameter of the coastal of the horizontal bar lies in the range from 27 mm to 32 mm.
Another horizontal barns are made from wood. But since the wood is heterogeneous, it is difficult to predict its behavior during loads. If we consider that movements can be jerks, the likelihood is that the wooden crossbar will crack. So if you want to make the horizontal bar, the wood is better not to use.

Reliability is the most important thing. And in the design and fasteners
A few words about the form of steel, which can be used. Make a horizontal bar for home ordinary pipe - from ferrous metal. After welding, it is cleaned to pure metal, processed with soil and color. This is quite enough to use in a house or apartment. For street tourists, it is better to treat the anti-corrosion composition after stripping, after the soil, and then - the paint in two or three layers. If you can - apply powder paint. It has an uneven surface, does not slide at hand. The same surface may have some types hammer colors. They also give an unusual effect: unequal color. On metal things looks very good.

Fastening should also be reliable
You can still make a horizontal bar for home or stainless steel street. On the frame to translate the road is hardly reasonable, but the crossbars can be made of stainless steel. Just do not take pipes from food stainless steel - they are made with thin walls, so they often do not stand and bent. Take good alloyed structural steel. It does not delete and will withstand solid loads. But there is another point: the pipe can be too smooth, which is uncomfortable. By grip, hands can slide.
Schemes and sizes
The schemes of the horizons are important. The diameters of the pipes, the wall thickness are important. It is really important, and the dimensions are approximate. They may vary depending on the growth and size of a person. Usually they are given under the "medium" growth and mean sizes of the chest. If you have more parameters than "average", increase the dimensions so that you feel comfortable.

This model is called three in one (3 in 1), as it allows you to train almost all muscles
Wall-mounted models
Some of the most convenient and functional - wallpapers. They are more cumbersome and complex in design, there are quite simple. Let's start with those more complicated.
In the figure, the horizontal bar on which you can do in two positions. On the picture on the right - the position for the study of the press, on the left - for studying the hands, back and chest muscles. The specified design can be improved. On the Scheme on the right there are two crossbars that are used to work with a narrow grip. You can install additional crossbars for medium, and extreme use for "normal". Wide grip provide handles sticking on the sides. More convenient if they have a tilt of about 30 °.

Two schemes of a wall horizontal bar for different grip. Different sizessimilar designs
So the horizontal bar is not always comfortable, so another design is invented - with handles on the front strip. It is less massive, requires a smaller number of pipes. But pumping the press will have to be on another simulator. This such opportunity does not provide.

Scheme and sizes removed from the finished wallpaper
Despite the shortcomings, the above design is repeated many times. It is simple, reliable, takes a little space, so popular. The dimensions are slightly adjusted, leaving the diameters of the pipes and the thickness of the corners unchanged or increasing the wall thickness. Example - in the photo below.

it homemade versionmade by factory model
There is even more simple design. This is only one crossbar on which you can only pull up. But this design is one of the most compact. It can be hung over the doorway and it will not interfere, will not attract attention. Make a horizontal bar of such a design makes sense if there is no place for placement more serious projectile or there is a Swedish wall.

Dimensions - under a small height
Proper structures are one of the most compact. Only those that are installed in the doorway or between two nearby walls are occupied less space (only a pipe is needed at all, which are made by special attachments).
Turks for the yard
In the courtyard they usually put more complex designs: there is no need to save space, so they make as a comfortable model as a comfortable model. It should be approached to the question weighted: to make the horizontal bar reliable, you need pipes with a solid wall thickness, and they are not cheap. Therefore, since there are already racks and crossbars, you can make a Swedish wall and a fastening for a swing - so that children can play, and adults to train.

Outdoor horizontal bar: drawing with dimensions
Note that the racks are pairly connected by jumpers. The jumper bursts into the ground and serves to stabilize the position at lateral loads. What else to pay attention is to the depth to which the poles are buried. If the land is prone to bent (clay and loam), it is preferably lower than the depth of freezing. For the middle lane of Russia, it is about 120-130 cm. In order to stood the racks securely, you can perpendicular to the underground part to trigger the pieces of pipes. This will complicate the installation, but the poles are definitely not separated.
How to make a horizontal bar for an apartment with your own hands - photo report
Even for the most complex wall model, 2-2.5 meters of profile pipe and about 1.5 meters round. To make a horizontal bar for home with your own hands, pre-printed a sheet with the selected model and sizes. For the frame used a profiled metal pipe 20 * 30 * 3 mm, for crossbar and "handles" - the remainder of the cornice for the curtains of Soviet times. The pipe is thin, but still withstands. To begin with the help of a grinder profile pipe saw into pieces of the desired length.

The beginning - cut the pipes into pieces of the desired length, stir up the angle of the stops
There are no corner stops in the diagram, they are made on the eye. Angle - about 50 °. Next, it's small - cook. With the help of inverter welding machine It is not too difficult. Especially since the pipe has a thick wall: 3 mm is boiled normally.
Two half frames turned out in the form of the letter "G" - they must be connected with jumpers. To the frame racks were parallel to, we use the planks that fix the parts at the same distance. At the same time, from the trimming of a pipe from a stainless steel at the bottom we weld the handles for which we will stay when pumping the press.

So that the distance between the racks was the same, we use the rails
For a dense adjoining of a round tube and rectangular, a semicircle was cut in a grinder in the rack. I had to focus with the file, but the fit is very good. It remains to brew.

Registration of round and rectangular pipe
To welcome K. round trumpet The handles for a narrow grip, in the cuts of the pipe, too, form the excavation. Cook them harder - the thickness of the pipe is significantly less. And in general, other electrodes go under the welding of the stainless steel. Due to the lack of experience, the seams turned out ugly, but without obvious marriage.
Next you need to bend the pipe along the edges. To do this, insert the rods of a smaller diameter into the pipe, we take gas burner., heal the place of bend, bending little by little. Bend to 30 °. To do this, on the floor, chalk drew an angle, bendingly curled along the drawn lines.

Add "holders" for a narrow grip, bend and can be painted
On the Bulgarian we put out the sandpaper, we clean the place of welding. Then, with a circle with a smaller grain, we remove the flare from the whole structure, additionally stabbing the seams. Ready to paint. Paint in the canopy was applied in three layers.

Hooks for hanging the horizon, too, made it yourself
For mounting on the wall, the metal strip 15 * 4 mm made hooks. Bend was not easy - clogged in the forceps a whole piece, managed to be beaten on both sides. The finished hooks were cut off at the desired length and drilled holes under the dowel. Used drill with a diameter of 8 mm, drilled by 12 mm under the fastener caps. The hooks are cleaned and painted the same paint.

Before making the horizontal bar, decide on the place where you will hang it. Not all spouses will safely take such innovation ... Homemade horizontal bar 3 in 1 on the wall in two working positions
Almost everything is ready. It remains to make pillows under the shoulders. For the base, pieces of plywood are taken, they are a thin furniture foam in two layers, covered with ecocuses with holes. For fastening the leatherette, staples and construction staplers are used, but you can use furniture nails if there is no stapler.

Making pillows under the shoulders
According to the experience: Hooks on the wall should be done longer, under three dowels at least. And yet: the design was improved - the handles for a narrow grip in the way that in the picture, uncomfortable, so another crossbar is welded.

Added cross-shredding
The homemade home horizontal manner turned out to be heavy - 19.8 kg, but in this form it is more convenient.
In conclusion, a small entertainment video-Prank "Grandfall punishes turnstiles". Be healthy!
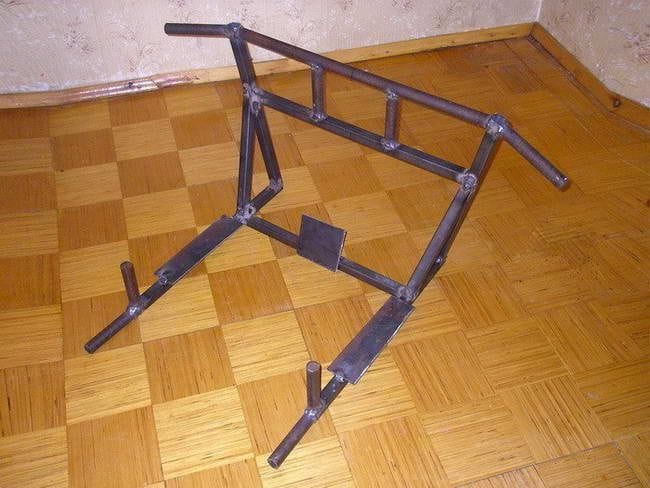
Every person who respects himself thinks to have physical shape, as well as maintain it. Sometimes it happens that there is not everywhere there are a horizontal bar and bars nearby, so you have to go out of the situation inventing your fixtures for this. In this article I will tell you how the author made a simulator two in one, which includes the horizontal bar and the bars and the opportunity to establish it at home, which adds this idea of \u200b\u200brelevance.
In order to make such a simulator, such materials are needed as:
* Pipe with a diameter of 30mm.
* Profile 30 * 30mm.
* Iron leaf 5mm.
* Bulgarian.
* Welding.
* Dermatin.
* Porolon.
* Plate.
* White paint.
That's all the items needed in the assembly, therefore proceed to the manufacture.
Step one.
The first thing to do is drawing. He will give an accurate picture of homemakes and will help in further assembly, because a clear example is much better than words.
The drawing contains elements by numbers for convenience and exception to confuse the part.

Step second.
There is a drawing, now it is necessary to arm the grinder and cut the desired number of pipe blanks and different profiles in length. When working with a grinder, be careful and dress the protective glasses and durable gloves.
Also need fasteners, which will keep the simulator, the drawing of the attachment is depicted in the photo.

The dimensions of the finished components are indicated in the photo.

Step Three.
Ruthlessly sawing one-piece pipes and profiles on the desired segments of a given length go to the tool called welding. Before you start welding the items, they need to be placed, as in the photo in a particular order.

When welding, observe safety measures, clothes welding mask and gloves.
Ready frame looks like this.
Step fourth.
It is still early to use such a simulator, you need to make soft pillows, one for the back and two for hands. On wooden bases, we have a foam rubber and tighten the dermatin, this can be done with furniture stapler.

So look ready-made soft pads for the simulator.

Pitch fifth.
At the end, it is necessary to protect the simulator from corrosion, it is easiest to make it easier with paint, color choose to taste and screw the plank with soft pillows. After that, fasten homemade mounting on the wall and install the simulator and check).
So homely looks in the bar mode.
Brussia is an integral projectile of any sport, because they give a common effect on hand and housing. In gymnastics, professional horizons are used, which should not be attempting to make themselves, since the level of exercises is associated with large loads and need especially durable shells. But if we are talking about ordinary strength exercises, you can do in the yard or even at home on homemade bars.
Professional shells
 Professional dyspete bars consist of grounds, high and low racks, and fiberglass jersey or fiberglass, adjustable mechanism and stretching cables. The distance between the points of the support is about 2.4 meters, the height of the floor from the floor is low from 1.4 to 1.66 meters, high - from 2.2 to 2.46 meters, the height change step is set to 5 centimeters. The distance between the Zherdess surfaces is also adjustable - from 1.3 to 1.8 meters.
Professional gymnastic parallel bars for men consist of an iron frame, four racks are equipped with fixing and clamping mechanisms, four swivels for adjusting the distance and two streams from wood or fiberglass, which is enhanced by carbon fiber. The distance between the points of the support is about 2.3 meters, the height of the pole from the floor is from 1.7 to 2 meters, the distance between the inner surfaces is from 0.42 to 0.62 meters.
Professional gymnastic crossbind consists of a steel elastic rod, two racks that are fixed with four stretch marks. The height of the floor crossbar is from 2.55 to 2.95 meters, the height adjustment step is from 5 to 20 centimeters, the length of the rod is 2.4 meters, the diameter is 2.8 centimeters.
Amateur Street Shells
Ordinary parallel bars can be made in the yard, spent about two days. Dimensions - approximately like professional, take averaged figures, between supports - about 2.5 meters, the width between the bars of about 50 centimeters, the height above the ground is about 1.7 meters. We need the following materials - cement bag (solution - for a part of cement Three parts of sand with small stones), bucket, trowel, shovel, welding machine, Bulgarian, level, borrow 20 centimeters diameter. The crossbars are made of pipes with a diameter of 4 centimeters, racks - pipes with a diameter of about 6 centimeters, can be taken from rectangular cross section, in height, you need to make a reserve into a soil for 60 centimeters.
Sport is incredibly useful for health, well-being and shapes. But visit gym Not available to everyone, and the purchase of attributes is rolled out at high costs. It is possible to solve the problem, knowing reliably how to make bars at home. You can equip a sports corner with bars both indoors and on the street. Creating this inventory will not require large capital investments and efforts.
Production of bars at home: Street version
The street projectile must have dimensions of about 1150 cm with a height and length of the handrails of 1240 cm. To create it, the following materials will be required:
- bar 100x100 cm height more than 145 cm
- rounds with a diameter of 10 mm
- nails from 100 to 200 mm long
From the blanks you need to cut 4 identical racks. To fix them in the ground, a concrete solution is needed. Before mounting, the supports need to be made on the racks, they are necessary to accommodate the crossbar. You can make a few notches, then the handrails can be adjusted in height. After installing all components and their fixation, the finished design is desirable to be treated with a protective coating. So that the inventory is high-quality and durable, you need to carefully approach the choice of materials: preference is desirable to give bruus from solid wood.

Production of bars do it yourself: option for rooms
Make a simulator for classes in any room, be it a house or apartment, you can from high-quality metal pipes. This design will be very compact and convenient, even in cramped conditions. For its creation, the following materials will be required:

- pipes 1.7 m long - 2 pcs., 1.5 m - 4 pcs.
- metal corners with prepared holes for screwing screws - 2 pcs. By meter
- welding machine
- screws in the form of screws
- household drill
Corners are mounted on the wall - one at the floor itself, and the second one at an altitude of 1.7 m. Designs need to be attached to the surface, marking points for screws. One-meter memety pipes need to be welded along two elements to each corner, having them along the edges. Metal rolling 1.7 m. Welded to the design last. Corners are attached on the wall by one facet, one-meter club clubs are mounted on the second.

Long pipes are welded to short - one on each side. The connection should not pass on the very edge. The optimal distance is from 110 to 120 cm from the corners. The design on the wall is attached by screws. Metal pipes can be used to create a street simulator. Its design can repeat the wooden analog.