Coffee table is always a flight of fantasy. There are practically no restrictions on how the coffee table should look like, what a design, form, height should be, sizes. This greatly facilitates the task, the main thing is that this piece of furniture harmoniously fit into the overall design of the room. Nevertheless, many want the coffee table to be an original, exclusive, unique element of the interior. For this, it is not necessary to look for ready-made products for a long time, you can gain courage and make a table with your own hands. Many questions may arise: how to make a coffee table on your own, what materials to use what form to choose other, in this article we will present a few instructions for the manufacture of coffee tables without spending a lot of strength, energy and finance.
The most popular materials for coffee tables are rightfully considered to be tree and glass. Of course there are plastic tables, and metal, and stone elements, but still the classic and the charm of the natural tree outweigh the scales in the direction of wood products. Glass coffee tables winnly look at the High Tech or Other Indoors, which involve the use of interior items in light colors. That is why we will consider only glass and wooden models Tables. Height of the coffee table Depends on the interior in which he will have to fit. For example, with low sofas and seats will win the coffee tables from 25 - 30 cm to 50 cm high. If the furniture around has standard dimensions, the table must be such a height so that it is convenient to use - so that it does not have to go too low or stretch it high, sitting on the sofa. Standard height Coffee table - 50 - 65 cm. Tables height more than 70 cm is considered high and not suitable for all interiors, only where they will use it. In the examples considered below there will be tables from the first two categories, as well as one model that can be done any height, including more than 70 cm.

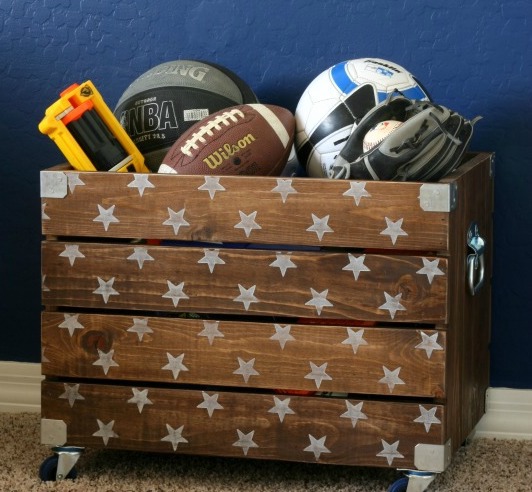
The easiest in the manufacture of a coffee table can rightly be called a table of wooden boxes. Such a table can be made of old or new ready-made wine boxes, but if they are not, and there is no possibility to purchase, then you can make from wooden Reques or plywood. For example, wooden boards with a width of 7 to 20 cm and thickness from 15 to 20 mm are suitable. If you want to do from plywood, then you will note that it should be polished, 30 cm wide and 60 cm long. In addition wooden materials You will need self-tapping screws, fasteners, furniture wheels, veil and varnish.
Option 1. Coffee table from finished boxes.

The finished wine boxes are good in that it is much easier for the task, in fact enough to install them correctly, fasten with each other and put on the wheels:
- First of all, it is necessary to make a frame for a table. It will create an additional support and increase the strength of the structure. Also, it is also possible to make wheels to make the table so that the table can be moved around the room. For the manufacture of the frame you will need a bar or a 40x100 mm board. Since the form of the coffee table will be square, the framework should be 4 bars knocked into a square, and 5 bar must be fixed in the middle, as shown in the figure.

- The sizes of the frame must exactly coincide with the external dimensions of the future table. Cut two long boards and two short boards. We put long boards in parallel to each other, insert short boards between them, resting their ends into the transverse boards. Should get a flat figure. Then we lubricate the ends of the short boards, press them to long boards. Then from the inside of the received square fasten the boards with each other with the help of corners and screws or screws. The fifth board is also glued inside the square and fix the self-drawing.

- We put boxes in the design of the future table. We connect them among themselves with self-draws. The side walls of the boxes must be screwed to the bottom of the bottom of the neighboring box. Attachments should be at least two for the side wall - one above and other below.
- We establish boxes on the frame and fix the self-drawers to it.

- We attach furniture wheels of suitable size to the frame.
- We are preparing a mixture for painting table if we want to make it darker. If the bright coffee table is also suitable, then it is enough to open it with varnish. After staining, the surface of the table must be seated, including from the inside.
- We open the coffee table with a lacquer and leave to dry. The number of layers of varnish depends on what effect we want to achieve. The more layers - the more glossy surface and the less visible the structure of the wood.
Instead of varnish, satin polyurethane can be used, then the wood surface will be satin.
Option 2. Coffee table "Boxes" from plywood.

Such a table can be made completely from beginning to end, spending funds only to buy 2-sheets of polished plywood, self-tapping screws, joinery and plow glue. For greater strength and similarity with real wooden boxes, plywood thickness should be 15 - 20 mm. On such a coffee table, the price will be lower than on a table of wooden boards. So, proceed:
- First cut the narrow side walls of the boxes from plywood, they must be deaf. On 4 boxes there should be 8 walls with a height of 400 mm and a 300 mm width. The slice should be even, so it is better to use the electric bike.

- I am styling the edges of the side walls of the boxes, we remove burrs.
- Since the wide side walls of the boxes and their bottom are the planks that are located with the gaps, the next step is the manufacture of sections or slats for the walls of the boxes. We cut the Phaneur to the slat with a width of 100 mm and a length of 600 mm. The gaps between the straps carry a purely decorative function, so if you have chosen other sizes for boxes, then calculate the location of the sections and the optimal distance between them (5 - 10 mm).

- For each long side wall of the box of 300 mm wide, 3 sections are 95 mm wide and 600 mm long. If you do not plan the gaps, you can use a 100 mm wide strip. Total, on 4 drawers it is necessary 24 such sheets.
- For the bottom section of each box with a width of 400 mm, it is necessary for 4 sections with a width of 95 - 100 mm and 600 mm long. For 4 boxes, 12 bottom planks need.
- On all the placters, with a narrow side, drill two holes with a diameter of 4 mm for fixing to the side walls.
- The next step is the assembly of boxes. The ends of the side plywood walls with a joinery glue or pva glue. Then they attach the planks to them, screwing them with self-draws. Self-tapping caps cut in wood so that they can be hidden by decoration.

- Each box must have such dimensions: height 300 mm, width 400 mm, length 600 mm. By installing these boxes in the figure, as in the photo, we will get an extravagant table. Connect boxes with each other by self-drawing, tightening the side narrow walls with the walls of the adjacent box.
- In order for the design to be even more durable, we produce a square frame from a wooden bar or a board under it, as described in the previous version.

- Free space in the middle, between the boxes, you can leave as it is, but can be done less deep. To do this, the piece is cut out of plywood, repeating the dimensions of the hole, then the piece is inserted into the free space and is fixed in about half the height of the drawer. Now on top it will be possible to fall asleep some decorative material or put the vase.
- Melt all the hats from the screws with furniture mastic or putty. Then grind the surface of the boxes.
- We open the pelk (alkyd or polyurethane) in several layers.

Coffee table ready. Please note that the planks can use a more subtle plywood, for example, a thickness of 6 - 10 mm. The product will not be too durable, but but more reminiscent of boxes.
Wooden carved coffee table do it yourself
This instruction will be useful for those who have in the arsenal lathe, milling, grinding, clamps and another tool. Materials will need wooden bar. 50x50 mm and wooden boards with a thickness of 25 mm, and a width from 45 mm to 10 to 15 cm, Titebond-2 carpentry glue.
Production of legs for table
Since we decided to make a coffee table round, we will need only one leg. For its manufacture, we take the timing of 50x50 mm and glue it along with each other. To do this, the Titebond-2 joinery glue and clamps or weaves are needed. Please note that the leg is not worth using one bar of the required thickness, the product will be more durable if you glue two beams of less thickness into one.
- The leg for the coffee table will have a carved form resembling balusters for stairs. Give the glued billet the necessary profile on the lathe.

- Grind the surface of the feet for the table.
- Cut the eyes in the legs to fix the supports - side legs. It is best to make the legs in the square part of the leg, one on each face. The depth of the face is about 1 cm.

- The lateral legs are cut out only from the whole board of the required width and thickness, gluing is not allowed, there should also be no bitch and cracks. Cut 4 blanks and carefully grind. The edges by the semicircular cutter.

- The side legs must be tightly in the eyes of the main vertical leg. If the form is chosen correctly, you will not need to cut the spikes on the side legs, the whole side leg will be spike.
- In the upper part of the riser - the vertical leg, choose the cut-through holes for the cross.

- We make a crossover from the boards of 45 mm width, a thickness of 19 mm, the length depends on the size of the table top. The ends of the crossbars must rest in the future of the prestole.

- Insert the cross in the hole at the top of the vertical leg.
The leg is almost ready, so we turn to the podstol.
Production of underpants and fixing it to the leg

For a round coffee table perfectly suited a substole hexagon. For its manufacture, we will use wooden boards with a thickness of 20 mm and a width of 45 mm.
- Cut the workpiece so that they formed a durable hexagon.
- Carefully grind the surface and glue the workpiece among themselves.
- For the manufacture of decorative edging, underground, under the contour of the substregnation we glue the wooden planks with rolled edges.
- Fix the substole to the cross with the help of 65 mm long samples.
Making round table tops

The next stage is a round table top. It will take for its manufacture furniture Shield. IN this case The table top glued out of two furniture shields width 300 mm. The most difficult thing is to cut a smooth circle. To do this, it is necessary to determine the center of the future countertops, consolidate a nail in it, and on a nail to put something like a circulation. For example, a piece of plywood is suitable for the required length. During cutting, the mill rests on the edge of plywood, and the circle is flat.
A round tabletop for a coffee table is thoroughly grinding, and the edge is processed by a mill.
Coffee table assembly and surface treatment

Do not fix the table top directly to the podstol. In the process of temperature deformations, it can crack down the seam. Therefore, so-called crackers are used to secure. First we make crushers, as shown in the photo. Then in the cross cut the cutter of the holes under them.

Install the tabletop on the prestole and the leg with the cross. For convenience, we turn the design and align the location of the elements. Then we insert crushers into the holes in the crossbar and screw the crown to the tabletop with self-drawers.

The coffee table is ready - it remains only to open it with varnish. To do this, the surface of the entire product is once again polished, then the veil is applied, after it is drying, it is cut again, since it is necessary to remove the rose pile. Now you can open varnish. After drying varnish in normal conditions You can use the table.
Coffee tables from wooden euro pallets do it yourself

Coffee tables made of wood are the most diverse configuration and sizes. And recently, the pallets are extremely popular. The costs of materials are minimal, and the end result depends only on the imagination of the one who makes the table. In this case, the whole secret is in the finish. The choice of color, drawing, the decor completely changes the appearance of the table. And there is a hidden advantage in it - it is enough to update the trim of a coffee table from the pallet, and it is already on a new interior design.

So, the first thing the wooden pallet must be carefully polished, removing burrs. Then open lacquer or paint in monophonic color (white, green, blue). Please note that the pallet needs to be painted all: from above, and below, and where it seems to you that no one sees. You can also apply a picture.

After processing to the pallet, it is only necessary to attach furniture wheels of the appropriate size. 4 wheels are attached in the corners of the pallet with screws.

The further decor of the coffee table from the pallet depends on the wishes and fantasy of the owner. Inside the pallet you can decompose books in beautiful catchy covers or albums. If you want to embroider there pebbles or others decorative stones, the pallet needs to be finalized. To do this, before fixing the furniture wheels from the bottom of the pallet, it is necessary to fix the sheet of plywood, exactly under the size of the pallet. It will also have to be painted or opened with varnish so that it does not stand out on a general background.

Now our pallet has a bottom, therefore, the decorative materials can be floated inside, which will be visible through the slots in the top cover - the pallet table top.

For those who love coffee tables from glass, design can be modified by putting on top wooden pallet Glass countertop and attaching it on velcro / suction cups or with special nails. On such a table, it is no longer scary to put a cup of coffee without a tray, a vase with flowers and it is easier to care for him. Even if something becomes accidentally, the glass is easily clean and wipes.

The next simple option of the coffee table, combining wooden and glass elements, is a log table. It is unlikely to get a log in a regular store, so you have to go to the sawmill and choose a suitable chubban. Please note that the wood is not amazed by bugs or mold. It is desirable there, on the sawmill, trim the log until the necessary height, as it is difficult to do it at home.

After buying a chumbana, its surface is grinning, and then it is all covered with varnish, a mourn or oil. Sometimes the chumbs are painted in a dark bronze color or another shade suitable for interior design.
After drying a varnish or paint to a chumbana, a round glass countertop is mounted using special suckers or nails. The resulting coffee table will resemble a mushroom with a transparent cap.
Coffee table with their own hands
As you probably have already noticed, glass elements in the coffee tables are mostly countertops. The legs can be made of any suitable material - Tree, metal, plastic. For example, you can buy ready-made metal legs in the store. furniture fittings, order a worktop of the required size and collect home glass coffee table.


Fastening legs and glass countertops is usually made using special suckers or nails. And even the model of the wooden table on one curly leg, the instruction for the manufacture of which is described above, may well have not a wooden, and a glass countertop.
In order for the product to look beautiful, it will be necessary to polish the crossbar and the substole, and also consolidate the tabletop not with the help of superstars, but with the help of bolts on glass or metal corners. Also possible is an option to fix the glass countertop on transparent glue, the surplus of which must be carefully removed.
Note that the glass table is heavier wooden, so it should be based on a durable podstol and leg. Also, the structure of the coffee table may be such that the glass will be firmly kept on it without additional fastening. For example, if a niche is provided under the glass, in which it stacked.
Coffee table do it yourself - it is easy to do on your own, using well-made materials or buying fittings in a furniture store. The work is non-sharp and takes no more than 2 days. It is possible to make a wooden coffee table with carved legs with a special turning carpenter equipment.
It is enough to connect 4 ordinary wooden drawers to make it. They can be painted, just cover with varnish or impregnation for wood to emphasize the natural color and texture. By the way, the table will also come with shelves for storage, and if you attach wheels to it, it can be moved around the apartment.
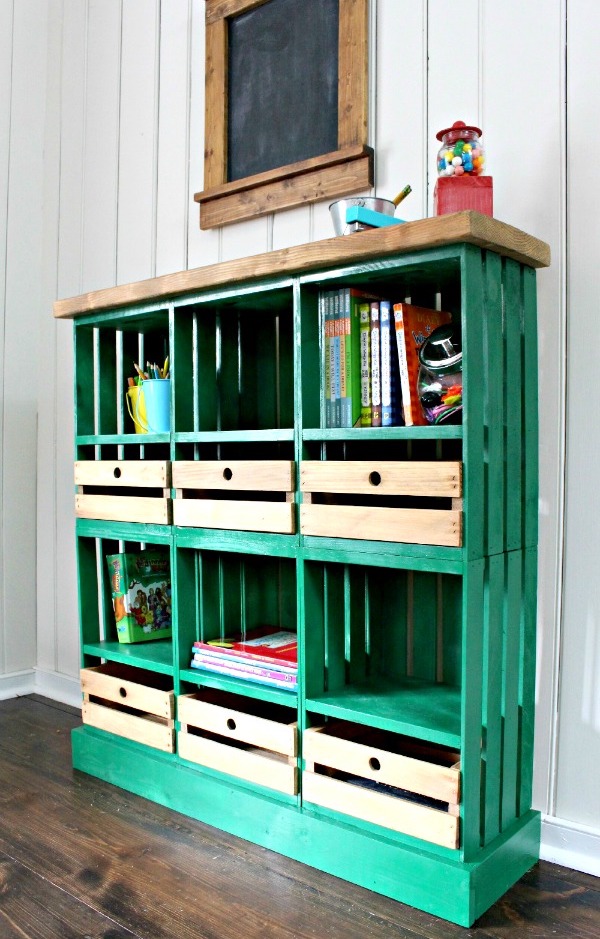
2 shelving with storage boxes
Such a rack can be delivered in any room: living room, hallway, nursery. He will fit perfectly in, especially in Scandinavian and Loft. To repeat this experience, you need drawers of different sizes and countertops for the base and top of the rack. You can paint in any color, but inside it is not necessary to put the same wooden boxes, you can use any boxes or baskets.
3
Such a shelf can be used simultaneously both as a bench. It is enough to connect 3 drawers, put them on the legs and attach the worktop. And choose the color to your taste and desire.

4 shelf for books and storage
Another example of a pretty shelving for, only this time the owners decided to fold the boxes like a puzzle: one horizontally, the other vertically. The rack can be painted with colored paint or to cover with varnish.

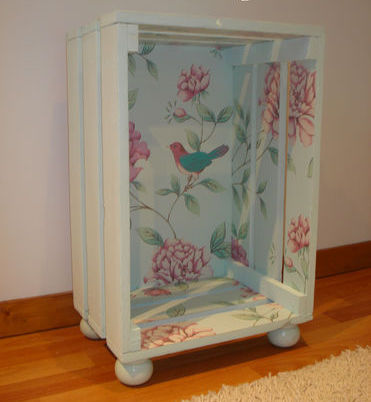
5 Bedside table
From one wooden box, it turned out such a cute small bedside table with a storage place. You need to paint the box, and inside. In principle, the design of such a bedside table can be any: depending on whether you can paint the box and use prints.
6 PUF
Puof from a wooden box? Easily! It is enough to strengthen the angles with metal plates and reinforce the top of the box before making a soft seat, it will increase its strength and it will be possible to sit without fear to be on the floor or break the design.

7 shelves for storage in the hallway
This idea is made easier than simple - take some ordinary drawers, paint them and attach them to the wall in an arbitrary order. Ready! On such shelves, you can and the necessary accessories in the hallway.

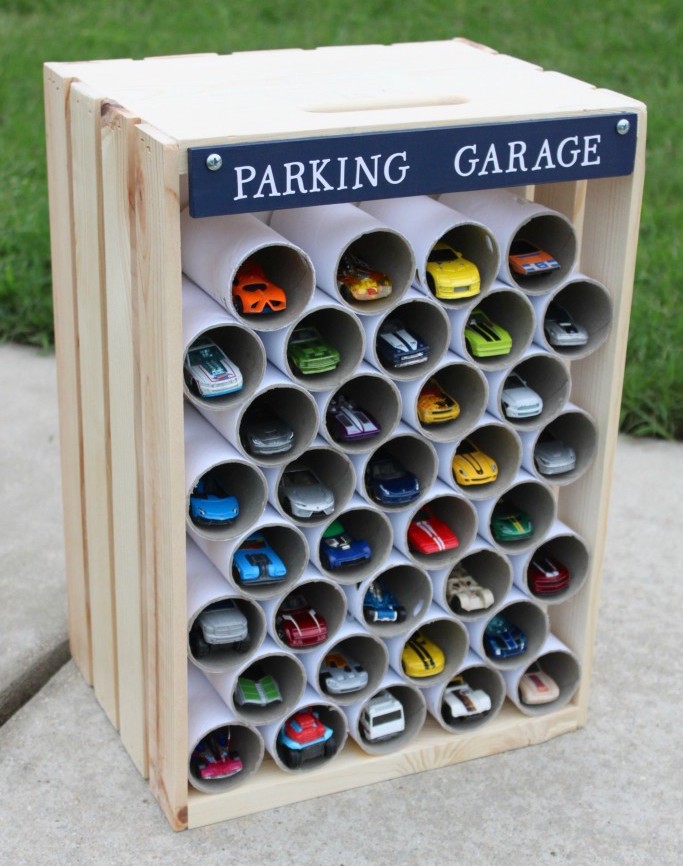
8 Children's "Garage" for toy machines
Inventive parents can make this garage for children's toy machines. To do this, you will need one wooden box and cardboard bushings - you can from paper towels. Divide them into several parts and fold on the principle of the chess field inside the box. You can be made with glue. Baby will probably like it.
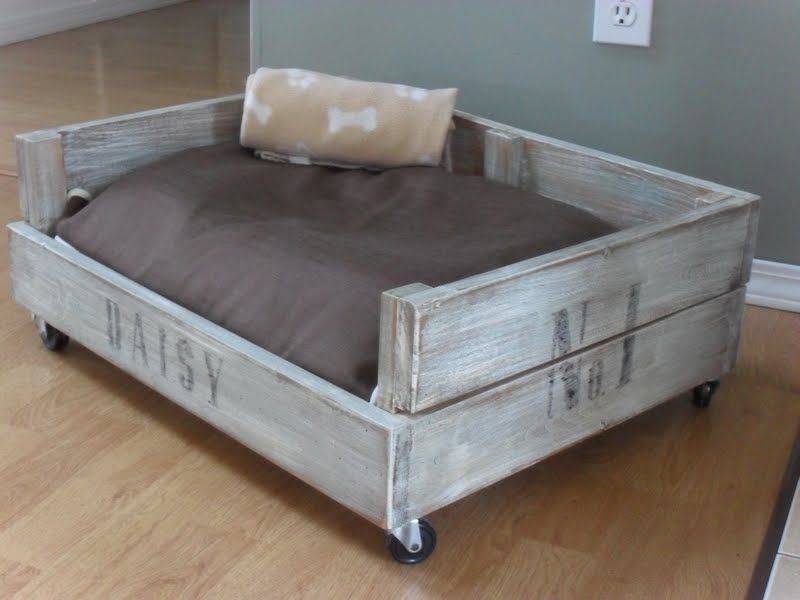
9 Pouch for Pet
One box, 4 wheels and a soft blanket - everything you need for your pet's personal couch. Suitable for cat or little dog.
10
In this idea, there is also nothing complicated. The main thing is to come up with a drawer and for convenience to attach wheels to it.
11
A mini-shelf for important trifles and keys will come in handy in the hallway. And it can be made of a wooden box. Attach the hooks inside the nails to which the keys can be suspended, and experiment with the design: Paint, cover with varnish or sign the box.

12 Table for the Player
Look at this wonderful table. Of course, it is completely optional to use it for a player and plates, but in such a design it looks very stylish. But everything is much easier than it seems: the usual drawer painted and attached to the metal legs.
13 Wine cabinet
From a wooden box and beams, which sawed, painted and attached to the box of mechanics, a very stylish wine cabinet turned out. He will actually decorate any kitchen in modern styleas well as in the aesthetics of country or provence. Take a note.
IN last years The so-called "lifehaki" entered the fashion. From the remedies by non-good manipulations, something useful for the house is built. Wooden drawers, of which it is easy to collect original, multifunctional furniture is easy to assemble. Basically use containers from under products: canned food, fruits and vegetables. In bachelor's apartments will be nice to look at military boxes in which weapons and cartridges were also kept. Stylish, "Male" Decor is not specifically stained to preserve the label and natural shabby look. Of course, such a non-standard decoration is combined in the design of interiors far from all styles. Strict classic, uncompromising modern, concise Haytech is difficult to combine with wooden packaging. Boxes will look cute and appropriate in homes where Provence, Country, Ethnics, Fusion, Scandinavian, Russian, Rustic Style is implemented. If you try to decorate, then such a decoration can be organically enter into the designer composition of the loft and minimalism. Let's talk about ways to use wooden boxes in the interior and how to make it elements of furniture with your own hands.
Wall shelves
Most often, rush boxes are used, but there are also plywood "models". Both options will be used to decorate the room. Wall storage system is needed in every home. With the help of mounted shelves, you can save space in a close bathroom, living room, in the kitchen, and even in the storage room or on the loggia. Of fruit or vegetable wooden boxes, an excellent organizer will be obtained, which will help to contain things and household items in a strict order. After prepressing Taras, modules fasten in between by screwing the screws into their side walls. If "single" shelves are needed with intervals between them, then the scale of work is reduced. They are painted in the desired color, decorated and attached the bottom cover to the wall vertically or horizontally. Safety will serve the shelves. In another embodiment, the boxes have "naturally", that is, one of the sides leans to the surface. Such shelves will turn apart, but are used more often in the storage rooms, as the content will not be displayed. Original decision will be the manufacture wooden carcasswhere the reorganized boxes will be placed as retractable tanks. By the way, you can organize in the same way hinged shelves From baskets. So that the storage system looks more beautiful, it is decorated with wrought support from below. The metal is perfectly combined with a tree. Unusual designer decision It will be the design of the wall in the hallway with various-caliber boxes. The center of the composition will be a mirror in a wooden frame. There are drawers around it different sizes: Some are used as a key, on others there are hats and gloves, and on the third - houseplants And small decor. Complete decoration of rack with hooks for bags.
Wooden boxes can be reappeted under the original shelves for storing wine bottles. Inside, they are separated into sections with a crossbar, and then coated with varnish, decorated with twine, pieces of burlap, fasten on the wall and put the substrate from the hay. Thematic shelf for wine storage is ready. In another embodiment, the drawer make an open end. It is put vertically upper cover Strengthen using decorative countertops from boards. Inside, the shelves crossbar are installed for horizontal bottles, as in the wine cellars.
Stellagi
From wooden boxes, excellent racks will turn out. They can be a strict rectangular shape or have asymmetric edges, which will give a special flavor of the room atmosphere. Ideally, a similar storage system for a home workshop, a working office or a living room. The boxes are fixed with the help of self-tapping screws or screws, painted and attach to the wall. You can store on such racks all that your heart: books, things, decorations, food, towels and pillows, household chemicals, small decor. It looks original design, on the shelves of which are located "necessary" things alternating with flower pots. Rectangular racks can be collected from the same drawers, which are strict or vertically and horizontally, but in such a way that the storage system of the correct form is formed.
Boxes fixed on special legs with gaps between modules will become an excellent addition to the kitchen in rustic style. They store vegetables (potatoes, onions, carrots), cans with pickles or canned food. It is important that each drawer is fixed in a natural position, that is, the bottom down. Thus, the strength of the locker will increase, because the container was originally designed for heavy loads.
The footwear stand
The shoeband is going to the same principle as the rack from the boxes. The only thing worth considering is: different height of sneakers, shoes, ankle boots and winter boots. For the first two, the shelves from the boxes located horizontally fit, and under high shoes they are placed vertically. If you arrange a homemade tube from the old packaging, which is unevenly painted, then such an element will complement the in-style Provence.
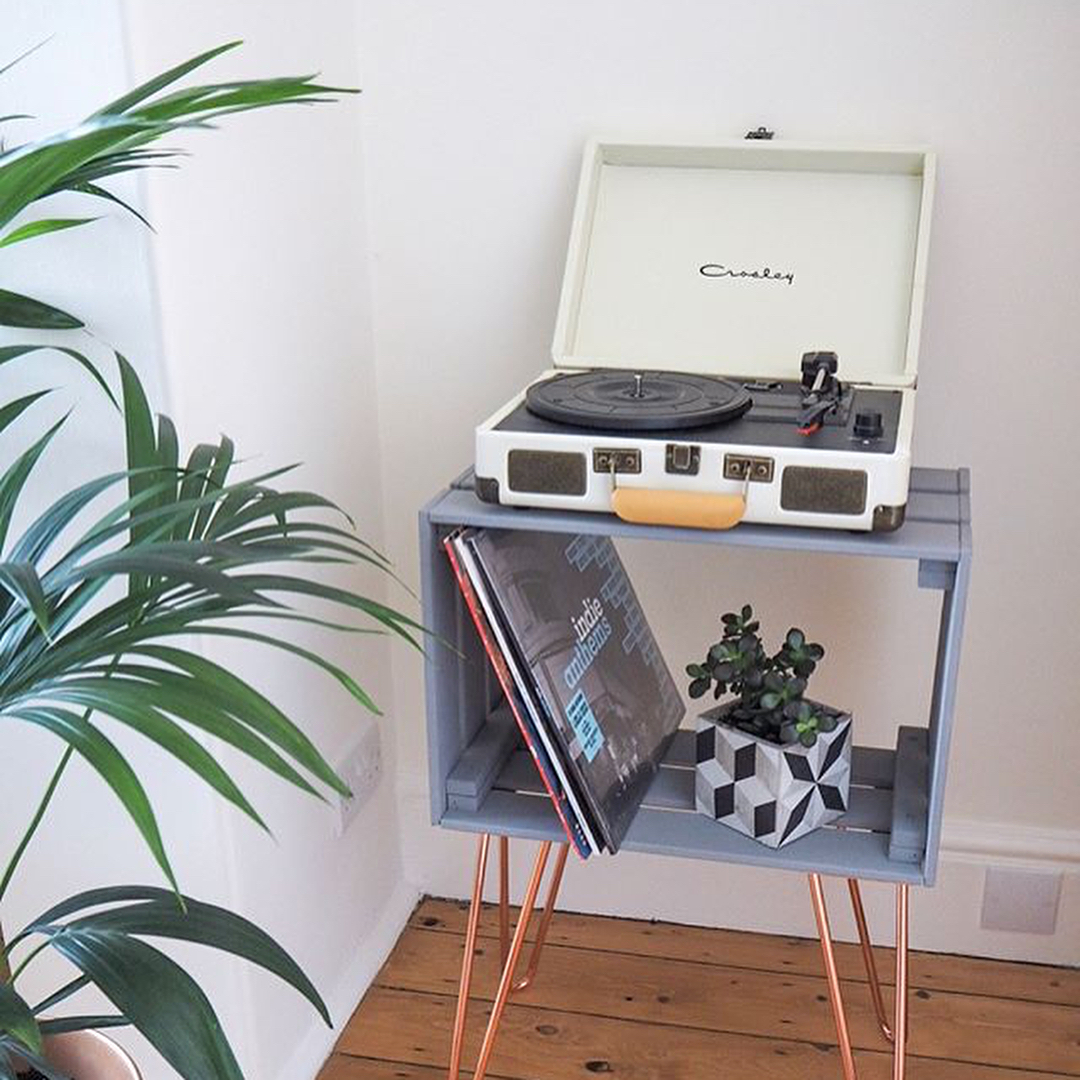
Bedside tables and tables
From the boxes you can make the couch, coffee tables and boxes for storing small things instead of plastic or wicker baskets. In the latter case, choose a container with high sidelights. It is simply grinding, covered with varnish or stained and equipped with pair handles on the sides for convenience when moving. Bedside tables are collected from two boxes interconnected. They store photos, clocks, phone numbers, magazines and books, and the top cover is used as shelves under the lamps or room plants. For creating coffee table You will need:
- Four drawers;
- Plywood sheet;
- Self-tapping screw;
- Wheels (optional).
From plywood cut pallet square shape. The width of its faces must correspond to the sum of the length of one box and the height of the other. If you wish, you can add minor indents on a pair of centimeters. To the pallet, first attach wheels, and then drawers on the helix, that is, the sidewall of the subsequent rests on the rear wall of the previous one. Empty middle decorate flower composition, a group of a candle or lamp. Such a coffee table can be decorated with a living room or rear courtyard in the summer. It is complemented by sun beds collected from pallets or puffs of old tires, rearranged by rope.
From miniature boxes, you can make decorative caskets for jewelry or boxes for flowers on a festive table.
Puff for a hallway
To make an empty for a hallway or living room, you will need:
- Box;
- A sheet of durable tree for the top cover;
- Foam;
- Material for upholstery;
- Construction stapler;
- Wheels.
The drawer is sliced \u200b\u200band covered with varnish. It is attached to its bottom wheels, and the cover is fixed at the top. If you need to use the emblem also as a storage system, it is planted on the loop so that in the future the seat has opened. Then the foam rubber is fixed on the lid and they are inhabited by his matter with a stapler.
Entertainment complex for cats and cats
From drawers and metal pipes create an entertainment complex for cats. As you know, the tail in the apartments becomes boring. In order for the animal to do not spoil furniture and wallpaper, it can be taken by its own miniature cottage, where the cats will be kicked, play and slow down claws. Some boxes are closed with plywood lids with inlets of round holes, and others leave only the bottoms that are covered with soft foam rubber and are inhabited by matter, and on the third, they fix the scratch. Modules are connected to each other in any order. Additionally, the "house" is equipped with a ladder system so that the animal is more convenient to move around the "floors". Instead of the acquired sun bed for a cat or dog from a drawer, cribs create. The box is carefully sliced. It is better not to cover the lacquer, as his smell may not like a homely pet. Then from one of the sidewall, which will be facial, cut off a pair of upper rails. Inside the box is filled with foam rubber or other soft material and covered on top of a blanket. Additionally sleeping place It is made in miniature pads, cross-handed. Of course, the size of the box and the future bed is selected under the dimensions of a pet. To make a feeder, you will need a bowl of stainless steel, wooden packaging and plywood. From the latter, the top cover is cut out. In the center make a round hole under the bowl. Then the paneur is fixed on the drawer. It remains only to insert a bowl. It is necessary to choose it with protruding sideboards, which the container will hold onto the lid. A bowl is easy to remove to wash or replace to another. A double feeder is made from the large drawer for the same technology with paired capacities under food and under water.
Use boxes in the garden
From the boxes are excellent flower beds. They can be simply put on the substrate by creating original composition in front of the house, or connect to vertical Klumba with several floors. Boxes in chaotic mess pose on each other, in parallel connecting self-pressing to obtain a sustainable design. In more complex versions, four rails are used, pairwise attached at an angle to each other. Instead of steps on this "lap" there are drawers with flowers or spicy herbs. If there is a free wall of the economic building or a wooden fence, the modules are fixed on it, on the shelves' manner, which put pots with plants. Original option There will be a composition of five boxes, four of which form the parties of the rectangle, and the fifth will become the center in contact with the remaining modules. If there is a container of different sizes, a multi-tier flower leaf is made of it. The large box is located downstairs, and above the modules are smaller in such a way that the tiny becomes the top of the pyramid. Beautiful in this composition will look at the alternation of "square-rhombus". Also, garden flower beds are made from the boxes, where the modules are equipped with decorative wheels and are transformed into trailers, and the front will become "head of the train".
- Tables from jackets
- Wooden table on a carved leg
- Final Stages Finishing
Finished factory furniture is not always distinguished by a variety, and the cost of unusual and high-quality models is sometimes great. Why not try to make furniture with your own hands? If there is no confidence in own powerYou can start with a simple coffee table. Make a table with your own hands is not so difficult, you can use not only the usual tree, but also wooden boxes. The design can then be treated with varnish or verses. It turns out an unusual and durable model.
In order to make a beautiful table, it is not necessary to buy expensive materials at all, you can make it from ordinary boxes.
Tables from jackets
How to make a table of wooden boxes left after vegetables or wine? For the manufacture you will need 4 drawers, furniture wheels, fasteners metal corners, Self-tapping screws for wood work, a selected color, transparent varnish and brushes.
Finished boxes greatly facilitate work, as there is no need to collect separate parts of the table from the boards.
In fact, the work consists only in coping the individual elements among themselves, and then install the wheels.

If the interior is bright in the room, then such a table can be painted acrylic paint Red, yellow or other color.
- first, the framework is performed for the future coffee table, and wheels will be attached to it. For the manufacture of a frame takes a regular board with dimensions of 40 * 100 mm. The form of the table will be square, it means that the frame must have the same form. The boards are knocked out with each other, nails and self-tapping screws are used for fasteners. In the middle of the design, you must attach the fifth board, it will perform the role of strengthening;
- now you can start installing the boxes on the frame frame, they will be connected by self-draws. Fasteners are mounted below and at the top, it is necessary not only to mount drawers to the frame, but also among themselves so that it turned out to be a steady and reliable design. First, it is recommended to connect boxes to each other, after that it is already installed on the frame;
- at the next stage, the installation of furniture wheels is performed. It is impossible to take too little, as they may not withstand weights, it is best to fit the medium-sized rubber or special plastic, which does not leave scratches on the floor;
- the finishing stage of finishing is reduced to surface grinding. It can be done manually, the usual sandpaper is used for stripping. After cleaning the selected color, the entire design is covered, then lacquered. Similar work It will not cause difficulties if the distance between the individual boards is sufficient so that the inner space can be painted after the assembly. If the simulator dried, the design can be coated with several layers of varnish. But what if the space between the boards is too small? Then the inner surface of the boxes should be painted before the installation, at the same time it is recommended to cover the tree with varnish. This will avoid difficulties when everything is already assembled, and it is difficult to get inside.
If the interior is bright or need to make a bright spot into it, then such a table can be safely painted with acrylic paint red, salad, yellow or other color. On the surface you can even depict any drawing, geometric patterns. After drying, the paint on the front surface can be secured by a glass countertop that can be solid or consisting of 4 parts.
Back to the category
Wooden table on a carved leg

Drawing of the coffee table.
If there is a lathe and skills to work with it, then you can proceed to the manufacture of a beautiful coffee table, which will stand on a carved leg and have a round tabletop.
For work, except for the lathe, it is also necessary to prepare milling, clamps, grinding machine. Materials use:
- wooden timber 50 * 50 mm;
- boards with a thickness of 25 mm, a width of 45 mm, 10-15 mm;
- special carpentry glue.
First you need to start making legs for the future table. In this case, the round countertop will not be big, so one support will be enough. For the manufacture of legs, a bar is used, 2 of its parts glued together. Why exactly 2 bars? Using only one will not give the strength that is necessary for the table top. The future shape of the leg will be similar to the baluster for the stairs. For wood processing, a lathe is used. In the manufacture of legs, it is desirable at the bottom of making thickening, too thin shape should not be.After the workpiece gets the desired form, it is necessary to polish its surface.
Now you need to prepare a central leg for fastening the side supports, there will be 4 pieces. The base is cut with eyelashes, the depth of each - 1 cm. Cut lateral supports It is necessary only from a solid board, it is impossible to glue it, therefore it is necessary to immediately choose the thickness and width of the required value. On the milling mill, the billets give a semicircular shape, then they are grinding them.
At the top of the central leg, it is necessary to cut the cutter with a cut-through cross-cutting holes for cross. It is made of a whiteboard with a 45 mm wide and with a thickness of 19 mm. Length in this case depends on which parameters will have a tabletop. All the ends of the crossbars will rest in the podstol, creating a reliable basis. The crossed is placed in the prepared hole and glued.
Now you can make a prestole for the future carved table. There are boards with a thickness of 20 mm, in 45 mm width. They are cut into equal parts, after which they are collected in the hexagonal form. After grinding, the workpiece must thoroughly glue with joinery glue, leave for drying. For a podstoly, it is recommended to make a decorative edging, it is enough to glue the rounded wooden planks along the contour. Bashed to the cross, the prepared substole should be screwed with a length of 65 mm.
The tabletop will be round, you can use a furniture shield. It is best to take 2 such shields with a thickness of 300 mm, they must be thoroughly glued together, and then put markings in the form of a circle and carefully cut out the future countertop. The item is polished, after which its edges are processed milling machine. For attachment of the table top to the leg it is necessary to use the so-called crackers. They will be screwed to the countertop by self-draws.