The repair and construction site is notable for the accumulation of dirt and dust. Therefore, for high-quality cleaning of the floor and walls, it is better to use professional models. When there is no possibility of buying a construction option, then we try to get it at home from improvised means and an old unnecessary vacuum cleaner.
I think many wondered whether it is possible and how to make a vacuum cleaner with your own hands? Or make a building from a household one?
A homemade construction unit will help to cope with such contamination: wood and metal shavings, debris after repair and dust.
Jpg "alt =" 115 "width =" 282 "height =" 300 ">  A do-it-yourself industrial vacuum cleaner is slightly different in technical specifications.
The principle of operation is that, thanks to the pump, the motor creates rarefied air. Air flow with dirt is sucked in. With the help of a filter, the air is purified.
The principle of operation of a construction unit with a cyclone consists of 3 important components. When choosing, pay attention to the power of the work and the motor.
- Engine;
- Pump;
- Filter.
A homemade construction option is distinguished by a multi-level air purification system.
How to make a construction vacuum cleaner yourself?
A powerful vacuum cleaner can be done independently with the help of parts lying in any garage or warehouse. This will require an old one, and with the help of new parts it will start a new life.
Jpg "alt =" 54475 "width =" 300 "height =" 259 ">
What tools and parts are needed?
In order to assemble the manual mini version, you will need an engine. We take the engine from the old or the engine from the washing equipment. A washing machine motor is perfect.
For self-made equipment with a type, you will need the following tools:
- old home vacuum cleaner;
- oil filter;
- bucket;
- a pair of corners at 45 and 90 degrees;
- plastic hose, 1 meter long.
For the assembly of an industrial structure with a water filter, spare parts are used:
old vacuum cleaner; plastic container; plastic pipes; sealant; aluminum tape.
Converting household appliances into construction
The best and easiest way to make a building vacuum cleaner from a conventional household vacuum cleaner with a cyclone chamber. If necessary, we complete the structure with a container with water or a special corrugation to reduce the volume of noise during operation.
For assembly construction vacuum cleaner choose powerful motors that handle all kinds of dirt. Because homemade handles 95% of dust and dirt.
We make an industrial vacuum cleaner from a household one with a cyclone filter. Consider a structure assembled on the basis of a household one.
- Install the filter bracket on the plastic cap for the container. It is installed tightly so that dirty air does not escape from the structure.
- We fix the outlet hose, air will pass through it.
- Leave the air filter unchanged. Around the filter, we install a bump stop from light debris, which protects the filter.
- The inlet pipe is attached tangentially to the barrel wall. For structural strength, we reinforce the walls of the container with steel material.
- For ease of transportation, we make a stand on castors from plywood. A household and manufactured filter is attached to it.
For a sturdier container, you can use a piece of wood or plywood. To get durable and wooden frame, you need to use a router bit and cut it out.
It is important that all attachment points are sealed, but on the other hand, easy dismantling is encouraged to remove construction dirt. To make the filter work longer with the touch of industrial debris, the filter can be supplemented with accessories. Be sure to observe the cleanliness of the filter and container, for a high-quality and effective cleaning premises.
A similar guide can be found in the following video:
We collect from available means
How to craft with minimal cost handheld vacuum cleaner? This will require:
- small motor;
- plastic bottle;
- switch with wire;
- batteries;
- flexible hose.
First, decide on the features you need. If you need a manual one, then an electric motor and a battery will do. For a more powerful option, use durable parts and materials.
So how do you get a vacuum cleaner out of a plastic bottle?
There are many different instructional videos on the Internet. Consider step by step guide on assembly:
- Cut off the neck from the plastic bottle, where it begins to expand. The cut piece must be tightly connected to the container.
- Then we cut off the excess from the cut. The remaining part will house the dust collector itself and the electric motor.
- We make the fan from scrap materials, a tin can or a bottom. The dimensions of the fan must be compatible with the inner diameter of the bottle. On the cut out circle for the fan, mark 8 equal shares and cut them. The resulting blades are bent at an angle. In the center of the circle, make a small hole for the motor, and attach it tightly.
- We attach an electric motor with a fan to the bottom of the bottle.
- Connect the wire with the switch and the selected power source to the motor.
- The next step is to make a filter. The filter is made of a fine mesh stretched over a wire in the shape of a circle. It must be firmly inserted into the structure, otherwise you will have to additionally fix it.
- Hose connection. Insert the hose into the cut neck and fix it with tape or adhesive plaster.
- The attachments can be taken from the small replaceable attachments of a conventional vacuum cleaner.
The effectiveness of homemade versus store counterparts
Self-made ones cannot be compared to professional ones. They differ in criteria:
- engine power;
- suction power;
- the volume of the container for collecting garbage;
- noise level;
- air purification;
- availability of additional functions;
- strength and stability of the case.
Compared to the construction option, of course, the homemade one differs in the power of work. But homemade vacuum cleaner cope with small chips without any problems and construction dust... Homemade is less weight and size, which will allow you to remove dust from the floor and walls. But the function by which the air is purified is not subject to it.
A DIY construction vacuum cleaner does a good job of collecting concrete, cement dust and sand.
Distinctive features: noise level and power consumption, does not overheat.
A homemade device creates less noise than purchased equipment and uses less energy. The unit can work for a long time and not overheat.
For efficient operation, the fans should not be connected closely, but at a short distance. Otherwise, the fans will interfere with each other during operation. In the spacer, make the movable blades at an angle to allow the air flow to pass.
For large-scale cleaning of dust or dirt, it will be difficult to cope with debris with a regular broom. Of course, it is best to use a vacuum cleaner in use. So our task will be to study detailed analysis the process of making a vacuum cleaner with your own hands. It is important to understand that this homemade unit will differ somewhat from the one purchased in terms of technical characteristics and multilevel system. The main elements include: a filter (with the help of which the air is purified), an engine and a pump.
Materials (edit)
The assembly will be carried out on the basis of an old household vacuum cleaner, so the following elements will be required from it:
- Various attachments;
- Motor part;
- Power regulator;
- Suction hose;
- Electric power wire.
In addition to the above components, you will need:
- glue;
- polyethylene barrel capacity. from fifty to eighty liters (cover required);
- bandages;
- scissors, with which it is possible to cut metal, or a well-sharpened knife;
- drill;
- Scotch;
- jigsaw;
- sealant;
- bolts;
- clamp;
- plywood;
- air filter;
- screwdriver;
- self-tapping screws;
- hairpin with washers / nuts;
- a branch pipe two hundred millimeters long and forty millimeters in diameter;
- insulating tape.
Assembling the vacuum cleaner
Now we will analyze the assembly of the device step by step.
 First you need to retreat one hundred millimeters from the upper edge. Mark and drill a hole to fit the nipple. With sharp scissors or a knife, do the following - edit the hole, it is necessary to tightly place the inner end to the wall at a certain angle (directed downward).
Give fixation to the element with glue, after degreasing the work surface. The same shenanigans should be done from the outside of the unit. Use a jigsaw to cut two small circles out of plywood so that the diameter is slightly smaller than the top surface of the barrel.
For blanks for bolts, make two holes and fix the subtleties on both sides of the cover. The remaining holes also need to be drilled. Remove discs and remove any burrs. Apply sealant over the entire surface without touching the center of the workpieces. Outright determine the fasteners. Make a round hole in the center of the plywood for the hairpin, and a larger hole next to it.
From air filter destroy the mesh from metal material so that it does not get clogged with sawdust and does not interfere with the performance of the device itself. Install the already improved filter element on the stud.
IMPORTANT! The stud must point upwards with the nut!
Since the motor part is usually round, it is necessary to create the necessary plastic parts (they are taken from the past unnecessary vacuum cleaner). They are usually included in the engine. To secure them, you should take a clamp.
 Next, put the power regulator in the box. Place the previously mentioned element and switch near the engine. Connect all components to each other. Connect the cable to the plug. It is worth making sure that the assembled structure is correct. Take the hose. If it is short, then it must be increased with some kind of product, for example, a corrugation.
Adjust the brush head to the hose. The next step is to attach the tube to the dust collector. There are two outcomes of events - either it fits the hole perfectly, or it doesn't. In the last of these cases, it is necessary to make a so-called adapter. To do this, take a small pipe.
REFERENCE. A drain tube will do as well. It must be soldered to the bag retainer.
ATTENTION! The first time you have to check the filling of the dust collector, since the device is not designed for a sensor. And do not bring to maximum level saturation of the dust in the bag.

With your own hands, you can make a vacuum cleaner not only from the above materials, but also from a plastic bottle.

Since every person, one might say, most people have a computer, making such a vacuum cleaner will not be difficult. In addition, this method is quite simple and will not cause various difficulties.
It is necessary to cut the bottle into two equal parts. Cut the filter out of the foam rubber and insert it tightly into the neck. Next, you need to take the half in which there is a lid. Insert the hose into it. Then screw the cork onto the bottle. Take the fan out of the PC and flatten the corners.
Insert inward so that the air flow is directed towards the back of the bottle. Wrap the location of the cooler with insulated tape. The last step is to connect to the power supply fan. It is necessary to bring the red wire to the plus side, and the black wire with the minus sign.
Such a small vacuum cleaner is wonderful to serve you enough time. In addition, it is easy to hold in your hand and work on removing the smallest specks of dust even from small parts. In addition, a homemade vacuum cleaner from a bottle can serve as a child's toy and teach your child the tricks of cleanliness in a playful way.
To do this, we have enough of the most common rubbish that can be found in any apartment: broken equipment, electronics, wires, cut pipes, hoses and other "garbage" that you regretted throwing away. All this will be useful to us to make a vacuum cleaner from a bottle with our own hands. Let's consider step by step how to do it.
First of all, you need to get somewhere a small working electric motor. Without it, everything else will remain useless junk.
Equipment often breaks down due to the breakdown of one part, and everything else remains intact. Therefore, you can, for example, borrow a motor and other parts we need from your old cassette recorder, turntable, music center or children's toy.
To make a vacuum cleaner with your own hands, you need to prepare the following parts:
- A plastic bottle of the right size.
- Electric motor.
- Switch with wires.
- Power supply or batteries.
- Power supply connector.
- Flexible hose or tube.
Tools and consumables:
- Stationery knife.
- Soldering iron.
- Solder.
- Hot melt glue.
- Scissors.
- Tin can or bottle.
- Marker.
- Ruler.
- Push pins.
- Nylon tie or thick wire.
- Fine nylon mesh.
- Scotch tape, duct tape, or tape.
Preparation
At the very beginning, you should clearly define the goals that your homemade vacuum cleaner will have to fulfill. Some features of its design will depend on this. If we need it, then a battery-powered motor from a children's toy will do just fine. If we are going to make something more serious (for example), then the parts and materials used should be, respectively, larger and stronger.
Most carefully, you need to approach the choice of a motor and a power source for it. Their electrical characteristics must completely match, otherwise problems may arise: one of the two will either burn out or simply will not work.
Step-by-step instruction
So how to make a vacuum cleaner from a bottle? To do this, you need to clearly understand what and looks like. We take plastic bottle irregular shape and cut off the neck from it in the place where it expands. We should have something like a lid that can be firmly inserted back.
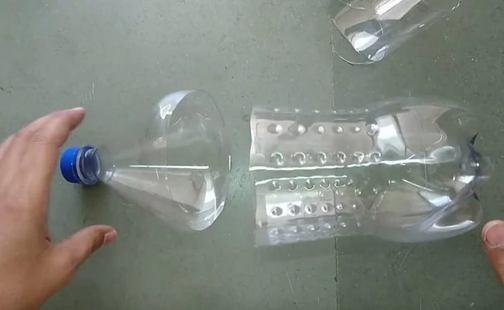
Then we measure the excess part from the neck cut and cut it off in such a way that the remaining volume is enough for the dust collector and the placement of the motor.
Any piece of soft metal of a suitable size will do for us to make a fan. This could be the bottom of a can, a tin lid, or something that you can easily cut with scissors and then bend. Ideally, if we are lucky enough to find a ready-made propeller from some toy.
The diameter of the fan impeller should almost match the inside diameter of the bottle for better suction.
Cut a circle out of the tin and mark it into eight equal parts. Further, along the marking lines, we make cuts with scissors, leaving about 5-10 mm to the center of the circle.
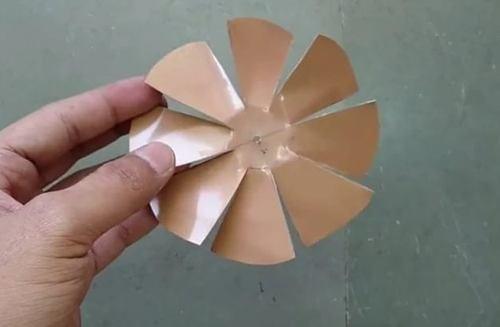
In the center we make a hole for the motor rotor, and the impeller blades are slightly bent at an angle so that they suck in air during rotation, and not vice versa.
We fasten together the fan and the rotor of the electric motor with hot glue or in another way, trying to avoid distortions in the connection.

In the bottom, we make holes for the air flow to exit by simply cutting off the protruding edges of the bottom with a clerical knife.

Then you need to attach an electric motor to the inside of the bottom. For this we need any plastic cover. The main thing is that its size roughly coincides with the size of the motor.

This is necessary in order to reliably glue the electric motor to the bottom of the bottle with hot melt glue.

The homemade vacuum cleaner is almost ready, it remains, which will separate the electric motor from the dust collection compartment. To do this, we use a fine mesh, which we will stretch over a nylon tie or wire bent into a circle.

If the made filter is tightly inserted into our homemade vacuum cleaner without additional fasteners, then you can leave everything as it is. Otherwise, you need to fix it on holders, which can be used as pushpins. The latter must be stuck into the bottle around the circumference at the place where the filter is attached and wrapped around them with adhesive tape.

For the manufacture of the hose, we use a tube with a diameter slightly smaller than the neck of the bottle. Several layers of medical tape can be wrapped around the end of the tube so that the tube fits snugly into the neck and does not slip out of it.

The suction nozzles can be made from anything: ballpoint pen, tubes from a dropper, syringe, plastic bottle - depending on their purpose. You can even use the small replacement attachments from a real vacuum cleaner if they fit.
Now all that remains is to solve the issue with the power supply of the electric motor, namely: connect a switch and a power source to it with wires, which can be batteries, a rechargeable battery or a power adapter.
After that, our homemade vacuum cleaner is ready to use!
Conclusion
As you can see, making a small homemade vacuum cleaner or keyboard cleaner is not difficult at all. Moreover, the device made by us can be easily transferred from place to place not only within the apartment, but also used, for example, in the garage to clean the seats and panels in the car.
There are different situations in life. If you suddenly need to use a mini vacuum cleaner, you can save on the purchase and do it yourself.
1. Draw the label along the top and bottom lines. Cut out the part of the bottle where the label was.

2. Take an old empty can or tin can, remove the top and bottom, then cut in the middle to make a rectangular sheet.

3. Measure and cut a circle of tinplate to the diameter of the bottle.

4. Leaving space in the middle for a small motor, draw out a tin circle and make cuts to make 8 sectors. Each of them must be slightly bent. Make a small hole in the center.

5. Now attach the motor to the resulting improvised fan.

6. Using a drill and a large drill, make 3 rows of holes in the bottom of the bottle.

7. Glue the cap from another bottle to the motor, first passing the wires from the motor into the hole on the side.

8. Place the fan inside the bottle and glue it to the bottom. Glue the seal on the inside of the top of the bottle.


9. Make a wire ring with a diameter so that it fits into the bottle and fits snugly on top of the seal. Glue a thin cloth circle onto the ring.

10. Put the ring in the bottle on the seal and close the structure tightly top bottles.
A low power centrifugal fan will do little good. Even quiet hoods are equipped with noisy commutator motors. If the fact does not scare you, let's start choosing the means. We will show you how to make a centrifugal fan with your own hands from improvised items. If in a typical - axial - fan the motor and the impeller are important, here, among other things, the housing is added. Let's try to assemble a centrifugal fan ourselves.
What is a centrifugal fan
The centrifugal fan is used as a duct fan. To simplify the discussion, let's say that the vacuum cleaner contains something similar to duct fan... Now think:
- The dust is sucked in by the hose.
- Passes into the bag (tank, compartment).
- Filtered.
- The engine passes.
- Dropped from back side housing.
Due to what it turns out: inside there is a centrifugal fan formed by a drum (squirrel cage) mounted on the motor shaft. This is not enough. The impeller motor is enclosed in a sealed housing through the channels of which the air flows out. Without a tight casing, the sense of the centrifugal fan will be lost. This is the main difference. Unlike axial fans, often serving for personal needs of a person, centrifugal fans are used in the economic sphere: ventilation of the room, cleaning, air purification. To understand how to make a centrifugal fan, let's study the principle of operation of the device.
The principle of operation of a centrifugal fan
The centrifugal fan works by the dynamic characteristics of the flow. Try tying a stone to a string and twisting it horizontally around you. The hand feels a tangible tension, if the connection were broken, the projectile would immediately fly out tangentially to the circular trajectory of rotation. Air molecules behave in a similar way: on the blades, the wheels acquire significant speed and, unsupported by anything, are carried away to the outer perimeter. Then the channel system already gives the flow the right direction. Finally, air enters in the center, usually from the side opposite to the engine.
Inside the vacuum cleaner, we observe the picture:
- The air from the bag (tank, container), free of dust, comes to the engine from the front side and enters the center of the drum.
- Molecules accelerated by the blades to a significant speed are thrown out. They pass through the channels of the sealed housing, simultaneously cooling the engine, leave the womb of the vacuum cleaner from the back side.
Design feature: the blades of a centrifugal fan create pressure, if the body is leaking, then the air flow will be disrupted. Therefore, the difficulty for a self-taught master is to create the right conditions.
In good hoods, motors with fans of the tangential (centrifugal) type are used. In a select few, the design surprises with a duet of squirrel cages. In the latter case, a pair of impellers are pushed onto the shaft on both sides of the motor. Then the air enters from two directions perpendicular to the plane of rotation of the wheels. Thus, the efficiency of the centrifugal fan increases.
How to make a centrifugal fan

From what has been said, the obvious way to accomplish our plan is to remove the tangential fan from the hood, for example. Advantage: Quiet operation is ensured. The manufacturer complies with the norms prescribed by the standards, therefore the factory hood class devices are relatively quiet. We believe that for most readers this is not the best solution problems, we will continue consideration.
Vacuum cleaner
A ready-made centrifugal fan lurks inside the vacuum cleaner. A big plus - there is already a ready-made case, which must be mounted in the channel on site. Additional benefits include:

The disadvantage of a vacuum cleaner motor is noise. In addition, the brushed motor generates sparks, which interferes with the mains supply. You will need to make a surge protector so as not to burn imported home equipment. The noise level is high. Exceeds 63 dB allowed by law to produce in an apartment.
Washer
What else to assemble a centrifugal fan? The image of a front-loading washing machine came to mind. If the door is removed, and channels are made in the housing so that the flow cools the motor windings, you will get a centrifugal fan. Plus - the working compartment of the washing machine is sealed. Simply remove the tank wall near the engine to create a kind of centrifugal fan. The drum will have to be drastically reworked to trap air. The case will need to be disassembled.

The main dilemma arises: is it worth dismantling the tank. Most models are specially made so that the operation cannot be performed without damaging the fasteners. This helps service centers keep track of tricksters making repairs. In any case, the drum is cut in place to form the blades in the walls. Bend the steel inward so that the structure does not touch the tank. Option: from the walls of a steel cylinder, and bend the blades of the desired shape in the image and likeness of factory industrial models of centrifugal fans.
The main thing is the correct selection of speed. 1000 spinning revolutions will be enough. The drum diameter is large. The vacuum cleaner gives 6000-16000 rpm, but the radius of the blades is much smaller. Therefore, it is necessary to evaluate the linear speed. As you know, the circumference is directly proportional to the radius, therefore, if the diameter of the drum of a Samsung washing machine is 45 cm, it turns out at least three times more than that of a vacuum cleaner - equivalent to a speed of 3000 rpm (minimum). But! In this case, the area of the wheel is much larger, therefore, the flow is enormous.
From the above, we conclude that the speed of 1000 rpm, especially 1500 rpm, is enough to independently make a centrifugal fan from a washing machine. The performance is approximately the same, but the specific pressure of the flow will decrease. Much depends on the shape of the blades, we strongly recommend to inquire at the forum of physicists and hydraulics. The simplest option borrowing the blade from the floor fan. The plastic is welded using a set of plastic bags and a soldering iron to secure the flywheel to the shaft.
The main thing is to maintain tightness. It is recommended to seal the extra holes that the drum abounds in. A homemade centrifugal fan from a washing machine is dangerous to use (if there are safe tangential fans), it is recommended to close the hatch for loading laundry with a strong grate. For example, make a series of holes on the front side of the housing for the element to be installed. The centrifugal fan device is complemented by a solid fence. Make the lattice from a steel bar and fasten it with bolts.
Adjusting the centrifugal fan motor
In 85% of cases, the engine is washing machine collector. Such, by the way, work from direct current... The direction of rotation is determined by the polarity of the voltage.
About the speed control circuit. The principle of operation of a centrifugal fan requires the use of spin modes. Find the thyristor circuit that adjusts the cutoff angle and adjust as needed. For maximum revolutions, connect the engine to a 220 V network. We consider the open questions, what is a centrifugal fan, and how to make it.