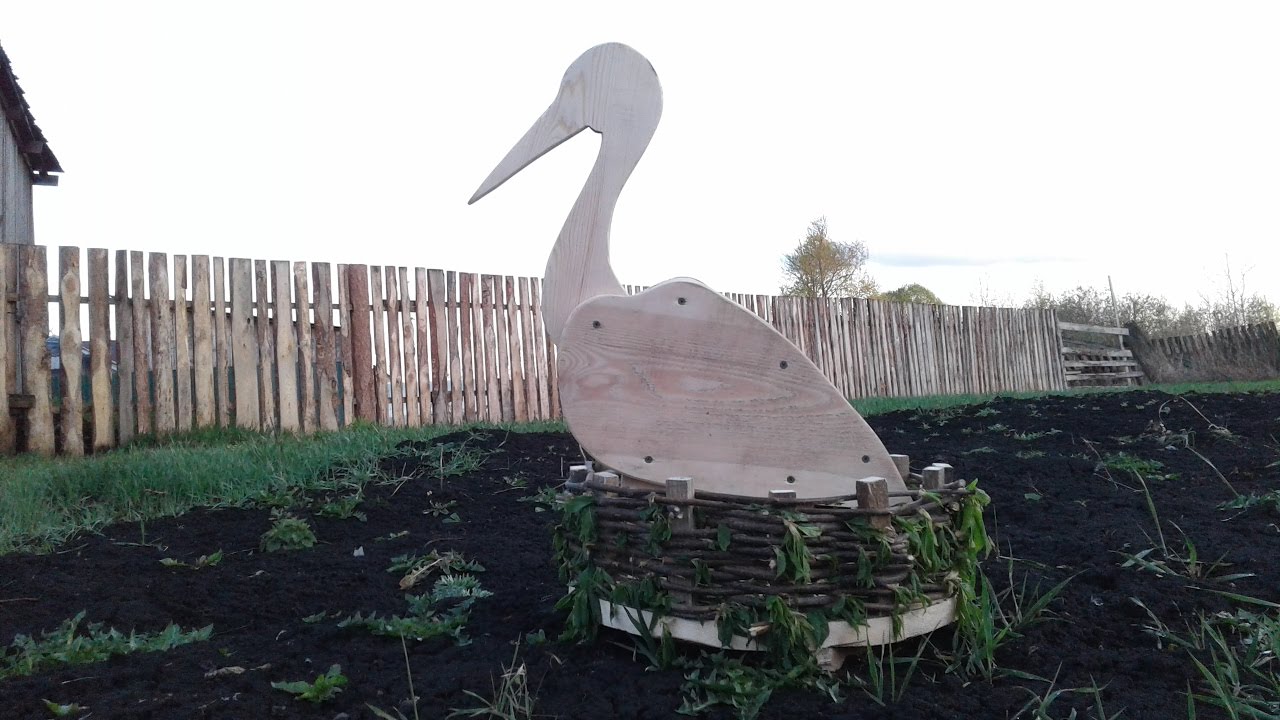
Olga Druzhinina
It will take:
1. An empty five-liter canister.
2. Steel bar for legs (we took an old arc from the gym and flattened it).
3. Steel wire for the frame.
4. Polyurethane foam 3 cylinders.
5. Disposable spoons (fortunately there were a lot of them in the garden after the oxygen cocktail).
6. Two simple 1.5 liter bottles (for the neck).
7.5 liter water container (for wings).
8. About 15 white polka dots from kumis or ayran (wings and tail)
9.2 liter iron cans (we found from under the beer) for the beak.
10. Stationery knife with a replaceable block.
11. Red tape for the legs.
12. Red beak paint and black feather paint.
13. Glue-liquid nails.
14. Copper wire for attaching feathers to the wing and tail.
15. Several self-tapping screws for fastening the wings and tail.
Work description:
They took a steel arc (asked the parent, he welded a small plate to it and screwed a canister onto it). I cut off a corner of the canister and, twist the steel wire in the shape of a neck and head, inserted it into the canister and foamed polyurethane foam... She waited until she grabbed and would hold on.
then cut off a half-piece from the neck and bottom (took only an even part) and, putting it on the neck, began foaming both the torso and the neck. I made the neck in several stages, waited for the previous part to dry out.


Then she froze the whole structure.

After complete drying, I cut off everything unnecessary, giving the structure a shape stork.

I cut off everything from the spoons and began to glue it from the neck.

Separately, I cut a 5-liter bottle in half, formed the wings and attached the pre-prepared blanks with wire and sewed to the wings (long to short)... Then she attached the wings to the structure using long self-tapping screws.

Then she formed a beak from iron cans and attached them using the same screws. Then she painted it with red paint. She wrapped her legs with red tape, more in the area of the knees, eyes - a painted spoon.


A little bit of spray with black paint and stork is ready!

The beautiful and bright figure of the stork will add a touch of grace to the backyard landscape, especially if it is made by hand. It may seem that making a stork is difficult and requires many years of practice in needlework, but the method of making it is simple, and the materials are inexpensive. Such a sculpture will be an excellent addition to the local area and decoration for a flower bed, lawn and garden plot, symbolizing prosperity, well-being and family comfort of its owners.
How to make a stork for a summer residence with your own hands: a master class
A do-it-yourself garden stork is one of the favorite crafts of summer residents and gardeners and there are a lot of variations of its execution on the Internet, but the manufacturing principle is approximately the same in all cases, regardless of the materials used and the richness of the decor. Read how to make beautiful wooden signs for your home.
First of all, the head, neck, torso, frame of the wings and legs are made, which are connected with fastening tools.
All the remaining time is devoted to a rather painstaking procedure for cutting, fringing and decorating feathers - they will make up the plumage of the body, neck and tail of the bird. There are options for homemade products without using plastic bottles but they are less common. Consider in more detail different variants making a stork in this article.
Garden figure materials and tools
The figurine of a stork consists of a head, beak, neck, torso, legs, wings and white plumage with interlayers of black feathers. All parts are fastened together furniture stapler and shrink with universal glue.
The stork's body can be cut out of a piece of wood of the desired size, foam or a 5-liter canister made of plastic.
- plastic bottles of 1.5 and 1 liter from milk;
- plastic bottles of 1.5 and 0.5 liters for kvass or beer;
- canister 5 l;
- scissors;
- glue;
- self-tapping screws;
- a piece of foam;
- corrugated tube;
- steel rods;
- wireframe mesh;
- thin wire;
- sandpaper;
- furniture stapler;
- red acrylic paint.
The plumage of the stork is also made from transparent bottles, but then the plastic under the feathers must first be painted with white and black acrylic paints.
Stages of manufacturing from plastic bottles
Having prepared necessary materials and tools, you can start making component parts crafts. Find out about beautiful wooden fences with your own hands.

It is important that all parts of the stork's body are proportionate to each other.
Head
With a sharp knife, the outline of the head with the beak is cut out of foam, after which the surface is sanded, and the edges of the beak are smoothed with sandpaper. If desired, the head can be painted with white paint - the coating will give the future product a rich White color and will create an additional barrier from sun, wind and rain.
The beak consists of 2 plates that are attached to the head with self-tapping screws. For the beak of a dark plastic bottle, the neck and bottom are cut off, and the rest is cut into rectangular plates. Triangles are cut from the resulting blanks, which will subsequently be the upper and lower parts beak.

The plates are bent in the middle and screwed to the junction of the head and beak.
Paws
The paws are cut out of 2 half-liter bottles with dark walls, having previously cut off the bottom of them. The fingers of the future bird are cut from the very edge to the neck of the bottle - you should get 3 in front and 1 in the back, and bend outward.

Scissors cut each toe into a long, sharp triangle.
Plumage
Processing blanks for feathers to give them a beautiful natural shape with feather veins is the most labor-intensive and time-consuming part of the work.
To cut the feathers, the bottom and neck of the bottle are cut off, and the cylinder of the bottle is cut into 6 equal parts - 6 feathers. They will different sizes: for body feathering - small, for tail - longer. Each feather needs to be airy by creating fringed trim around the edges. He will tell you about metal forged gazebos for summer cottages.
Feathering on the neck can be done in 3 ways:
- cutting out even smaller plates than for the abdomen, decorating them with fringes and curling them with scissors;
- cutting off large plates in the length of the neck and serrating their edges;
- cutting off half of the bottle and making deep sharp cuts in the resulting plates.

Each nib is a rectangular plate made of a plastic bottle with a rounded or embossed edge.
Frame
It is convenient to make the stork's body from a 5-liter canister, from which the handle is previously cut off. Then a mesh mesh is attached to the container, to which future feathers will be attached - it is bent and cut in the shape of a wing.
Then you can start assembling the main part of the product - a tube-neck is inserted into the neck of the canister, and 2 holes are cut in the lower part through which a long piece of a thick rod bent in half is threaded - these are legs.

The nets are fixed with wire or steel staples on the canister.
Assembling and decorating
The stork is collected, starting from the head, - it is connected with a wire to a corrugated tube and is additionally fixed with hot melt glue.
The feathers are fixed with a stapler, starting from the bottom of the canister and further up in layers. The tail is attached to the back of the figurine. The plumage is also layered on the net, starting from the outer edge, and fixed with wire. In this case, black feathers are located on the outer edge. You will get about 6-7 layers of feathers in total. The extreme row, connected to the tube, is screwed in with self-tapping screws.
Prepared plates with sharpened edges made of halves of bottles are wrapped around the neck.
The number of feathers depends on the location of the wings: the option under consideration is designed for folded wings, but when flapping, the wing mesh is covered with feathers on 2 sides and the back of the stork is also made.
After assembling the bird, you can proceed to the creative design of the craft.
Eyes can be bought ready-made in stores that sell parts for knitted and sewn toys, and glue with hot melt glue. Large black beads or balls are chosen for the inset eyes. Eyes can be painted with simple black or colored paints to your taste.
If you used transparent bottles during the work, you need to paint the feathers before cutting them, after wiping the surface of the coating with an alcohol solution.

The beak and legs of the product also need to be painted with red paint. Alternatively, you can wrap them with red tape.
What else can you make a stork from?
Craftsmen manage to create masterpieces from everything that is lying around in the garage, including, and also use the leftovers building materials after renovation. Several such variations of garden storks can be safely taken into account - they will not be more difficult to make than the previous version.
From polyurethane foam
In this way, you can create a garden sculpture by turning and giving the stork a realistic image. The steel frame will serve as the “skeleton” of the product - steel rods are welded to each other, and then other elements of the stork's body are placed on them.
To make a stork you will need:
- 5 liter plastic bottle;
- polyurethane foam;
- steel rods;
- Styrofoam;
- dye;
- soil solution;
- Scotch;
- rasp.
On the frame, you need to put on a body-bottle, and to the neck rod with tape attach the sharpened pieces of polystyrene to each other with tape. Shaped styrofoam hips are secured in the same way.
Even with the use of waterproof plywood, the possibility of the sculpture becoming soaked in the cold season increases, so it is recommended to store it indoors before the onset of heat.
To make a stork you will need:
- plywood;
- plastic bottles with white and dark walls;
- hot glue gun;
- rods;
- jigsaw;
- self-tapping screws;
- scissors;
- screwdriver;
- furniture stapler;
- red acrylic paint.
It is advisable to apply the elements of the body and wings to the paper first, creating a "pattern" of the parts before cutting them out on a sheet of plywood. The wings are screwed to the body with self-tapping screws. The legs are made of steel rods and attached with staples to plywood sheets that act as a body. Plywood sheets are also used for or.
Feathers are created from bottles, and each plate, in turn, is trimmed with scissors around the edges to obtain an airy fringe. The plumage is applied to the entire surface of the stork, starting from the back: first, black feathers are laid out, and then white, from which the bird's tail is also created.
Each workpiece is ground at the edges and the surface is primed.
- a layer of red paint is applied to the plywood beak;
- the eyes can be drawn by yourself.
The foot rods can be sharpened from the bottom edge so that they can easily fix the product in the soil.
Styrofoam
Styrofoam stork is a monolithic construction, lightweight and easy to manufacture.
For work you will need:
- foam sheets;
- steel rods;
- universal glue;
- scissors;
- saw;
- furniture stapler;
- sandpaper;
- acrylic paint in black and red colors.
First of all, legs are made - the lower edges of the 2 steel rods are sharpened, and the upper ones are bent for subsequent fixation in the body of foam.
The main creative work over such a stork consists in creating the correct blanks from foam, because the finished bird will completely consist of it. The body, head and neck are drawn in foam and trimmed with a saw. About plastic barrels for watering to the country will tell.
In the body of the stork, iron rods are fastened with staples, its surface is sheathed with a layer of foam for volume, and wing blanks are glued on top. The neck and head are placed on the rod.

The stork's beak is painted red, and it is better to make insertion eyes, from beads or balls - this way the figure will turn out to be more expressive.
Next, they perform the final modeling of the figure, give it smooth and beautiful features with sandpaper and a knife. This is the case when you don't have to make feathers for the bird - the embossed plumage can be cut right on the body of the product, simply by accentuating the edges of the wings with black paint.
How to make a garden stork nest
The classic composition with storks in the nest traditionally symbolized cozy home with big family among the East Slavic peoples, indicated the fertility and hospitality of the owners. Placing storks in a nest on their own plot, flower bed, roof of a house or a playground for families with children will help not only decorate the territory, but also show guests that the owners are jack of all trades. He will tell you about outdoor country sinks.
Old wheels from a bicycle, cart, trailer or wheelbarrow will fit under the nest frame. You can weave a nest from shrubs and live or dry branches, securing the entire structure with steel wire and installing it on a special platform consisting of X-shaped pads.
Video
How to make a stork from plastic bottles, see this video:
Output
- The most time-consuming work on a garden stork is to create its plumage - each feather must be worked on by hand, giving the edges a jagged or fringed shape so that they look like natural bird feathers.
- Feathers from transparent bottles should be painted white and black to imitate the natural plumage of a stork.
- Before painting the feathers, they must be wiped off dust and wiped with an alcohol solution so that the paint lays down evenly.
- The easiest way to make a stork is to make it completely out of polystyrene and sharpen it with a knife and rasp to the desired shape; The simplest wing without a frame is made from a piece of plywood, which is screwed to the homemade body with self-tapping screws.
- A body with a neck can be made from a plastic 5-liter canister with a cut off handle and a neck, into which a corrugated tube is then inserted.
- You can also make a garden sculpture from the remnants of building materials lying around after repairs, and it will cost almost free. In addition, you will only need to buy acrylic paints in order to paint eyes and and paint feathers.
Do-it-yourself decorative plywood stork will decorate any adjoining territory... Playgrounds, summer cottages look boring without any kind of decoration. A well-groomed flower bed will attract even more attention and delight the eye if you supplement it with the fake bird shown in the photo. There are many variations on the manufacture of artificial birds, made from all kinds of improvised materials, which sometimes cannot even be presented in the form of crafts.
Some animals require special skills, abilities and take up a lot of precious time, so it is better to take on such work, which will most likely be effective without painstaking efforts. One of these creations is a stork made from plywood with his own hand.
Why exactly a stork? The answer is reasoned enough. Even a small child knows that this noble bird personifies peace, tranquility, family well-being, loyalty, constancy. Many beliefs and signs are associated with the location of the stork nest, their annual return and offspring.
Where to start making decor


It has been proven and tested in practice that all ingenious inventions are simple and accessible to everyone. So this unpretentious composition is acceptable in terms of material costs and complexity for people seeking to embellish and refine not only their territory, but also the surrounding space.
You will have to work with plywood. Quite suitable material for those who are trying to master the lessons of carpentry. The material is easy to cut, although it is quite strong and dense. You can process it without a grinder, using sandpaper. After coating with several layers of linseed oil or varnish, it is generally not subject to swelling, delamination, cracking due to external influence of precipitation and temperature changes.
Garden plywood storks are made from medium grades and thicknesses wood board... It is impossible to exclude the impact of environmental factors, but looking for the most expensive and high-quality plywood for outdoor exposure is an unreasonable decision. Therefore, it makes no sense to describe in detail the characteristics of the material. What will get it, from that an excellent creature from the family of birds is blinded.


You need to start by roughly representing the actual size of the bird in order to know the specific parameters of the consumable. Plywood canvases come in different sizes, but there is no need to cut a two-meter bird. If the stork settles on the front garden, then a small bird will fit into this space, perhaps more than one. And if you attach it to the pediment of the house, a vivid example in the photo, then it is advisable to make a larger-scale decor so that it is visible from afar and is not lost.
How can such beauty be lost, even if the color scheme is the simplest and at the same time bright. Running a little ahead, it will be necessary to stipulate that the color of the finished stork, cut and assembled by hand, includes only three colors: gray, red, black.
Based on the description of a stork for a summer cottage or garden, you can already make an estimate of the materials for its manufacture:
- plywood sheet;
- paper or finished sketch;
- pencil, scissors;
- jigsaw;
- paint with a brush;
- ship varnish.
Sequence of work
You can cut a stork out of plywood in a matter of hours. Sleight of hand and imagination will speed up the process unhindered. The first step is to draw it. Everyone can imagine what a stork looks like, but not everyone will be able to portray it.
The plywood stork drawings in the photo simplify the first step. All that remains is to project them onto a large paper size. As can be seen in the proposed sketch, a mold, compasses and others technical tools are not useful. Anyone can draw two ovals and connect them with smooth lines. Try to depict a bird with a long neck, beak and wings in such a way that the silhouette resembles a representative of the stork order. The better the proportions are observed in relation to the template, the more chances you will get a semblance of the source.
Next, the drawn silhouette must be cut out. The plywood stork stencil is ready. All stages of creating a symbol of devotion and good luck are within the power of even a schoolchild, so the participation of children will not hurt. The paper stork must be placed on a plywood sheet and lightly attached with buttons, stapler, tape, whatever comes across. Draw outlines with a pencil. The lines should be clear to maintain all the smooth curves of the torso and sharp angles of the beak, tail and wings when cutting. Now you can start cutting. At this stage, rush and strong pressure on the jigsaw is useless. You have to work slowly.
The plywood stork template will be completely ready after thorough grinding from all sides. The first sanding is done with coarse sandpaper, after which it is imperative to walk a couple of times with a fine-grained one, including sections. When the surface becomes smooth, without burrs, the most beautiful stage of creating a creation with your own hands begins: assembling all the parts into a single product.
Screwing on the legs and gluing on the wings is quick and easy. If the stork settles in the garden, it must be installed on a base. Take a small block of wood, drill holes in it, coat them generously with wood glue, and insert your legs. It will take a little time for the wings and support to dry. It is advisable to press with a clamp and fix the wings with the body.
Then it's time to paint the bird. The most popular and suitable paint is acrylic. A sample of color is shown in the photo: the beak and legs are red (dark orange can be used), the body is light gray, the plumage of the tips of the wings and tail is black, the eyes are marked with small black circles. Cover with varnish when the paint is dry.
That's the whole procedure! A video with a lesson on making a magic bird is attached.
Arrangement of crafts
It is not enough to make a stork out of plywood. Regardless of the location of the plywood stork, you still need to make a nest for it. It will even resemble the present, because it will have to be built from thin twigs. On a horizontal surface, the nest should look like a stork. The same wide, deep. On the gable of the roof, the nest can also mimic a nest. Make it three-dimensional to make the composition look complete.


If desired, the stork can be paired. Then he is not alone. It is inexpensive to "reproduce" miracle birds, so after a few training sculptures, you can tackle more complex and time-consuming designs.
First, decide where you will place the stork figure, because it depends on what base the craft will have. Traditionally, such figures are attached to trees, building a nest of branches under them. But you can place the stork on the roof of a house or on a flower bed on the ground.
We decided to make a whole composition, which will include not one, but two figures of a stork, if you repeat everything exactly after us, you will get the same thing.
Prepare the following materials in advance
Plastic bottles.
-Wide board.
-Metal rod or thick enough wire.
-Sheet of styrofoam at least 10 centimeters thick.
-The hose is corrugated, can be used, leftover, for example, from an old vacuum cleaner.
- Plastic cans with a volume of at least 5 liters.
-Metal grid, from it we will make the bird's wings.
-Stapler.
How to make a stork figure
Despite the fact that the figure is spectacular, it will take only a few hours to create it.
First of all, with a sharp knife, cut out the bird's head from the foam with a base under the beak. Make eyes right away, you can draw them, or glue black beads instead.

From the bottle suitable color cut out the beak. We have it in two parts. Do everything exactly as in the photo. The finished beak is glued to the head.

Now let's start creating the body of the bird. For this purpose, we have prepared a canister, in which we will immediately cut off the handle so that the shape is close to the real body of the stork. We attach a mesh to the body, bent in the shape of a canister. We cut off the excess details immediately.

We make the legs from a rod, and the board is prepared as the base of the figure. Secure the rod to the board as shown in the photo.

Now let's move on to the fun part: we will decorate the figure with plastic spoons. Start with the tail, gradually working your way up the body.

The head and the body are connected with a wire, and to make the neck look natural, we put a corrugated hose on the wire. We make linings from plastic bottles so that they look like feathers.

Also, the cut out elements of the bottles go to the feathers of the wings. Lay so that each next row partially overlaps the previous one. You can attach the plastic to each other with a stapler.

At the last stage, we connect all the parts to each other. The result is the figure of a bird, but to give it the greatest realism, it should be painted correctly. Pay attention to what details of the figure are being painted.

Having the skill of making a stork figure, you can make other bird figures: an excellent imitation of plumage is obtained from plastic bottles and spoons.
We have all known the song from childhood "Stork on the Roof - Peace on Earth" for a long time. And we already know Alena Zinovieva from the village of Chastaya Dubrava decided to settle in her garden a couple of white storks in love, which symbolize peace in her friendly family... These beautiful birds are also made from waste material: foam plastic, metal mesh, plastic bottles and plastic canisters.
To make storks, we need:
1. Two cans of 5 liters
2. Metal mesh for the wings
3. Strong wire
4. Plastic tubes for legs and neck
5. Styrofoam for the head
6. White milk bottles
7. Dark beer halls, 1.5 l each
8. The hose from the vacuum cleaner (can be replaced with a corrugation)

1. For the head I use construction foam 10 cm wide

2. I cut out the workpiece, highlight the eye sockets, make a flat beak.

3. Grind to smoothness with sandpaper, insert eyes (or beads)

4. I glue the eyelids, strengthen the beak with a part of a plastic bottle, gluing it to the Titan. I make the beak of the second stork open.

5. For the torso I take 5 liters. canister.

6. I cut off the handle.

7. I bend the net into the shape of the canister - the wings of this AISTA will be folded.

8. Round off the "wings".

9. Bend the wire for the legs.

10. One liter milk bottle is cut into 6 feathers.

11. I cut the feathers.

12. I begin to fasten the feathers from the lower part of the body.

13. I reinforce the neck wire and put a hose on it.

14. I screw a row of feathers to the hose with self-tapping screws.

15. Side view.

16. I cut the milk bottle halves into fringes and fasten them around the neck with tape.

17. I start with the flight feathers at the edge of the wing.

18. The second row overlaps the first one by one third.

19. The third and subsequent rows of white bottles.

20. Paws from 0.5 l bottles.

21. Making a torso for the second stork.

22. As with the first, I cut off a part of the canister from above - you need to screw the feathers.

23. I cover the body with feathers, but, unlike the first, I fasten the feathers to the entire canister.

24. This stork has wings slightly open. The first row of feathers from 1.5 l bottles (6 pcs from one)

25. I screw the second row only to the curvature of the wing.

26. The third is for the whole wing.

27. I make a tail, it is short, feathers are slightly spread.

28. Flip the wings over to screw the feathers onto the underside.

29. The last row, covering the edge of the wing, is made of feathers bent in half, rounded on both sides.

30. This is approximately how it looks.

31. Each of the subsequent feathers covers the junction of the previous one.


And we will soon meet again with Alena and her new works.
Copyright © Attention !. Copying of text and photos can be used only with the permission of the site administration and indicating an active link to the site. 2019 All rights reserved.