This article will describe the work performed to install latch handles on interior doors, which are by far the most popular in use.
The latch handle has the following design.
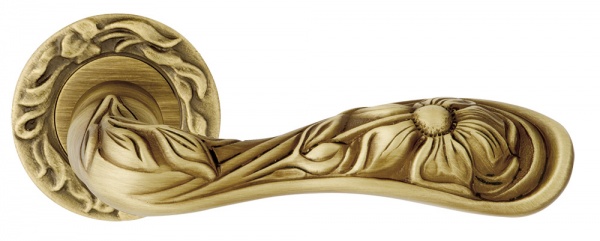
The visible part of the handle can be of completely different types and may look like this:

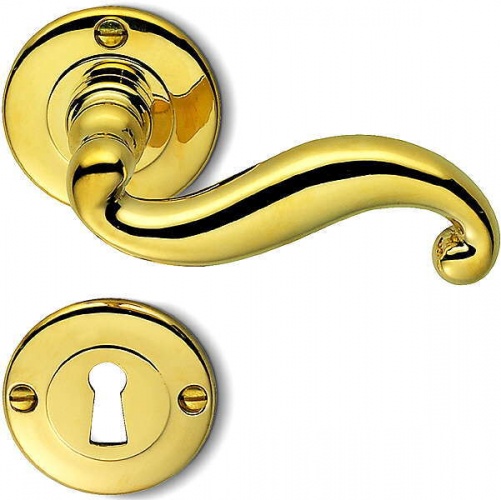
Or in this way:

All such handles-latches basically consist of two parts, from a handle:

and the latch:
 Each of these parts of the latch handle requires a separate cut into the canvas.
Such latch handles are available on sale in different ways, with a latch that have an additional mechanism installed in the handle itself, which allows the door to be locked from the inside, and from the outside on the handle there is a mask for the key that allows the door to be locked. Also, such handles are available and they are not locked without a lock. Handles-latches from different manufacturers have various design features that in no way can affect the process of cutting into the canvas itself. The weight of such handles has a latch in its inner part, so the whole process of installing the latch handle is the same for everyone.
Therefore, if there are any differences, then because of this, there is no need to doubt very much and you should pluck up the courage and start performing the work. And you should start with the preparation of tools.
To do this, we will need tools for work..
- Screwdriver or hand drill.
- A crown with a diameter of 50 mm for wood.
- Reduced size 23-24mm for wood.
- Pencil
- Chisel
- A hammer
In order to facilitate and speed up the process of installing the handle-latch in the door leaf, a special set can be purchased in specialized stores.

We begin to install the latch handle
1. In order to start the installation, it is necessary from the beginning to make a marking for drilling on the canvas. If you purchased a special set for inserting such a latch handle, then this set already contains a marking scheme.

If you do not have such a scheme, then the markup can be done manually. For this, we make a mark at a distance of 1 meter from the bottom of the door leaf, then measure 60 mm from the edge of the door along this mark and make a mark for drilling, as shown in the photo.

2. We also find the center on the side of the door leaf and make a mark for drilling.

3. Next, we take a chisel and for the face plate of the latch on the door leaf we gouge a recess equal to 3mm. It is better to drill the center of the door leaf thickness with a slightly thin drill, so that later you do not have to do the markup again.

4. With a crown with a diameter of 50 mm we make a through hole. It is better to make a through hole on the door leaf on both sides so as not to damage the door leaf.


5. As a result of the performed manipulations, we will get a hole.


7. As a result, we get several holes on the door leaf.

8. Insert the latch into the hole on the side of the door leaf and screw it on.


With the help of a special key that should be included in the kit or any thin and flat object.

We press in the hole on the tongue.

and remove the handle.

10. After the handle, remove the decorative cap and expose the mounting holes.


12. Insert the other half, after which we tighten both halves of the handle with the screws that come with the kit.

14. Cover the door leaf and mark the place where the tongue touches the jamb, in this place we hollow out a recess for the latch tongue.

15. A plastic pocket must be installed in the hollowed-out recess.

16. On top of the plastic pocket, install the metal plate and screw it on.

As a result of the work carried out, the door latch handle has been installed, now the door is ready for use. 
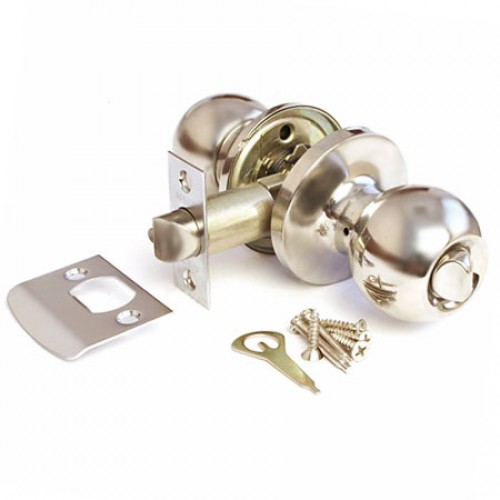
In this material, we will look at how to disassemble the knob handle, which have received an unusual distribution on interior doors. And also along the way we will find out how the installation of these handles occurs. Below you can find not only instructions in pictures, but also watch a video.
To install the knob handle, it is necessary to mark on the door and make two main holes, according to the template, which, as a rule, is included in the kit with the handle with installation instructions. So, let's start installing the handle, disassembling it along the way.
Given an interior door:

We make a sample of the hole from the end of the door leaf for the latch. Hole diameters from 23 to 25 mm: The hole can be conveniently drilled with a so-called wood drill.
Using a wood crown with a diameter of 50 mm, a through hole is made for the main fastening of the handle. The distance from the end of the blade to the center of the hole is 60 or 70 mm, depending on the latch included in the kit.

You can find a template for installing a knob handle from some manufacturers in the form of a stencil on the inside of the box packaging or in the attached instructions. It is very convenient to use ready-made kits for installation, which are called the "installation kit interior handles". It is not scary (and often the opposite is useful) if the holes are made with a diameter of 1-2 mm larger than recommended. The latch mechanism is two-position: it provides the possibility of installing a knob on the door, with different widths of the first beam of the door. The distance of the center of the knob handle from the edge of the door leaf is 60mm in the standard:

but by moving the sleeve under the square, you can set the offset to 70 mm:

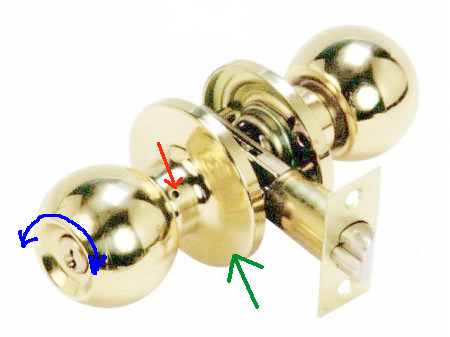
The standard height of the handle on the door is approximately 950 mm from the floor. Further, to install the knob handle, we partially disassemble the inner half of the handle in order to gain access to the holes for the fastening screws. To do this, we will use a special "key" from the pen kit or any suitable object, for example, a knitting needle. The handle has a special hole through which the knob door handle should be disassembled. In the photograph shown, it is round, but it can be of various shapes. This hole is located on the bottom of the handle:

Press the spring-loaded latch through the hole, while pulling out the handle of the interior knob.

We take out the handle and completely remove it:


Then it is necessary to pry off the outer decorative flange of the handle with any sharp object. Take a closer look, as a rule, the flange has a corresponding groove for this:

Well, the knob knob was disassembled and we got access to the mounting screws

Further assembly of the knob handle takes place on the door in the reverse order.
First, we will install the latch in the door and secure it with two screws from the end. It will look like this:

The latch mechanism rectangular faceplate is mounted flush with the door leaf. To do this, having marked under it, a chisel makes a selection of the required depth at the end of the door leaf. The same applies to the knob striker, which is installed according to the markings on the door frame. Also, under it, a selection of the required depth is performed with a chisel.

Further, you can already assemble the knob handle on the door leaf, pulling the disassembled halves with fastening screws. The square of the handle and bushings for fastening screws will, during installation, pass through through the previously installed latch, through its technological holes


Knob handles are universal and cannot be left / right-handed. The design provides for the installation and adjustment of the knob for any door with a thickness of at least 35mm.
If the shape of the knob handle has a non-symmetrical ball shape, etc., then after installing the knob on the door, using the above described method, remove the knob handle, and change the outer and inner handles in places, having achieved their correct location relative to the location of the door leaf ( left or right side). The latch or lock mechanism, if any, is also brought into correct location, and if required, we also swap the outer and outer sides.
The handle assembled and without distortions installed on the door should work easily in both directions and independently, under the action of the return spring, return to its original position. If this does not happen, then you need to check the evenness of the installation, as well as tighten or loosen the fastening screws, having achieved their equal tightening and the soft movement of the knob handle.
Install the handle on interior door- an occupation that does not require special skills and secret knowledge. Any man can cope with this task, if he at least once in his life held tools in his hands. Difficulties can arise only if a person has never been involved in any repair and construction work at all and has not been interested. But even in this case, there is nothing wrong: from our article you will learn how to correctly, quickly and efficiently install the handle on the interior door. We will also talk about how to determine the handle model, and how to correctly calculate the required height of its placement on the door leaf.
What does it consist of
To make it easier to cope with the installation of door fittings, we will find out what parts and elements are included in the handle.
- Lever... This is the main decorative part of the product.
- Each handle has a special ring that attaches to the door.
- Rod and socket- also two integral parts doorknob.
- Travel stop... This element prevents the sash from hitting the wall when opened.
- Stoppers.
And here is how the handle is repaired plastic windows, can be read in this
In addition to the above, the "composition" of the door handle also sometimes includes the following elements:
- locking mechanism;
- tongue;
- metal box overlay; (so be sure to know)
- screw for tightening the structure. This part is required when the handle is installed on a hollow interior door.
It happens that a latch is also included in the "composition" of the handle. In order to install such a model, you will need an additional rotary screw inset. Please bear this in mind.
How to choose
Let's find out what types of handles for interior doors are currently on the market, what are their features and advantages.
On the outlet
This type of handle is the easiest to install. A large hole is not required here, it is only necessary that the product rod freely pass into the prepared round opening.

On the outlet
Outside, the hole is closed by a convex rosette handle, most often round and decorative.
Noba
This is the name of a handle with a rotary system that has a latch or provides a keyhole. This is a convenient option for those interior doors that must be locked: to the bathroom, toilet.

However, the choice of such a model should be approached especially carefully: made of low-quality material with active operation, the nob will quickly become unusable. It is also worth paying attention to how it looks and how it can be installed.
Push
In order to open the door with this handle, you need to press it and move the handle down.

Push model
Everyone came across these types of structures when they visited the offices of officials in some government agencies: it is in such offices that these laconic and practical models are most often found. But they are installed at home, especially if the style of the home is also laconic and minimalistic. And here's how to choose a lock for the entrance metal door, can see
Latch
This type of handle is made up of two parts, each requiring a separate cut-out. This type of door hardware can be made with or without a lock. If the product is not equipped with a lock, the door will not be locked from the inside. The latch allows you to both lock yourself in the room from the inside and close the room with a key from the outside.

Latch handle
In addition to choosing the principle of operation of the handle mechanism, it is necessary to take into account the external design of the product, and its shape, and the material from which the product is made. And this is what a multi-point lock looks like on aluminum door, and how you can install it yourself, this will help you understand
Most often, handles for interior doors are made of wood or metal.
But there are specimens made of glass, plastic, and even stone. Many people choose metal models with different kinds external coating: chrome, nickel, brass, etc. Also, note that some types of handles are designed to be installed on the right side of the door, and some on the left. Check this point with the seller.
You may also find it useful to know about
Tools
What arsenal of tools will be needed to professionally and efficiently install a door handle. 
- Drill and screwdriver - irreplaceable tools for drilling holes and screwing in self-tapping screws.
- Various drills. Necessarily - a feather, as well as crowns of different sizes.
- A hammer is a tool that is in every home.
- Self-tapping screws.
- A pencil and square will help to position the handle perfectly evenly on the door leaf.
- Stationery knife, as well as an awl.
- A tape measure will help determine the height of the handle to be installed.
- A jig will also come in handy - a kind of template used to install handles. It will make it easier to measure and drill holes.
And here's what it looks like and how you can install
Determining the required height
We will find out what tips will help you correctly calculate the required handle installation height.
But it should be noted that if we start from GOSTs, then these standards clearly indicate the height of the handle - this is one meter from the floor. Of course, in our apartments and houses we are not at all obliged to follow such recommendations, since in this case rather, they are intended for professional builders.
It is best to maintain a uniform handle height throughout the apartment, especially if the doors are located next to each other. And in general, this approach is much more convenient, because, having got used to opening doors throughout the house, you will already be “on the machine”.
If you are installing a handle in the nursery and the child is still small, it will not be superfluous to take into account this nuance, and equip the door to the baby's room with fittings located in the zone of his reach.
How to install
We will find out what stages of work must be taken in order to install the handle on the interior door on our own.
Before starting work, it is necessary to carry out a marking so that the product is located correctly, evenly and at the required height. For measuring work, you need a simple pencil and a square. First, measure the desired height from the floor. As already mentioned, this height varies from 90 to 100 cm. Consider your height and arm length - select this parameter individually, focusing on your feelings: the main thing is to be comfortable.
In order to correctly carry out the markup with your own hands, draw a horizontal line at the desired height using a square. The handle is usually cut in 6 cm from the end of the door. Mark this point on the resulting horizontal line. Perform all the same actions on the other side of the door, having precisely defined the area where the product will be installed. It is possible at the same stage and mark the place for inserting the groove under the tongue, if it is provided by the model.
Having decided on the height and exact location of the handle, attach a conductor in this place from the end of the door. It will facilitate further drilling work. Take a drill and make a through hole in the door leaf with it: it is clear that in the place where you intend to place the fittings.
With a pen drill or a crown of a smaller diameter, make another hole in the same place, but from the end. Insert the tongue of the product with the lock inside the resulting "tunnel", and immediately check how it works in place. And here's how to install an electronic combination lock on front door, and how to do all the work with your own hands, this will help you understand
On the video, how to install the handle on the interior door:
Trace the outlines of the overlay with a simple pencil, and then remove a small layer of material so that the part is installed aesthetically. Screw on the cover with self-tapping screws.
Place the rod of the product inside the lining, and on top of it put the handle itself, equipped with a ring and a decorative rosette. In the event that the ring fits too tightly against the door, and rubs against it, it is necessary to grind off a little of the door covering with a chisel so that the ring turns out to be recessed in the door array.
Screw the mechanism with self-tapping screws (usually three are enough), or secure with special pins. Fasten the decor overlay on top of the structure. This most often requires a suitable hex key.
Installing the latch

Sometimes for doors in the house it is very convenient to use a model with a latch, which will allow, if necessary, to tightly and reliably close the door, providing a person with separate room peace and solitude. Let's find out how to install the handle on an interior door with a latch lock.
Drill a hole in the door leaf - it must necessarily coincide with the section where the latch mechanism itself will be located.
If the latch has a tongue, then you need to cut another hole in the door frame for it. But in the case when the lock works by fixing the so-called latch tongue, there is no need to cut an additional hole.
We examined the features of installing a handle on an interior door leaf. And, as mentioned at the beginning, there is nothing difficult here. Therefore, by choosing the right product, armed with simple tools and our recommendations, you can easily equip the doors in your home with stylish and necessary fittings.
At first glance, it may seem that this work does not require effort and is quite simple to perform, but this is not so. In order for the installation of the door handles to be successful and correct, the installation is carried out in stages in accordance with all instructions.
Classification of door handles
Door handles differ in both type and material. Therefore, the installation of door handles begins with their selection. You can put a stationary handle on the interior door, which does not interact with either the latches or the lock. It is fixed with screws or clamping screws. In the complete set of the door handle with a push mechanism, a latch is used, which cuts into the door. In this case, the latch is removed only under mechanical action, i.e. when you press the handle, and so it is always in the extended position. Installation of fittings with a swivel mechanism is great for toilet and bathroom, since on one side it can be opened and closed with a key, and on the other it has a locking button or latch.
When choosing accessories for a door, you need to decide on the material from which it is made. You can use a doorknob made of metal such as aluminum, brass, steel, etc. The wooden element is made from valuable wood species. In order for it to serve for many years, it must be made of solid material. You can also install your own glass handles made of Bohemian glass or natural stone. For utility rooms, elements made of plastic and other artificial materials are mounted. When making your choice, you need to remember that the fittings should be combined with both the door and the interior of the room.
Installation instructions for door handles

Required:
- roulette;
- square;
- awl;
- chisel or chisel;
- a hammer;
- electric drill;
- screwdriver;
- door handle fittings.
When doing the installation of door handles with your own hands, you must follow the instructions for installing them to obtain quality result... First, the height at which the fittings will be installed is marked. When marking it, the average height of family members is taken into account. Basically, door handles are installed at a distance of 80-120 cm from the floor. Having decided on the height of the position, a mark is made in this place with a pencil. In this case, the fittings are applied so that the tongue protrudes completely from the door.
All markings should be done using a square. To do this, first draw a line on one side of the door leaf. Then, retreating from its edge by 60 mm, an appropriate mark is made with an awl. After that, using a square, a line is drawn at its end, which is pierced with an awl in the middle, and the same marking is made on its other side. Further, for the installation of door fittings, you will need a drill with a special drill with a crown, which can be of various diameters. First, a hole is drilled on one side of the web to a depth equal to half its thickness. For this, a corresponding mark is made on the crown. Then, by analogy, installation is performed on the other side. In this case, during operation, the drill must be held strictly at a right angle, in no case deflecting it to the sides. The resulting hole will house the door handle mechanism.

For the subsequent installation of the handle with your own hands, the crown is changed to a conventional drill, with the help of which a hole is mounted from the end of the door leaf. It is needed for the tongue protruding from the door. You need to drill a hole for it by moving the drill evenly. After that, a contour is punched with a chisel or chisel, a sample is made and a latch is applied. If everything is done correctly, then it should be located in the same plane with the end of the door leaf and at the same time be completely recessed. At the end, the latch is secured with screws.
Next, the fittings are applied to the place of their location and the holes for the bolts connecting the handles on both sides are marked with an awl. At this stage of the work, you will need a drill, matched to the size of the hole. After all the marked places have been drilled, the construction of the hardware for the door is assembled. To do this, first, one of its parts is inserted, while falling into the special holes of the latch with the help of guides. Then the second part is substituted and everything is tightened with bolts.
Final stage of installation
Required:
- awl;
- bit;
- a hammer;
- electric drill.
After completing the installation of the fittings, a metal frame is installed on the door frame.

First, markings are made for the hole for the tongue. In order for everything to work out accurately, it is necessary to apply either a drop of oil, or paint, or toothpaste to its end. Then the tongue is retracted into the door, and in its closed form, the handle rises and falls several times. In this case, a clear trace of the applied product will be imprinted on the box. You can also mark it by inserting a metal ruler into the gap between the closed door leaf and the frame, first at the top of the tongue, then at the bottom of it, making the appropriate marks with a pencil.
Next, a metal frame is applied to the markings on the door frame and the place of the subsequent sampling under the tongue and plate is marked. First, a sample is taken under the tongue. To do this, using an awl, a mark is made on the inside, and then a hole is mounted under it with a chisel or chisel.
Before proceeding with the selection of the contour under the frame, you should check the correct installation of the tongue, i.e. it should come out of the latch completely, and the door itself should close well. Then the metal frame is fixed with screws to the box. In order to properly install the door hardware, all instructions must be strictly followed. And as a result, the handles are easy to press and the latch is also easy to walk around.
Repair manual for door fittings
Required:
- set of screwdrivers;
- screwdriver.
During operation, the hardware on the door may loosen or come off. In this case, its repair will depend on the type of handle. If it is spherical or similar, it is secured with a through pin. To repair it, you need to open door turn one of the handles counterclockwise, fixing the other part of it and decorative overlays in place. When separating them, the pin must remain in one of them. Next, you need to adjust the pin and, putting the pads back on, insert the element with the pin. Then, on the other side, attach the other part of it, and wrap everything carefully by hand, without using tools.
When making repairs to a door handle in the form of a bracket, you need to screw in all the screws either with a screwdriver or a screwdriver. In the event that the screws are twisted, they must be unscrewed. Further, sliding the handle on one side so that it covers the old holes, on the other side, all the screws are screwed into new places. To avoid scrolling, screw them in without effort. Fittings of this type are positioned vertically for convenience.
Interior doors are sold without fittings, the delivery set includes only the door leaf and racks, from which the door frame will be assembled. There are no holes in the canvas and made at the factory for the installation of locks and handles. This is due to the fact that the handles, being standardized, have various designs and sizes. In addition, the choice of fittings depends entirely on the preferences of the buyer. Therefore, a person who has started a repair with the replacement of interior doors is faced with the problem of choosing - to invite a master or install the handles on his own. It should be noted that, having decided to install doors with your own hands, you will definitely cope with the installation of door handles.
Types of handles for interior doors
Door handles for interior doors can be classified according to installation method, method of operation, shape, material, and the presence of a lock.
According to the installation method, stationary (overhead) and mortise models are distinguished. Overheads are attached to door leaf, and for mortise it is required to drill holes in it.
By the way of work there are:
One of the most popular materials for the manufacture of door handles is brass. In addition to its excellent aesthetic properties, brass is practical and durable.

As a rule, complex doors are not installed on interior doors. lock systems... An exception is the plumbing lock installed in bathrooms and toilets.

Installing a handle on an interior door
Consider the installation features of the most popular model for interior doors - knob handles. Handles are usually installed on a hinged door, but many experts recommend removing the canvas for installation. True, this can not always be done easily.

Advice. If the door leaf cannot be removed from the hinges and the installation is carried out in the hinged position of the door, move a chair or some object to it so that the door is motionless during your work.
Installation tool
The tool will require the most common one, which is in every home:

A marking scheme is attached to the door latch, but it is easy to mark the holes without it. From the bottom edge of the canvas, 1.0 meter is measured on both sides. Measure 6 cm from each edge of the door and make a mark. With the help of a square, a strictly horizontal line is drawn that will connect these two points. At the end of the canvas, a mark with a pencil and an awl is placed on this line in the center. A latch bar is applied and the veneer is cut with a sharp knife. Remember that the strip must be recessed into the door leaf so that it forms a single surface with the door leaf.
Some experts advise starting drilling from the end of the blade with a pen drill. With this order of work, when drilling with a crown, the chips will fly out into the already made hole, and not clog the teeth of the crown.

The drill bit should go to the depth of the blade, no more. The drill is pressed against a point on the end of the blade and a hole is drilled. Then, with the help of a crown, holes are drilled alternately on each side of the canvas, they do not need to be made through. As soon as the tip of the crown appears on the opposite side, the drill must be stopped and start drilling from the other side. So the veneer will not be damaged when the crown comes out.

After the holes are ready, using a chisel and a hammer, we make a selection along the line cut with a knife under the latch bar. Install the latch and tighten with two self-tapping screws. It is better to take self-tapping screws not "regular" ones, which are attached to the latch (they have ordinary soft metal), but high-quality ones.

Using the key included in the kit, we disassemble the handle into two parts so that it can be installed. To do this, one fastening screw must be loosened, the other unscrewed. The center rod is inserted into the hole and on one side the fixing screw is tightened tightly. Then the second half of the knob is put on the rod, and the second screw is tightened. Self-tapping screws are screwed on both sides, which will close the decorative overlays and the screws will not be visible.

After installing the knob handle, it remains to install the "return" on the box. The door is closed, but not completely, and the upper and lower edges of the tongue are marked with a pencil. With the help of a square, the distance from the edge of the leaf to the center of the latch strip is determined, and this dimension is transferred to the door frame. Then a “return” strip is applied to the box, a veneer is cut with a knife, and a chisel is used to cut under the strip and tongue. The door is closed and the operation of the latch is checked.

Then a strap is installed on the box. Special "pockets" are sold for grooves under the tongue, they are made of plastic or metal. The self-tapping screws that fix the "return" bar can be closed with self-adhesive plugs. Then the installation is complete.
How to disassemble and assemble an interior door handle?
An installed knob can be disassembled in two ways, depending on its design. Unfortunately, most of these models are of rather low quality and often fail.
Disassembly of one structure begins with the fact that it is necessary to carefully pry off and remove decorative strip... The lining has a special groove, usually it looks down. The ball-shaped handle will interfere with unscrewing the screws, so you need to squeeze the locking pin and, at the same time, with a little effort, remove the handle from the central rod. Once the ball of the handle is removed, it will be very easy to unscrew the screws.

To disassemble the second design, which does not have a locking pin, it is necessary to press the spring pin through the technological hole using the supplied key and remove the handle ball. If the length of the key is not enough (it happens), use a simple nail. Then the decorative strip and self-tapping screws are unscrewed. If you cannot find the spring pin through the technological hole, it means that the knob was assembled incorrectly. Rotate the decorative strip 180 ° and the problem is solved.

The handle is assembled in the reverse order.
