IN Lately Providers are increasingly using . This is a simple and reliable way to connect to the World Wide Web. What is especially important when using local network the user does not need to install any programs, drivers or additional equipment (such as an ADSL modem).
Your Internet cable needs to be connected to the WAN port (Internet port) of the router, and the compressed twisted pair cable to the regular LAN port of the router and to your computer. After simply setting up your router, you will be able to use the Internet as before.
Method No. 3. To extend the Internet cable, you can twist it.
The easiest way. All you need is a piece of twisted pair cable of the length you need. It is not difficult to purchase uncrimped twisted pair cable.
After this, you need to cut your Internet cable in any convenient place and wedge in the purchased piece of twisted pair. This is quite easy to do. In order to connect a twisted pair cable, you do not need to solder anything. All you need to do is expose the conductors and carefully twist the twisted pair according to the colors. Naturally, everything needs to be properly insulated using electrical tape. You can watch the video on how to twist twisted pair cables.
In this article we will talk about how to extend the wire at home. As a rule, many people sooner or later encounter this problem. Nobody knows how to fix it, I decided to remove all the questions and do it for you detailed description. And talk about all the situations and ways to get out of them.
How to extend a wire: basic methods
Here we will talk about the simplest extension of wires, when there is full access to the wire and the cores of the conductors are made of the same metal. Such methods are suitable for both copper and aluminum wires.
Remember, you can only connect a copper wire with an aluminum wire using a special terminal.
Read the classification of wires, not everything can be extended.
And so, here we have discussed the main methods with you. Watch the video, it will be even clearer to you.
Now let's talk about situations that may arise. Standard methods are good, but you need to be able to get out of any situation. I’ll tell you about all the situations.
Wire extension: everyday situations
A vein in the wall broke
If this happens, you must decide if there is enough wire to connect everything. If there is enough, then we use any method that you might have seen before. If it’s broken so you can’t get under it, you have to break the wall and carry out all the actions there.
How to extend cable in water
This situation arises in cases where it is necessary to lengthen a section of cable laid in water, for example: a wire for submersible pump build up. Here you will need heat shrink tubing. We do everything only as shown in the picture. This method is suitable for underground cables.
Remember, you can heat it with a lighter, but make sure that the tube must fit tightly onto the wire.
How to extend a wire or cable to power powerful electrical devices
In this case, only one option is suitable - soldering. Don't even look at others - it will only bring trouble. Powerful electrical appliances include: air conditioning, electric stove, etc. The conductor cross-section should be (4mm).
How to extend a cable or cord of low power
For example, if you decide to extend the microwave cord, washing machine– throw this idea out of your head. After all, if you connect it incorrectly, there will be big problems. And you can mistakenly connect the grounding with the phase. In this case, it is easier to stretch the wire under the baseboard, and safer.
Increase the length of the temperature sensor wire for heated floors
Initially, read the instructions for it, if there are no problems, use the terminal blocks.
How to extend twisted pair
In this case, there are no problems, but remember, you need to build up each vein separately. Don't forget to carefully insulate the wire extension area.
How to extend the wire of an LED strip
To do this, you will need to purchase special connectors; they allow you to gradually increase the wire for LED lamps. Other methods and materials will not suit you in this case.
How to extend a wire: video
Interesting article: ABS cable description.
How difficult is it to damage electrical wiring? Many will say that if you do not apply mechanical force to the wires, it is almost impossible. If you follow all installation rules, the wiring will serve you faithfully for many years. But as practice shows, sooner or later malfunctions arise and sometimes you have to turn to specialists.
In the life of any electrician, there are times when it is necessary to extend electrical wires. During operation, the wiring may become damaged or the wire may break. Moreover, the wires, as a rule, break in the most inconvenient places, such as, for example, under the ceiling when connecting a chandelier or lamp.
Also, wires very often break off when connecting sockets, especially with aluminum wiring. Oddly enough, even during repairs, builders can leave a short supply of wire, to which it will be difficult to connect anything. I'm not even talking about cases involving the use of grinders, hammer drills and drills. In general, there can be so many situations that you can’t imagine it yourself.
How to lengthen the wires in a socket
Hello to all guests and regular visitors of the “Electrician in the House” website. I'll tell you my story, in which I had to extend the wires in the socket. The other day a small job came up. One of my friends called, he seemed like a normal guy (in the sense that his hands grow from where they should be), he said he needed help with replacing the socket. He says that he tried to replace it himself, but it didn’t work because the wire broke off. Well, I think no problem, I’ll come and have a look.
Upon arrival, a friend said that there was a single socket in the kitchen, into which the refrigerator was constantly plugged in. And recently purchased electric oven, the place for it has not yet been determined and it is temporarily connected from the same outlet (and as you know, there is nothing more permanent than temporary). And you understand, in order to use the electric oven you had to unplug the refrigerator from the socket.
This was very inconvenient, which is why the idea arose to install a double socket, but such a disaster happened. In this place it would have been possible to install a block of sockets, but the house was a panel house and I didn’t really want to drill another hole in the wall, and the recent renovation did not allow it. In general, there was no other choice. Fortunately, the wiring in the apartment was all copper.
What I saw when I arrived at the place, see for yourself. As you can see in the pictures, a two-core wire with a cross section of 2.5 mm2 sticks out of the box (socket box). There is no grounding in the apartment, so all wiring is two-wire. One of the wires broke off completely.
As you can see from the photo, the connection wire was too short. 2 cm stumps with which you can’t do anything and you can’t connect anything to them. All that was left to do here was to extend the wire; there were simply no other options. In any case, that’s what I decided for myself.
Of course, it was possible to gouge the wall and raise it and reinstall the socket a little higher, thereby moving the socket a little in the end. But as I already said, it’s troublesome: repairs, wallpaper, dust...
How to extend copper wires in a socket
Since many users still have old aluminum electrical wiring that is still in use, it would be dishonest to ignore this fact. Therefore, I propose to consider several ways to solve the problem - for copper and aluminum wiring.

Those who carefully read the article realized that the wiring in my case was copper. And this is already a plus. There are several options, in this case. You all know them very well, since I have already talked about them on this site.
- - crimping using GML sleeves;
- -screw terminal blocks;
- - soldering of wires;
- - self-clamping terminal blocks of the Wago type.
This is not a complete list of compounds that can be used for extension of wires(I named only the most basic ones). I decided to go with the first option and execute extension of wires in a socket using crimping sleeves.
For crimping I will need a GML sleeve (tinned copper sleeve) with a cross section of 2.5 mm2 or 4 mm2. Why there are two sections of sleeves - more on this a little later. We will insulate the whole thing using heat shrink tubing. Safety comes first, so the first thing we do is turn off the circuit breakers in the electrical panel and check that there is no voltage on the wires being repaired. As you can see from the photo, there is practically no supply of wire. You will have to build up both wires, phase and zero.
When asked why the wires in the box were so short, the owner said that when the electrician installed all the sockets and switches after the repair, he specially cut them so that no extra wires would stick out and get in the way. So it is, but there should always be a supply of wire - keep this in mind for the future. It’s good that the socket boxes are normal; there is enough space to place both the sleeves and the socket body itself.
Let's get down to work. Naturally, it is important that the extension wires are of the same material and cross-section. In my case, the wire that is needed build up with a monolithic copper core, so the extension wire should be the same.
Now I want to dwell on the cross-section of the sleeve. Remember just above that I considered two options for a 2.5 mm2 or 4 mm2 sleeve. I settled on the second option. Why is that? If you use the first option, a 2.5 mm2 sleeve, then in this case the extension is made joint to joint. How does all this happen? We take press pliers PK-16 for crimping sleeves and press the sleeve with the wire on one side. Make sure that when crimping the wires are evenly spaced inside, that is, the ends of the wires are located in the middle of the sleeve. Then we insert the wire on the other side and also crimp it.
If you use a 4 mm2 sleeve then wire extension there will be no joint to joint, but an overlap. Such a connection, in my opinion, turns out to be more reliable and of higher quality. The only thing that needs to be done is to finish off the sleeve with another 1.5 mm2 copper core. We remove the insulation from the wires to the length of the sleeve.
On one side we pass the wire completely through the sleeve, then insert the second wire from the other side. We also thread it completely through the sleeve.

As I said, to seal it, we add another 1.5 mm2 vein. The latter fits tightly, due to which the connection is really good.
Now we take pliers and put two presses at the beginning and at the end. I do two opposite presses.

Now ours connection must be insulated. You can use any means you have. I will use heat shrink tubing. We cut off the tube a little longer than the length of the sleeve so that after compression the bare parts of our connection do not peek out from under it.
We put on the tube and warm it up with a hairdryer. After the tube shrinks, carefully place the whole thing in the box. If one layer of heat shrink is not enough, you can apply another one on top. Now you know how to extend the wires in a socket.
After we have increased the phase wire in the socket, let's do the same with the neutral wire. We do the same thing: the sleeve, wire cross-section and heat-shrink tube are all the same.
We also overlap the wires and finish off the sleeve with one core with a cross-section of 1.5 mm2.
I think everyone understands how to lengthen the wires in a socket using crimping. All that remains is to reliably insulate the exposed parts. To do this, we use a double layer of heat shrink.
After the wires are insulated, we place them carefully on the bottom of the box, so that the connection points do not break when connecting sockets in the future.


There is actually nothing complicated here. To lengthen the wires, the first step is to remove the insulation from them. Then we insert the wire into one side of the terminal block and tighten it with a screw. We do the same with the other end of the wire. When tightening the screws, you must be careful, otherwise you can crush the aluminum core.
One of the advantages of such a connection is that there is no need to insulate the terminal block, since it is already covered with PVC insulation. After building up the wires in the socket, carefully place them in the box, connect the wires to the socket and put it in place.
In this article we will look at several ways in which you can extend the Internet cable. With your own hands (using twist) and without additional devices, or with minimal costs (using an adapter). Using the instructions in this article, you can also extend the network cable that you use to connect your computer to the router, or for other tasks. Not just the cable that your Internet provider installed into your home.
Most often, there is a need to extend the Internet cable that comes into our house or apartment from the provider’s equipment. Please note that we are talking about cable. If you have, for example, fiber optics, then the solutions in this article will not work. During the repair process, when rearranging furniture, or moving devices, it turns out that the Internet cable is short and does not reach our computer or router. In this case, there are not many options: adapt to the length of the cable, ask the provider to lay new cable the length you need (which they are unlikely to do), or just sharpen the Internet cable. What are we going to do now? But first, some tips:
- If you want to connect a regular network cable that you use to connect two devices (for example, PC with router), then perhaps this makes no sense. It is easier to make a new cable of the required length. This will make it easier and the cable will be more reliable. Since any connection and especially twisting is not very good. You can make such a cable yourself, or ask to crimp the cable to the required length at some digital equipment store.
- Perhaps in your case it makes sense to install (if it doesn't exist yet), and not extend the cable and lay it through the entire apartment. And if there are stationary computers to which a network cable is most often laid, then they can be installed in the same way. You only need a Wi-Fi adapter, which I wrote about.
- If we are talking specifically about connecting an Internet cable, then you can call your Internet provider and explain the situation. That you do not have enough length of the network cable laid into your house. Perhaps the provider will offer you some reasonable solution. For example, they will send specialists who will replace the cable free of charge.
- Internet sockets. If they are installed in your house/apartment, then consider possible options connections using these outlets.
If you cannot do without connecting a network cable, then it is best to use special connectors (coupler, joyner). If everything is done correctly, the quality of the connection will not suffer. I do not recommend using twists. They create additional resistance and this can greatly affect the stability of the connection. And ultimately on speed and ping. A computer or router may simply not see such a cable.
Extending the network cable using an adapter (connector)?
This method is suitable in all cases. Both for connecting the network cable through which the Internet enters the house, and for extending the network cable for a computer, TV, router, modem, etc.
These connectors look something like this:
They call him a joyner. There is simply an input for the network cable on both sides (for RJ-45 connector). The "mom-mom" type. To connect a cable using such a LAN connector, you need to crimp the cable on both sides into an RJ-45 connector. I wrote in the article how to do this with your own hands without a special tool. If you have a special tool (crimper), everything can be done according to these instructions: .
If you use such a connector to extend the Internet cable, then you can buy a second piece of cable in the store. It will be ready (with connectors). If the cable of the required length is not available, then this cable can be made for you. Ask around in stores that sell computers and other computer equipment.
Simply connect two network cables to such an adapter and you're done.

Let's say on one side we have an Internet cable from the provider, and on the other side there is a second piece of cable that we made ourselves or bought in a store.
There are slightly different LAN cable connectors - couplers.

With their help, extending the LAN cable is even easier and more convenient. No need to crimp the cable into the connector and no need special tool. Only a screwdriver.
Do not confuse these connectors with splitters. They have one entrance and two exits. And they are intended for other tasks.
If you need to extend the network cable for a computer, TV, router
When the network cable is not long enough to connect a computer, TV, another router or some other device from a router or modem, you can also use connectors. But don’t forget that you can always buy or make a longer cable, or connect the device via Wi-Fi. Perhaps in your case this solution will be more correct and convenient.
Of course, you can take two pieces of twisted pair cable crimped on both sides into an RJ-45 connector and connect them through the connector.

Using such a cable, you can connect absolutely any device that has a LAN input to the Internet.
We connect the Internet cable using twisting
I already wrote above that this is not the most The best way, which can be used to connect a network cable. The quality of the connection may suffer, or even not work at all. But if there are no other options, or you need to do everything urgently, then you can try.
Simply strip the cable at both ends and twist it color-matched. For insulation, use insulating tape or heat shrink tubing. Each cable must be securely twisted and insulated.
I did everything for the first time. The most difficult thing is to strip the veins and twist them. They sometimes break. First we remove the outer insulation, and then we strip each wire.
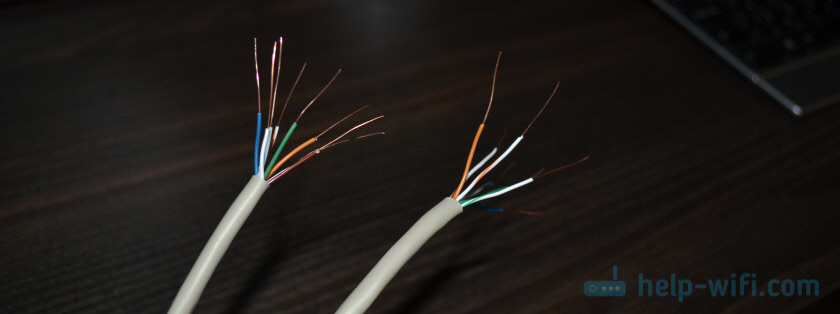

I think this can be done more accurately than I did. After the network cable is twisted, each wire must be insulated. I used heat shrink tubing. Duct tape will also work. Here's what I got:

Believe it or not, this cable even turned out to work :)
Just be careful with it, the wires are very fragile without insulation. They are easy to break and the cable will not work. You can wind the cable lower so that the connections do not move or break.
Write in the comments what method you use to extend the network cable and how it works for you.