This article will discuss the design homemade machine from a household jigsaw. Below will be given step-by-step instruction, photos, videos, as well as drawings and diagrams.
Introduction
There are a lot of design options - from the simplest ones, where it just sticks out from the tabletop, to quite complex designs with guides, the ability to cut at an angle, when it is possible to set not only 90 degrees to the base, but change the angle (well, within reason, of course) . There are devices (machines) for, that is, making straight and even cuts.
Such devices are increasingly used due to their versatility and functionality. In fact, their parameters and purpose are similar to stationary machines and have a strictly defined practical use in every workshop.
Purpose
| Plywood thickness, mm | Layers of plywood, no less | Sanded plywood | Unsanded plywood | ||
| Maximum deviation, mm | Different thickness | Deviation, mm | Different thickness | ||
| 3 mm | 3 | +0,3/-0,4 | 0,6 | +0,4/-0,3 | 0,6 |
| 4 mm | 3 | +0,3/-0,5 | +0,8/-0,4 | 1,0 | |
| 6 mm | 5 | +0,4/-0,5 | +0,9/-0,4 | ||
| 9 mm | 7 | +0,4/-0,6 | +1,0/-0,5 | ||
| 12 mm | 9 | +0,5/-0,7 | +1,1/-0,6 | ||
| 15 mm | 11 | +0,6/-0,8 | +1,2/-0,7 | 1,5 | |
| 18 mm | 13 | +0,7/-0,9 | +1,3/-0,8 | ||
| 21 mm | 15 | +0,8/-1,0 | +1,4/-0,9 | ||
| 24 mm | 17 | +0,9/-1,1 | +1,5/-1,0 | ||
| 27 mm | 19 | +1,0/-1,2 | 1,0 | +1,6/-1,1 | 2,0 |
| 30 mm | 21 | +1,1/-1,3 | +1,7/-1,2 | ||
Preparatory stage
- draw up sketches and make a drawing of the future product,
- make paper patterns for future elements and details
- stick templates onto blanks for future parts.
There are two ways to make templates - take tracing paper and draw the kennels of the future workpiece on it. This has been done since ancient times, since nothing is needed for this except a ruler and a pencil. However, if you have a computer and a printer, of course A3 would be nice, but A4 is also suitable (you just have to print several sheets and then glue them together), then the process of drawing with a pencil and ruler can be replaced by drawing the contours of the blanks on the computer.

Then we cut it out with a stationery blade or just a sharp knife.

After that Once the template is ready, it needs to be glued to the workpiece.
Tip: There is no need to glue it tightly, since in the future you will have to remove the template, and this will be difficult if you glue it tightly. Accordingly, you can glue it, for example, with stationery glue, use a glue stick or, as in our example, spray glue.

Creating blanks
At this stage you need to do:
- Cut the blanks exactly according to the template,
- Process the workpieces - align the ends, remove burrs
- Drill the necessary holes;
- Make grooves with a file;
- Drill out the seats for the bearings;
- Select grooves with a router for the cover and a seat;


We install the bracket. It should be noted that the bracket must be fastened without over-tightening the nut - there must be free movement. To do this, use a self-locking nut and only tighten it slightly.

Installing the spring should not be difficult. You need to do it as shown in the photo below.

For future fastening of the file, you need to make a simple clamp in the form of a plate with two holes. It must also be installed on the bracket using a self-locking nut. Moreover, the backlash of the plate in the seat is very important because the bracket moves, and a clamped plate will restrict its movement.

Below is a sketch of the design of the upper attachment point for the file.

Then it is necessary to make technological holes for the jigsaw controls so that it is convenient to change the engine speed, you can gain access to the start button and its lock. There is another solution that makes it more convenient to turn on the tool - this is to place in an easily accessible place on the machine body an socket and a switch that would turn the voltage on and off in the socket. We plug the jigsaw cord into a socket, and it turns out that we will turn it on and off using a switch installed in a place convenient for us. However, this is a matter of taste.
So, below is the manufacture of technological holes on the body.

This is what the controls look like when they are now available.

Now you need to make clamps for the file itself. The principle is simple - take the bolt and make a cut at the base of the head, but not all the way. In the future, the file itself will be inserted into this cut. The principle is shown in the photo below.

This is how the upper saw attachment unit is installed and assembled.

The lower unit is almost similar to the upper one, except that it is not a plate that is used, but a standard file (you can use a “BU” one), almost the entire cutting part is sawed off with a grinder (angle grinder) and the shank is left. A hole is made in the remaining cutting part with a similar bolt with a slot at the base of the head, into which the file will also fit. The principle is shown below.

After the file is secured, we install the jigsaw itself. We fasten it with bolts with countersunk heads so that they do not stick out on the table top of the machine.


Now we need to adjust the perpendicularity of the file relative to the table of our machine. To do this, you can use a square, or, as in our case, just a block that is precisely trimmed. We make the adjustment as follows. To adjust the file left/right, the top plate is adjusted - its displacement on the axis - respectively, in the desired direction.

And to adjust the saw blade position forward/backwards, the saw blade mounting unit itself is shifted forward or backward.

The machine is almost ready, all that remains is to make and install the plate that surrounds the jigsaw file. It can be made from PCB or any piece of sheet plastic.

This completes the manufacturing of the jigsaw machine.
We hope that the material presented was useful to you.
Conclusion
dimensions
Here is a table with overall dimensions:
General assembly diagram
Let's attach a complete assembly diagram, which in a sense can be a 3B drawing for making a machine from a jigsaw with your own hands.

Video
Videos on which this material was made.
The idea of creating a homemade jigsaw is most often due to the disadvantages that factory hand tools have. You can make a small tabletop machine with your own hands, which will include a pusher, a reciprocating motor, and a saw tension system.
In this case, you do not need complex drawings - once you understand the essence, it is easy to achieve the result.
- The desire to create a homemade jigsaw may arise for several reasons:
- There is no power supply in the workshop, but it is possible to use low-power internal combustion engines.
- There are pneumatic motors, but the compressor power is not enough for a serial tool. The electric motor is powered by batteries or solar panels
- , the power of the source is not enough to use the power tool.
It is required to obtain saw motion parameters that are unattainable using a commercial tool.
Designing a jigsaw is not difficult. A typical structure looks like this:
The installation is easy to adapt to any torque source. A pair of pulleys (one is located on the engine shaft, the other drives the crank mechanism) allows you to vary the gear ratio, reducing the load on the power unit and allowing you to get the required speed (they are also responsible for the number of saw strokes per minute) on the actuator. A machine built according to the above diagram may have the most, the material of manufacture is also selected individually. Example ready installation looks like this:

Disadvantages of a manual jigsaw
The manual jigsaw is designed for shaping straight cuts. In this case, as the rollers, rod, and pusher wear out, the saw may wobble, deviate from a straight line, and change the angle of attack. Regardless of the quality of the tool components, the following features are always present:
- When the saw becomes dull, deviation from a straight line is observed when cutting material of uneven density (for example, low-quality chipboard). The saw is capable of leaving the cutting line when it encounters a knot in the wood.
- When trying to make a curved radius cut, you can observe next picture: the upper cutting line, which the worker follows, follows an exact trajectory, the lower one deviates, goes to the side, the radius becomes larger. The higher the wear of the tool and the lower the sharpness of the saw, the more pronounced this phenomenon is.
- Some materials cannot be worked using a pick-up or bottom feed of the saw. The carpenter is required to move the tool forward extremely evenly, which is impossible to do very accurately; as a result, the saw beats along the entry and exit path.
It is even more difficult to work with thin saws designed for curved cuts. Without practice, it is very difficult to achieve a good result, especially on thick slabs or wood materials. Let's look at how you can make a carpenter's job easier and the result better.
Standard solutions
The machine is made from a manual jigsaw based on a simple table. This device is common and mass-produced; samples can be seen in the photographs below.


The mechanics of work are simple:
- The jigsaw clearly fixes the tool, ensuring that there is no influence of the human factor (the hand can move the jigsaw unevenly).
- The presence of a support allows you to move the device without deviations along the trajectory.
With the help of a table, jigsaws begin to cut in a straight line, but the capabilities of such a device are limited. If you remove the side fence and try to guide the workpiece, forming a curved cut, the same problems of saw deflection arise. The problem can be solved by using a simple saw, rigidly fixed with a pair of rollers. Making curved cuts is now convenient and fast. What homemade and industrial products of this type look like is shown in the following photos.


Tension devices for curved cuts
To perform very thin and precise shaped cuts, you can make a machine from a jigsaw with a saw blade tension system. The idea of creating it yourself is as follows:
- A very thin saw is used, ideally for hand jigsaw.
- A clamp is attached to the rod of the power tool, which will tighten the cutting blade.
- The trajectory stabilization system will regulate both one freedom of movement and two (horizontal and vertical).
Used as a tension block hand jigsaw clamp, to which an adapter is made, which in turn is inserted into the clamping device of the power tool rod. To ensure adjustment of one freedom of movement, a pair of angles and a bolt are used. The result of the implementation of the idea is presented in the following photo.

The saw provides clearly vertical movement, good tension can be created, but there is a mandatory runout in the horizontal direction. The canvas comes with a pick-up and does not move in a straight line.
The development of this idea is in the next photo. Here the part that fixes the trajectory moves, and the metal clamp provides structural rigidity and mechanical resistance.

The system is stabilized in two degrees of freedom, the cut made with its help is neat and precise. By using a diamond-coated cord for a hand jigsaw, you can cut glass without creating messy chips on the edges.
Accessories for extremely delicate work
If you need to work extremely delicately and slowly, you will need to reduce the force on the cutting blade while maintaining strong tension and precise movement of the file. For this, a homemade jigsaw is equipped with spacer devices with long shoulders.
In this case, the power tool does not operate in the cutting zone, but at some distance. This allows, depending on the wishes of the carpenter, to regulate the force, speed and amplitude of movement of the saw. One of the options for implementing the idea is shown in the following photo.

Depending on the needs of the master, the structure can be made of steel, have additional fixing zones, and the power tool cannot be installed rigidly, but with the ability to move within its support beam.
In practice, such solutions are rarely used. For delicate work that is performed constantly, it is much more profitable to purchase a specialized band saw, which will ensure quality and productivity.
As can be seen from the presented designs, a jigsaw can even be made from sewing machine having a moving rod.
IN Lately I was very interested in cutting out with a jigsaw, I don’t even know why. It all started with the fact that I needed to cut out several gears from plywood...
And off we go. At first I cut out the gears by hand, then I thought, pumping the muscle with a hand jigsaw is of course good, but if you automate the process, it will be much faster!
So, first of all, let’s get acquainted with this manual jigsaw for artistic cutting.
(all photos in this article were found on the Internet)
To saw you need files, they are thin as wire, with sharp teeth. Previously, such files were sold in a pack of 50 pieces, recently I went to the store, and these “bimesmen” started selling them individually. You can break a couple of these files in an evening.
For cutting, we will also need a special table, it can be a board with a conical slot, screwed to the table with screws or a clamp.
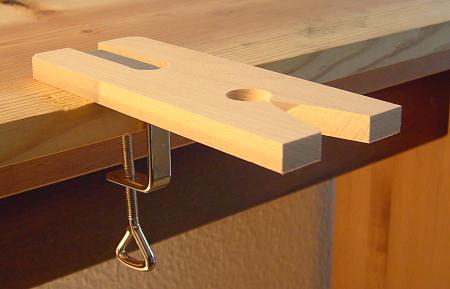
To make it easier to attach the files to the machine, it is better to use a special device that will compress the contour of the jigsaw, so you can easily change the file without effort. With the help of a wooden eccentric, compression occurs.

And now about automation. In the next photo you see a factory-type tabletop jigsaw; you can find a sea of different modifications on the Internet. This thing is not very expensive, but even if I really want it, I can’t find it in my city, and in principle there’s no need. 
Industrial machines are, of course, good, but I’ll probably use them for a couple of months and give up on this activity, and in general, such a machine, as I learned, can be easily assembled yourself from plywood and wooden blocks.


The following photo uses an industrial manual jigsaw and a spring to return the saw.

So, we can easily assemble a tabletop jigsaw with our own hands at home. I personally did just that, but I have a special design, there are no photos of me in this article, but I will definitely post them, as well as a video in progress.
A jigsaw is a special device that is designed to perform work on sawing wood, its derivatives, as well as other materials (for example: plastic, plasterboard sheets, polystyrene foam, and so on) along curved contours and straight lines.
Depending on the power of the electric drive, it can be divided into two types:
- power up to 150 W;
- power over 150 W.
Machines with a power of up to 150 W are used mainly at home, for making various crafts from materials of medium and low density and thickness.
Machines with drive power over 150W are mainly used in industrial environments, when working with hardwood and other materials. Such jigsaw machines allow you to work with material thicknesses up to 10 centimeters.
For home and semi-professional use, in order to save money, you can make a homemade jigsaw machine. In this case, you will need to have basic knowledge in plumbing and electrical engineering, as well as a small amount hand tools.
Making a homemade jigsaw machine
In order to make a jigsaw machine with your own hands, you will need:
- eight wooden planks for making a frame;
- a sheet of thick plywood for the countertop;
- some metal corners, welding machine;
- electric jigsaw;
- accessories for fastening, drill.
1) We start designing the machine from the frame. The frame will require wooden blocks of square section 50*50 mm. For the support posts, four 250mm long beams are used.

For longitudinal connecting beams, bars 380 mm long are used. The end connecting beams are 250mm long. All bars are connected to each other using ordinary wood screws.
2) We make the tabletop. For the countertop we take plywood, in this situation we should be guided by the principle: the thicker, the better. A sheet of plywood 10mm thick can be considered normal. The sheet is cut to the dimensions of the frame so that the edges and corners protrude 5 centimeters beyond the edge.

After this, on the plywood board you should mark the attachment points for the legs and the jigsaw itself. Holes are drilled according to the markings so that the self-tapping screw is in the center of the leg.
The attachment points should be transferred to the markings for the jigsaw and holes should be drilled. A hole for the saw blade is also cut in advance. We screw the tabletop to the frame using self-tapping screws.

3) The next step is to install the jigsaw under the table top. To do this, the entire structure of the rack is turned over onto the table top.
Electric jigsaw installed according to the markings and screwed to the tabletop with bolts. At this stage, we must not forget that the canvas must already be installed and occupy the position provided for it with a margin for the hole.
At this stage you will need a welding machine to make a fixing structure. It will require four corners. Bottom strip 50*50mm with two holes for bolts. A 200mm long corner is attached to it. Next is a corner measuring 230mm (selected for each case individually depending on the distance from the edge of the tabletop to the canvas).

The descent to the canvas is made from a 150mm long corner to which a jigsaw wheel is attached. This design absorbs all the vibration from the canvas and prevents breakdowns. The entire structure is attached to the tabletop with two bolts. They should not weaken from vibration.
The work on manufacturing the jigsaw machine is completed, the machine is ready for full operation.
Video: DIY jigsaw machine.
What to do when you need a jigsaw but don’t need to buy one? You can make a jigsaw with your own hands. There are many ways to make or repair such a tool. Let's look at the simplest and most accessible of them.
Manual jigsaw - simple, fast and affordable
How to make a jigsaw quickly from available and inexpensive materials? Here's the easiest way.

List of tools and materials:
- plywood sheet (10 mm);
- plywood sheet (4 mm);
- steel sheet (2 mm);
- bolts and nuts;
- drill;
- chisel;
- sanding paper;
- file.
The base of the manual jigsaw is a bracket; it should be made from a plywood sheet (10 mm). Next, it is recommended to make thickenings for the tool handle from thinner plywood (4 mm). These thickenings must be glued to the handle on both sides, which will ensure more convenient operation in the future. Sand the bracket and handle well using sanding paper and a file. It is necessary to cut out the steel plate with a chisel, and then clean the clamping jaws with a file. After this, drill slots in the jaws with a drill, and then use a sharp chisel to cut notches inside the clamping jaws. In the left clamping jaw, modify the slot for the bolt; for this you need to make a thread. Attach the jaws to the bracket, then screw the bolts into the left clamp, securing them with nuts.
Return to contents
Table jigsaw: two manufacturing options

The desktop fixture can be made either new or by modifying or repairing improvised means.
Making a new benchtop mechanical jigsaw will require the following tools and materials:
- duralumin pipe;
- plastic base;
- clamps;
- screws;
- copper sheet;
- drill.
First you need to prepare the frame; for this purpose it is better to use an aluminum pipe. When making the frame, it is necessary to provide a passage through which the cord will be laid to provide power. A copper sheet should be taken to make a U-shaped frame, which will subsequently need to be attached to the frame itself. At the junction of the frame with the handle of the jigsaw, screw the frame with screws. In the plastic base, use a drill to drill a hole for the file, as well as slots for fasteners. Attach the jigsaw to the prepared plastic so that the file passes through the hole. Using clamps, attach the finished tool to a flat surface, such as a table.

A hand-held device based on sewing machine, This perfect option, if repairing a sewing machine is not as important as making such a tool. List of tools and materials:
- sewing machine (you can use either a foot- or hand-operated model);
- file;
- needle file;
- drill.
After unscrewing the bolts at the bottom of the sewing machine, you should remove the entire threading system. Next, knock out the metal fastening rod and remove the drive shaft of the thread weaving system. The panel covering the sewing machine parts can be easily removed by unscrewing 2 more bolts. Carefully remove the needle. The needle slot needs a little repair - it needs to be widened to accommodate a file. To do this, it is better to cut the hole using a needle file, focusing on the dimensions of the file itself. After this, adjust its size to the maximum possible needle size by cutting top part files. After grinding down the upper teeth with a file and the lower part on the tip, you can proceed to the next step. The prepared file must be placed in the place of the former needle - in the needle holder. After this, you should turn the wheel and check:
- so that the saw does not come into contact with the panel and the presser foot;
- so that in the upper position the plywood passes freely under the saw;
- so that the material can be drawn smoothly.
This jigsaw is suitable for working with materials made of plywood, balsa wood and plastic, and if you use an electric machine, you will get an electric jigsaw.